How To’s Day: Crossroads Quilt by Harding Hill Designs
March 24th, 2015 by Camelot Fabrics
Hi everyone,
Happy Tuesday! We hope you are having a lovely day. We forgot to mention that yesterday was National Puppy Day, and wanted to give a shout-out to our favorite little snuggles. We adore you!
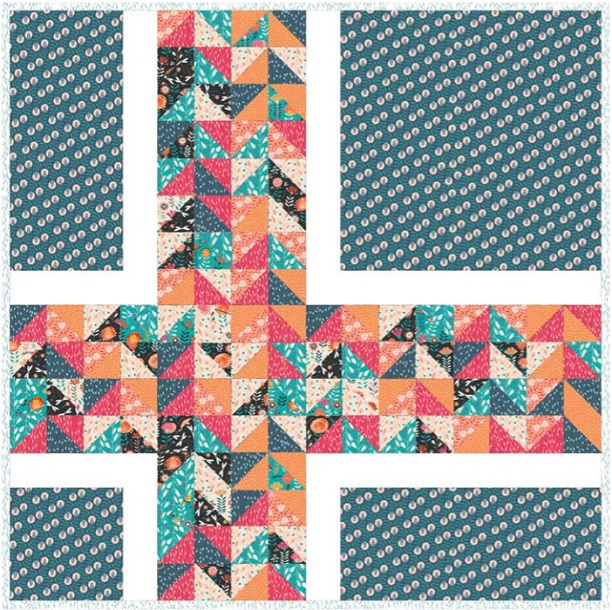
Time for this week’s How To’s Day! Today we are featuring one of our quilt patterns from our Free Projects Program, our Crossroads Quilt by Harding Hill Designs. Crossroads is an intricate, but stunning quilt design that is composed of a multitude of half square triangles (HSTs) sewn together. Together they intertwine to create an absolutely beautiful “cross” design, the centerpiece of the whole quilt. Because of the complexity of Crossroads, it would be a showstopper as a bed quilt or wall design. All the intricate work would be absolutely worth it. Promise. As well, it looks amazing with our vivacious Gypsy Lane by Jane Farnham Collection!
This one is for all you enthused quilters!! Want to make your own Crossroads Quilt? Click MORE for the full instructions.
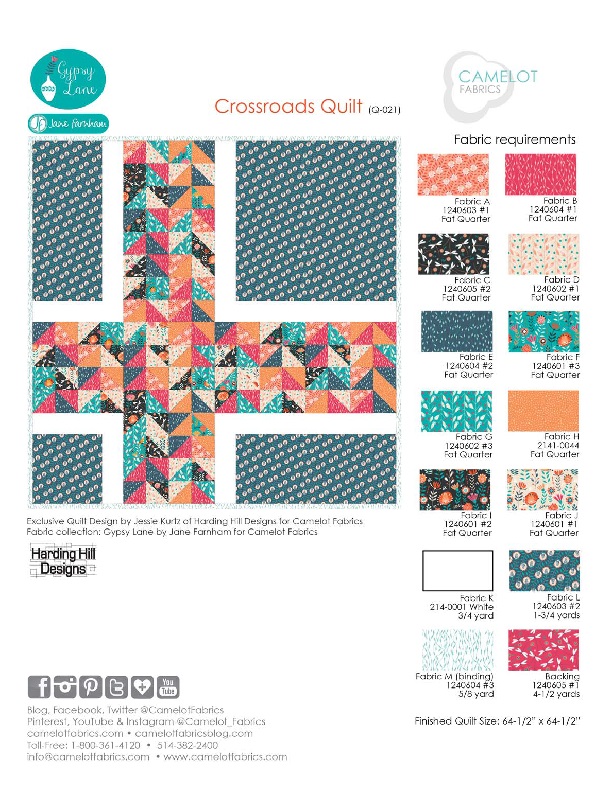
CROSSROADS QUILT
Project By: Harding Hill Designs
Fabric Featured: Gypsy Lane by Jane Farnham for Camelot Fabrics
NOTES:
– For best results read through all the instructions before starting.
– Please wash, dry & iron your fabric before beginning, and trim selvages.
– Unless otherwise directed, sew all seams with an accurate 1/4” allowance and the fabrics’ Right Sides together, and press seams open as you go.
– WOF = Width of Fabric
– FQ = Fat Quarter
– HST = Half Square Triangle
HST BLOCKS
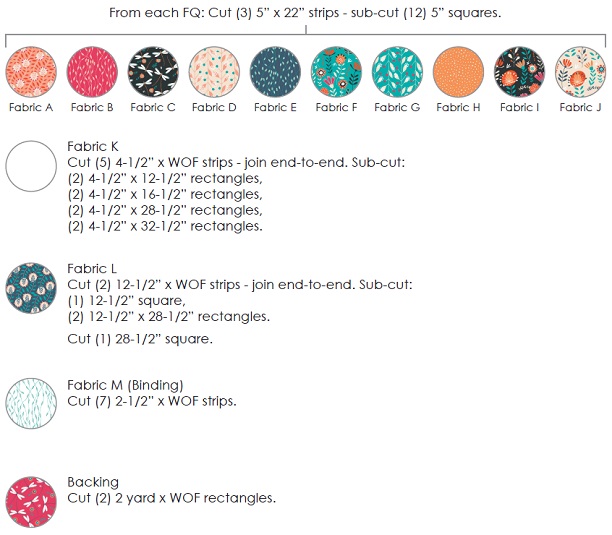
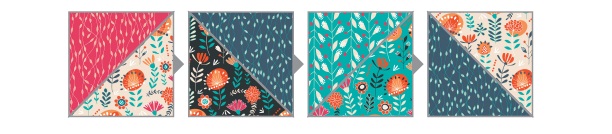
1. Pair up your 5” Fabrics A-J squares – you’ll have (56) pairs. Draw a diagonal line from corner to corner on one square of each pair as shown, on the Wrong Side of the fabric.

2. Sew each pair of squares together with (2) lines of stitching, 1/4” from either side of the diagonal line.

3. Cut the unit into (2) HST units along the drawn line and open them up.
Each pair of 5” squares will yield (2) slightly over-sized HST units. Trim the units down to 4-1/2” square.
 Make (112) in various combinations.
Tip: Before stitching your 5” squares together, play with their pairings to make sure you like the variety in your pairs.
ROW ASSEMBLY
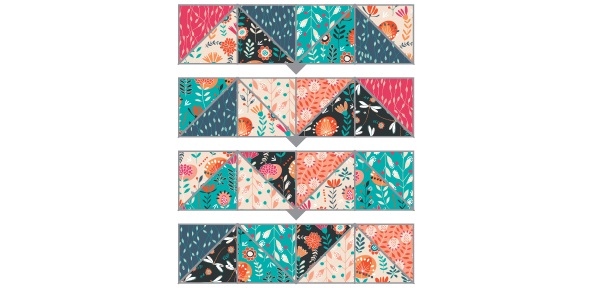
1. Sew (16) of your HST units together in (4) rows of (4) units, alternating the direction of the central seams.
 Make (4) in various combinations.
2. Sew the rows together in groups of (4) to make a 16-square panel as shown.
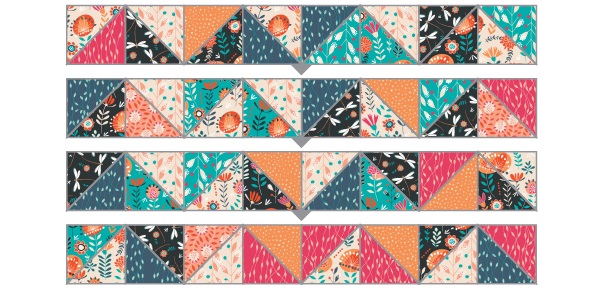
3. Sew (32) of your HST units together in (4) rows of (8) units, alternating the direction of the central seams. Sew these rows together into a 32-square panel.
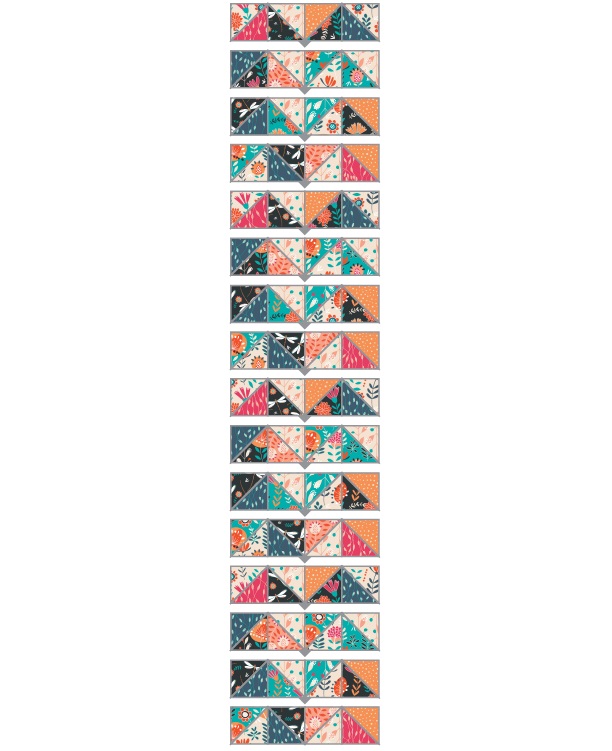
4. Sew (64) of your HST units together in (16) rows of (4) units. Sew these rows together into a 64-square panel.
MAKING THE BORDERS
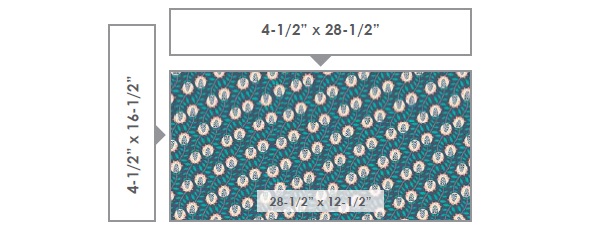
1. Sew a 4-1/2” x 12-1/2” Fabric K rectangle to the top edge of a 12-1/2” Fabric L square.

2. Sew a 4-1/2” x 16-1/2” Fabric K rectangle to the right-hand side of this K-L unit to complete the Bottom Left Border Block.

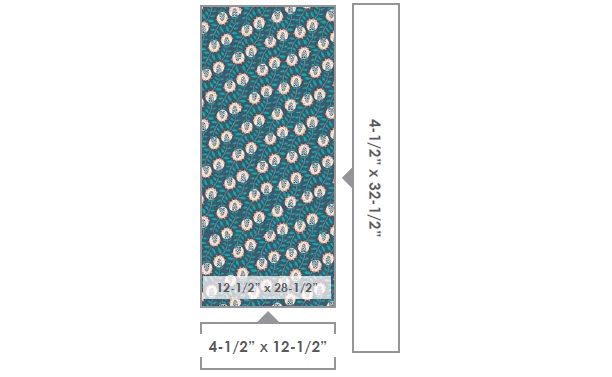
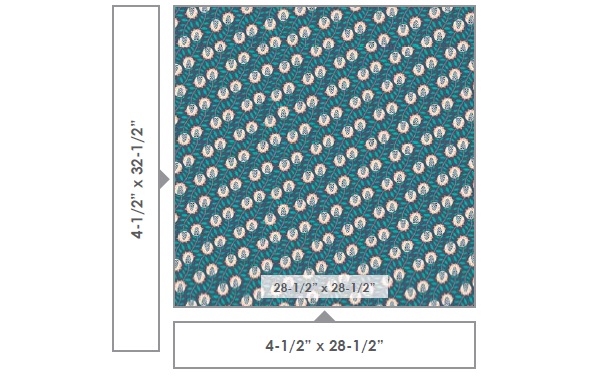
3. Sew a 4-1/2” x 12-1/2” Fabric K rectangle and a 4-1/2” x 32-1/2” Fabric K rectangle to the bottom & right-hand edges of a 12-1/2” x 28-1/2” Fabric L rectangle as shown.
This completes the Top-Left Border Block.
4. Sew a 4-1/2” x 28-1/2” Fabric K rectangle and a 4-1/2” x 32-1/2” Fabric K rectangle to the bottom & left-hand edges of a 28-1/2” Fabric L square as shown.
This completes the Top-Right Border Block.
5. Sew a 4-1/2” x 28-1/2” Fabric K rectangle and a 4-1/2” x 16-1/2” Fabric K rectangle to the top & left-hand edges of a 28-1/2” x 12-1/2” Fabric L rectangle as shown.
This completes the Bottom-Right Border Block.
FINISHING THE QUILT TOP
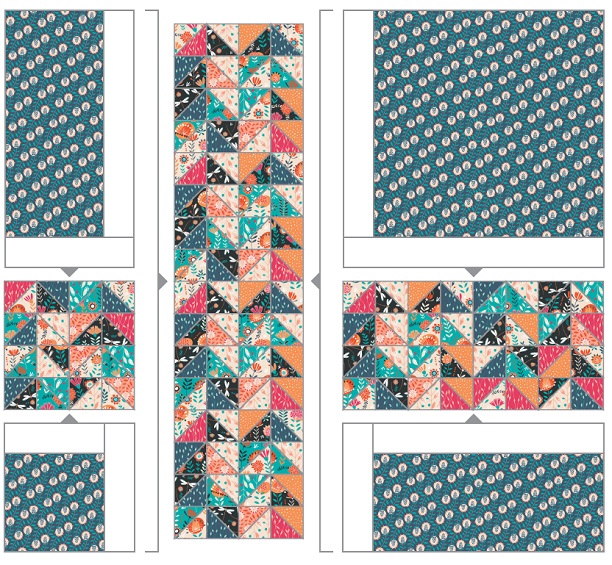
Refer to the Assembly Layout on the following page for this section.
1. Sew the Top-Left and Bottom-Left Border Blocks to the top & bottom edges of your 16-square HST panel.
2. Sew the Top-Right and Bottom-Right Border Blocks to the top & bottom edges of your 32-square HST panel.
3. Sew the columns formed in Steps 1-2 to the left-hand & right-hand edges of your 64-square HST panel.
4. Join the (2) Backing rectangles along their 2-yard edges.
5. Layer the quilt top, batting & backing. Baste & quilt as desired.
6. Join the (7) Fabric M strips end-to-end and use them to bind your quilt.
ASSEMBLY LAYOUT
We hope you have enjoyed this week’s How To’s Day! If you decide to create your own Crossroads Quilt, we’d love to see. You can always send your project pictures to info@camelotfabrics.com. Have a great rest of the day!
Happy Sewing!
September 03, 2015 at 12:08 am, Robyn Carpenter said:
Crossroads Quilt caught my eye right off. Don’t ask me why but that usually means I need to make it and I believe it might make a great quilt for my mother.
It is stunning and beautiful and I believe the instructions were understandable.
Thank you for sharing,
Quilters Nest, Robyn C