How To’s Day: Twist on Tradition Quilt by The Quilted Button
September 30th, 2014 by Camelot Fabrics
Hi everyone,
Happy Tuesday! We hope everyone is having a wonderful day so far. Today is National Mulled Cider Day…yum! And just perfect for the cooler weather, we definitely could use a mug of mulled cider this morning.
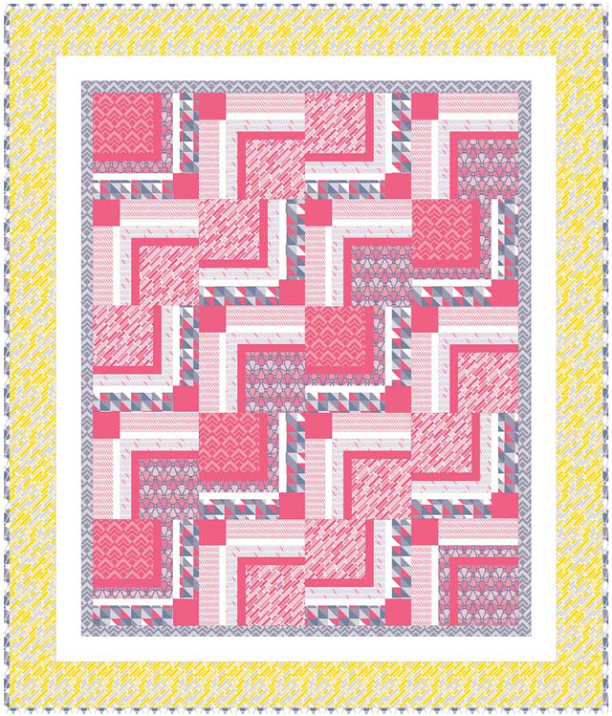
Time for this week’s How To’s Day! We have been busy expanding our Free Projects Program on our website, and have been getting such amazing responses from all of you. We thought we would share our newest additions, to our website, on the blog. Today we are featuring our Twist on Tradition Quilt by Larene Smith of The Quilted Button. This is a beautiful, whimsical, and scrappy-like quilt design that would work wonderfully for a baby’s nursery or as an accent quilt on a sofa. The wispy design makes this quilt look very intricate and exquisite, and we think it would be remarkable as wall decor. As well, it looks just fabulous with our Pastel Me More collection, making this quilt happy and popping.
Click MORE to see the full tutorial for our Twist on Tradition Quilt! You can also find the printout PDF on our website. We hope you love it as much as we do! :)
TWIST ON TRADITION QUILT
By: Larene Smith of The Quilted Button for Camelot Fabrics
Collection: Pastel Me More by Camelot Design Studio
Other Tools & Supplies:
– Rotary Cutter & Mat
– Tape Measure & Ruler
– Sewing Machine & Coordinating Thread
– Straight Pins
Notes:
– Please wash, dry & press your fabric before beginning, and trim your selvages.
– Sew all seams with an accurate 1/4” allowance.
– WOF = Width of Fabric, from selvage to selvage (42”) or 20” for Fat Quarters.
– LOF = Length of Fabric, parallel to the selvage (18“ for Fat Quarters)
– Press seams open as you go.
– Each finished block is 8” square.
– To avoid confusion, place pieces for each block together as you cut and label each block as it is completed.
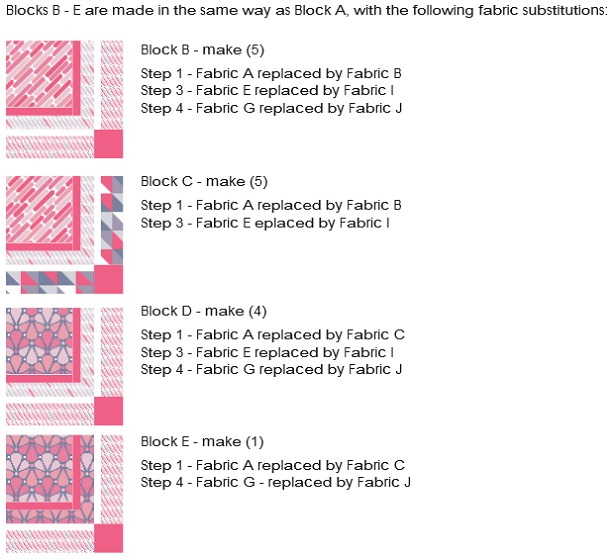
MAKING THE BLOCKS:
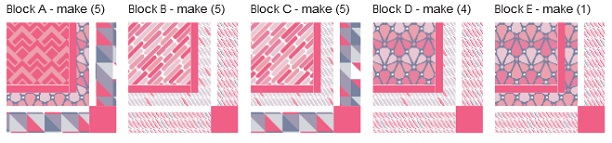
Block A
1. Sew a 1” x 5” Fabric D rectangle to the bottom of a 5” Fabric A square.
2. Sew a 1” x 5-1/2” Fabric D rectangle to the right-hand side of the unit you just created, to make a 5-1/2” square unit.
3. Sew a 1-1/2” x 5-1/2” Fabric E rectangle to the bottom of the unit, followed by a 1-1/2” x 6” Fabric E rectangle on the right-hand side, to make a 6-1/2” square unit.

4. Sew a 1” x 6-1/2” Fabric F rectangle to the top of a 6-1/2” x 2” Fabric G rectangle to make a 2” x 6-1/2” unit. Make (2)
5. Sew (1) F-G unit to the bottom of your 6-1/2” square unit.
 6. Sew a 2-1/2” Fabric H square to the left-hand side of your remaining F-G unit. Sew this F-G-H unit to the right-hand side of the unit from Step 5, to finish Block A at 8-1/2” square.
![]()
Make (5) of Block A and set them aside.

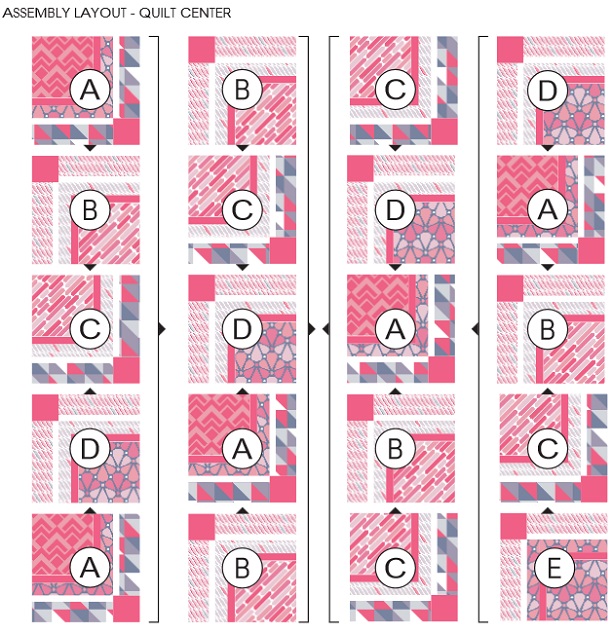
COMPLETING THE QUILT CENTER:
Referring to the Assembly Layout on the following page, sew (5) blocks together to make each column, then sew the columns together to finish the center at 32-1/2” x 40-1/2”.
Note: take care to rotate the blocks as shown in the Layout.
ADDING THE BORDER:
1. Sew the Inner Border 1-1/2” Side strips to the left- and right-hand sides of the quilt, then add the Top & Bottom 1-1/2” strips.
2. Sew the Middle Border 2-1/2” Side strips to the left- and right-hand sides of the quilt, then add the Top & Bottom 2-1/2” strips.
3. Sew the Outer Border 3-1/4” Side strips to the left- and right-hand sides of the quilt, then add the Top & Bottom 3-1/4” strips.
This finishes the quilt top at 42” x 52”.
Quilt and bind the quilt as desired, using the 2-1/2” Binding strips.
ASSEMBLY LAYOUT – BORDERS

We hope you have enjoyed this week’s How To’s Day!! Be sure to check out The Quilted Button for all of Larene’s other patterns. As well, be sure to check out our Free Projects Program for all of our other amazing quilts and projects. Have a fantastic day!! :)
Happy Sewing!
Comments are closed.