How To’s Day: Quilt Bars by Tamarinis
April 8th, 2014 by Camelot Fabrics
Hi everyone!
Happy Tuesday! We hope everyone is having a lovely day. It’s rainy and dreary here today, but you know what they say…April Showers bring May Flowers! But for now, to brighten our day we still have our Bright Now Giveaway going on! Today is the last day to enter, so if you haven’t yet – be sure to here!
Today we are bringing to you another stunning quilt tutorial for this week’s How To’s Day! The quilt design we are sharing with you is Quilt Bars by Tammy Silvers of Tamarinis – a simplistic, yet fresh and versatile quilt that works with a multitude of different fabric designs.
The clean cut lines of this quilt design by Tammy give a very modern and geometrically pleasing look, perfect to showcase coordinating fabric colors and patterns. For this tutorial, we have used our Mint Condition by Jackie McFee Collection and the mint & grey patterns compliment each other perfectly in this quilt!
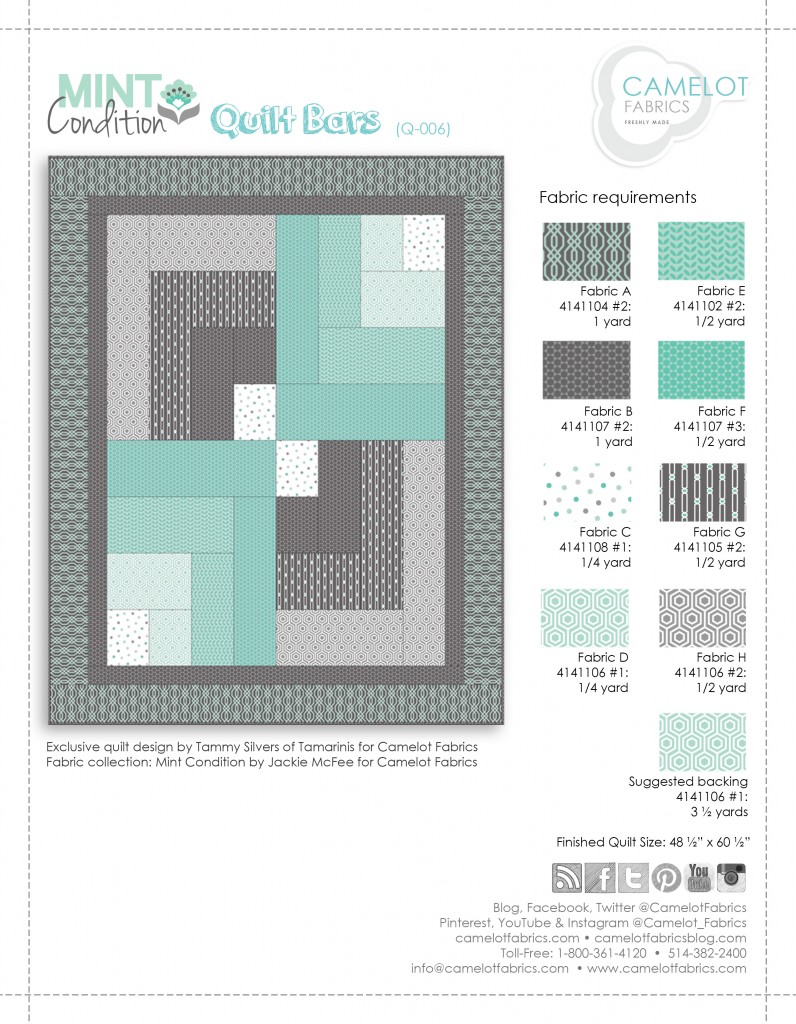
This would be a great quilt to gift, for both genders and any age! We can imagine this quilt with some soft pastels for a “baby’s first quilt” or this quilt in dark navy hues for a boy quilt. So many possibilities! You can get the PDF version of this tutorial on our website, in the our Free Projects Program section, but today we are going to share the tutorial with you on the blog. Be sure to also check out Tammy Silvers of Tamarinis, as well as her Facebook Page, Pinterest, and Etsy!
Click MORE to see the full tutorial of Quilt Bars!
Quilt Bars for Camelot Fabrics
Design and Instructions by Tammy Silvers of Tamarinis
Other Supplies: Rotary Cutter, Mat, Rulers, Straight Pins, Sewing machine, and threads to match your fabrics.
Notes:
1. Read all instructions before cutting fabrics.
2. All seams are accurate ¼” seam allowance.
3. Cut fabrics according to cutting chart on Page 2.
4. HST = Half Square Triangle QST = Quarter Square Triangle
5. Unless otherwise notes, strips are considered to be width of fabric (selvedge to selvedge)
6. Fabrics and Diagrams are not always to scale
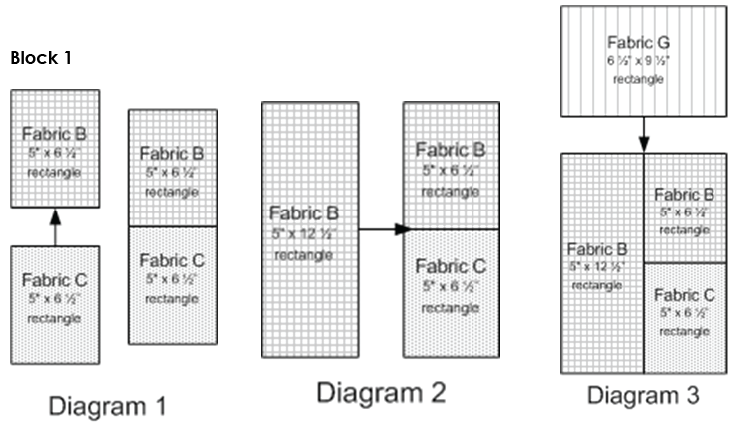
1. Sew (1) 5” x 6 ½” Fabric B rectangle to (1) 5” x 6 ½” Fabric C rectangle (Diagram 1). Repeat to make (2) units.
2. Sew (1) Fabric B/C unit to (1) 5” x 12 ½” Fabric B rectangle (Diagram 2). Repeat to make (2) units.
3. Sew (1) Fabric B/C/B unit to (1) 6 ½” x 9 ½” Fabric G rectangle (Diagram 3). Repeat to make (2) units.
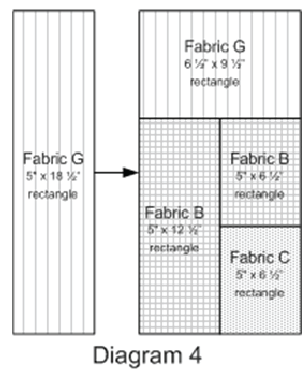
4. Sew (1) Fabric B/C/B/G unit to (1) 5” x 18 ½” Fabric G rectangle (Diagram 4). Repeat to make (2) units.

5. Sew (1) 6 ½” x 14” Fabric H rectangle to the unit created in Step 4 (Diagram 5). Repeat to create (2) units.
6. Sew (1) 5” x 24 ½” Fabric H rectangle to the unit created in Step 5 (Diagram 6). Repeat to create (2) Block 1.
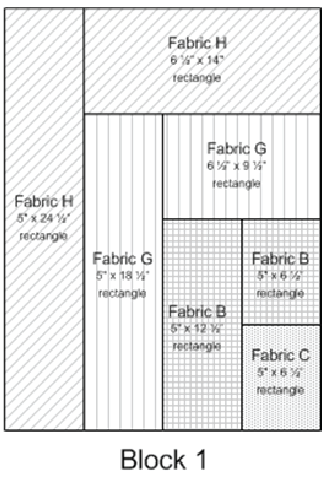
Each block should measure 18 ½” x 24 ½” unfinished.
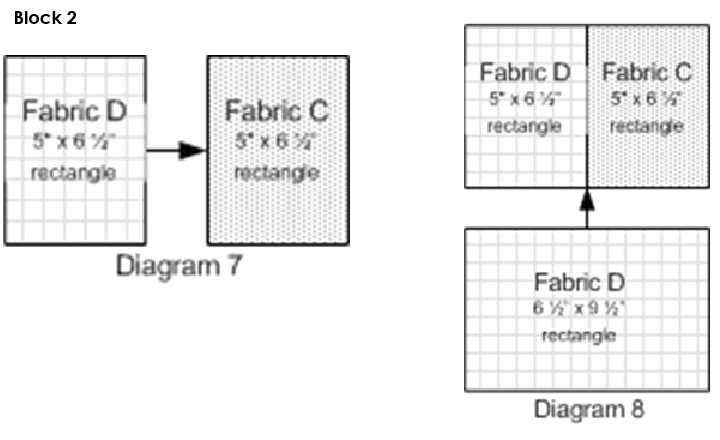
1. Sew (1) 5” x 6 ½” Fabric D rectangle to (1) 5” x 6 ½” Fabric C rectangle (Diagram 7). Repeat to create (2) D/C units.
2. Sew (1) 6 ½” x 9 ½” Fabric D rectangle to the D/C unit (Diagram 8). Repeat to create (2) D/C/D units.

3. Sew (1) 5” x 12 ½” Fabric E rectangle to the D/C/D unit (Diagram 9). Repeat to create (2) D/C/D/E units.
4. Sew (1) 6 ½” x 14” Fabric E rectangle to the unit created in Step 3 (Diagram 10). Repeat to create (2) units.
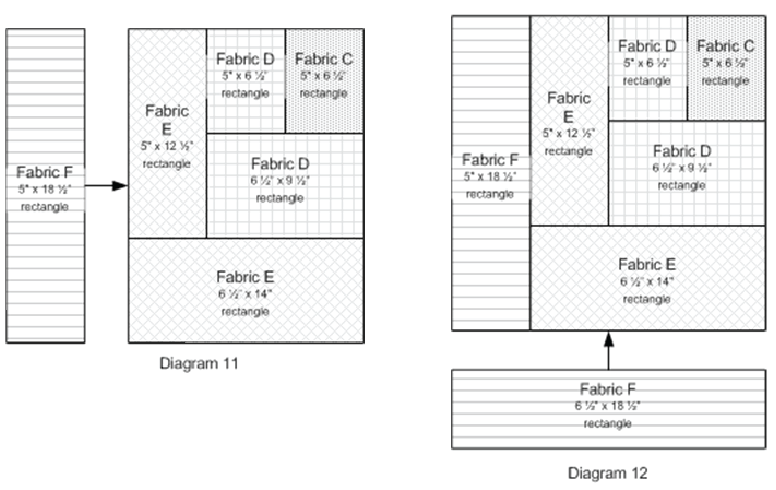
5. Sew (1) 5” x 18 ½” Fabric F rectangle to the unit created in Step 4 (Diagram 11). Repeat to create (2) units.
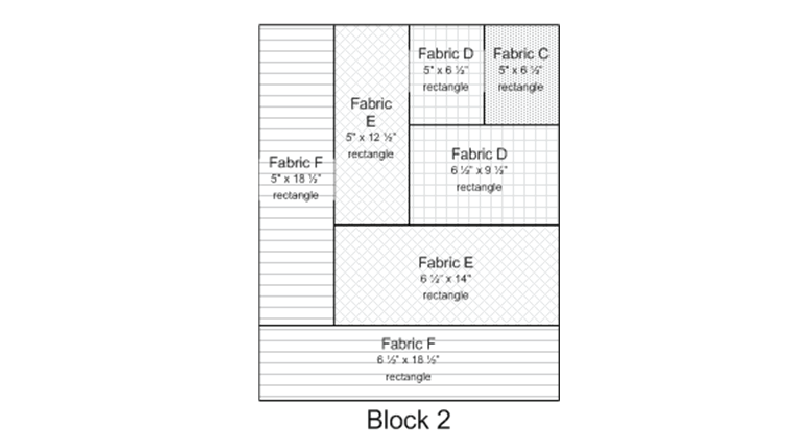
6. Sew (1) 6 ½” x 18 ½” Fabric F rectangle to the unit created in Step 5 (Diagram 12). Repeat to create (2) Block 2. Each block should measure 18 ½” x 24 ½”.
Putting the Quilt Together
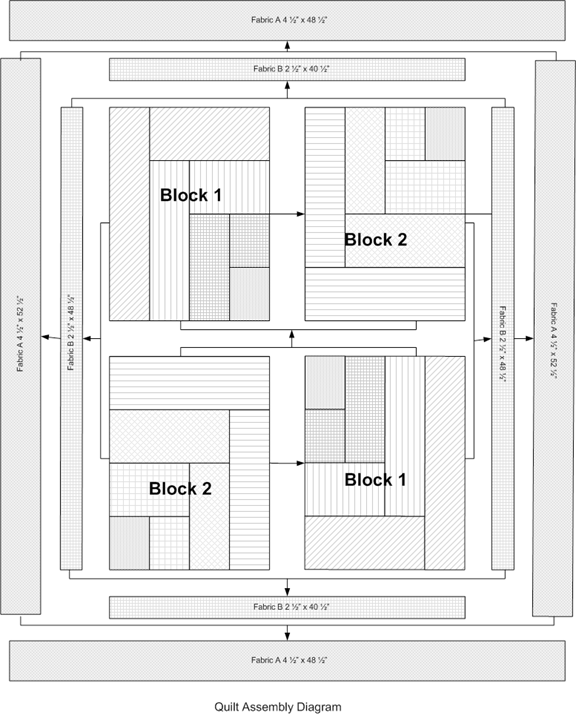
1. Using the Quilt Assembly Diagram as a guide, sew (1) Block 1 to (1) Block 2, noting the orientation of the blocks.
2. Rotating the blocks, sew the remaining Block 1 to the remaining Block 2 (again, note the orientation of the blocks.
3. Sew (3) of the 2 ½” Fabric B strips together end to end; trim to (2) 2 ½” x 48 ½” rectangles (left and right inner borders). Trim the remaining (2) strips to 2 ½” x 40 ½” (top and bottom inner borders).
4. Sew (1) 2 ½” x 40 ½” Fabric B rectangle to the top and bottom of the quilt center. Press away from the quilt center.
5. Sew (1) 2 ½” x 48 ½” Fabric B rectangle to the left and right side of the quilt center. Press away from the quilt center.
6. Sew the (6) 4 ½” Fabric A strips together in sets of (3). Cut (2) 4 ½” x 48 ½” rectangles (top and bottom borders) and (2) 4 ½” x 52 ½” rectangles (left and right borders).
7. Sew (1) 4 ½” x 52 ½” Fabric A rectangle to the left and right side of the quilt center. Press away from the quilt center.
8. Sew (1) 4 ½” x 48 ½” Fabric A rectangle to the top and bottom of the quilt center. Press away from the quilt center.
Finish the Quilt
1. Cut the backing into (2) 63” long pieces.
2. Using a ¼” – ½” seam allowance, sew the two pieces of backing fabric together, along the long side. Press the seam open.
3. Center and lay the batting on top of the wrong side of the backing fabric
4. Center and lay the pieced quilt top on top of the batting.
5. Pin or baste the quilt sandwich using your preferred method for securing the layers.
6. Quilt as desired.
7. Trim the edges of your quilt.
8. Use the Fabric B binding strips to bind the quilt.
We hope you have enjoyed this week’s How To’s Day post! You can also check out the quilt pattern here, as well as all our other free quilt designs by our fabulous quilt designers! Have a great day! :)
Happy Sewing!
April 08, 2014 at 6:20 pm, Christine Sherman said:
Love this design, thanks for sharing!
April 09, 2014 at 11:00 am, Vanessa@camelotfabrics.com said:
> Thank you so much, Christine!! We really appreciate you stopping by our blog! :)