Hi everyone,
Happy Tuesday! I hope you all are having an amazing one.
I am sure you will all agree that this is probably the cutest project we can make with our Finding Dory collection!
Wallace the Whale
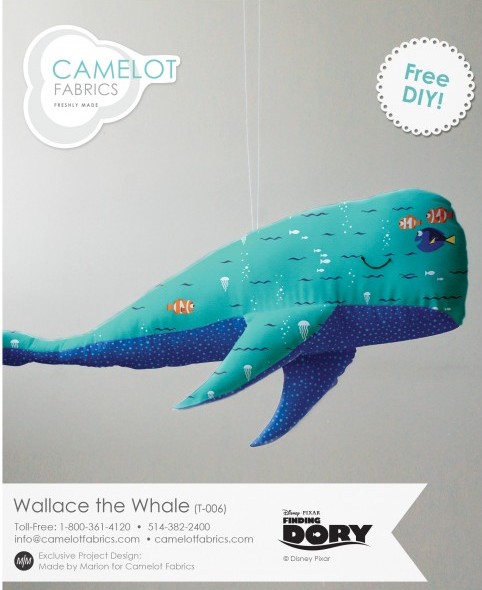
Our adorable and friendly whale combined with this fabulous collection just makes our hearts swoon. Wallace is a larger sized plush animal, so he is perfect as a cuddly pillow and toy for your loved ones.
The pattern is from our very talented Marion! You can check out the free printable PDF of this pattern on our website. We hope you enjoy!
SUPPLIES:
– 2/3 yard of The Design Studio quilting cotton (44” wide) from Camelot Fabrics in 2140504 #1 for Wallace’s Back
– 1/2 yard of The Design Studio quilting cotton (44” wide) from Camelot Fabrics in 2140507 #2 for Wallace’s Belly
– Fiber stuffing or fabric scraps
– Paper printer
– Contrasting embroidery floss & an embroidery hoop, for eyes
– 2 yds of ribbon, for hanging (optional)
– Basic sewing supplies: sewing machine, needle & coordinating thread, iron & pressing surface, scissors & fabric shears, straight pins and a fabric marker
NOTES:
1. Please wash, dry & iron your fabric before beginning.
2. Use a 1/4” seam allowance throughout.
3. All seams are sewn Right Sides together.
CUTTING:
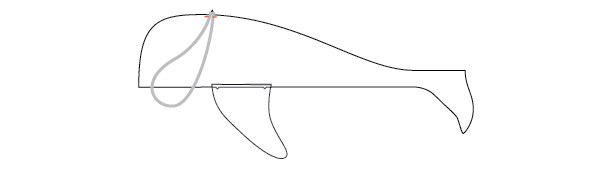
1. Print the Wallace the Whale template PDF at 100% scale and cut out the pages at their marked borders. Join the pages according to their numbered triangles and cut out the templates pieces.
2. Trace or pin the template to your fabric as indicated on the pattern pieces, and cut out the pieces in fabric. Take care to include the notches!
You will have:
– (2) Back pieces, mirror images of each other
– (2) Back fins, mirror images of each other
– (1) Belly, cut on the fold line
– (2) Belly fins, mirror images of each other
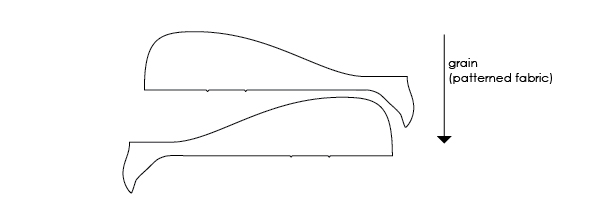
Note: For a directional print, trace the Back piece (2x) onto a single layer of fabric as shown, so that in both pieces the fabric’s pattern runs from the top of Wallace’s back toward his belly.
For non-directional cottons, cut your pieces from folded double layers of fabric.
EYES:
1. Transfer the Eye marks from the Back template to the Back fabric pieces. If you’re having trouble seeing the Eye through your fabric, use straight pins to mark either end and the center of the Eye curve, then trace between the pin points.
2. Embroider a sleepy Eye on each Back piece.
ASSEMBLY:
1. Sew the Fins to their matching body pieces as shown, with the notches aligned (the fins should point toward the tail ends of the body pieces). Press these seams toward the fins.

- Baste the ends of your ribbon to the Wrong Side of one Back piece as shown, at the notch in its top edge. The raw ends of the ribbon should point toward the fabric’s edge, and the long loop should point away from the edge.
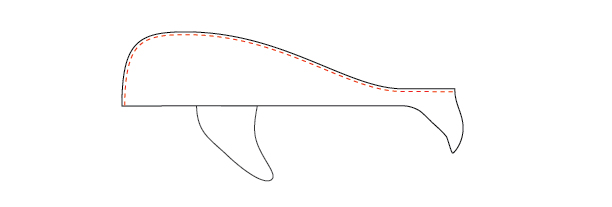
- Sew the Back pieces together as shown, from the center of the tail to the tip of the nose. Clip into your curves & press the seam open. Turn Wallace Right Side out, press the seam again and turn him Wrong Side out once more.
- Pin & sew the Belly & its Fins to the Back & its Fins. Begin by pinning the tails together, then the Fins where they join the bodies, then around the remaining body, fin & nose edges. Leave a 4” gap behind one Fin, for turning. Backstitch at the beginning & end of this seam.
Note: When sewing around the nose, have the Back pieces facing upward and be sure to keep them smooth as you go, to prevent any bunching or puckering.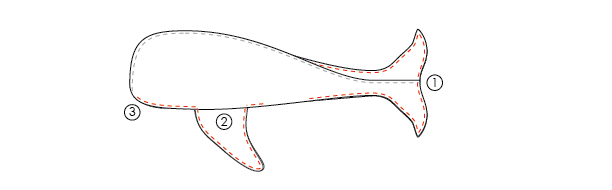
- Clip into the corners where the Fins join the body, and around your curves. Press the seam open & turn the whale Right Side out through the gap behind his Fin. A knitting needle or length of dowel makes it easier to invert the tips of his Fins & tail.
6. Stuff Wallace firmly, making sure to stuff all the way into his tail & Fins, and whipstitch the gap closed.
7. To eliminate any bulging between the Fins, stitch in the ditch (by hand) between the top & bottom seams of each Fin, closing the gap between them. You’ll want to use a doubled-up thread for this part.
We hope you have enjoyed our super sweet Wallace the Wallace tutorial this week! We would love to know what you think. If you decide to give this tutorial a try, or any of our DIYs, we’d love to see! You can send all your pictures to info@camelotfabrics.com or tag us on Instagram (#camelotfabrics). Have a whale of time (haha)! :)
Happy Sewing!
more.