Archive for the ‘DIY’ Category
Hi everyone,
Happy Tuesday! We hope you all are having a lovely day. Today is Pancake Day in the UK and Mardi Gras Fat Tuesday. Lots of reasons to eat yummy food! ;)
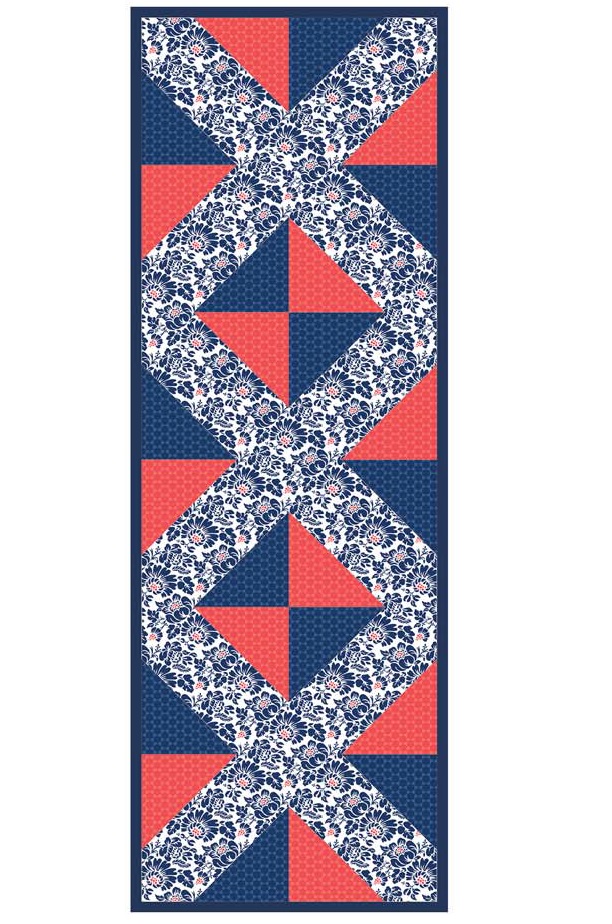
Time for this week’s How To’s Day! Today we are featuring one of our wonderful projects from our Free Projects Program. Cheryl, of Meadow Mist Designs, created a stunning table runner pattern for us that we absolutely love. Her Best Wishes Table Runner is featured with our Paisley Please collection, the complimentary navy and orange hues working magically together. We love the simplicity and modern feel of this table runner, the perfect accessory to any bare table. Add some pretty white dishware, silver decor, and white tulips…and you have yourself a beautiful, cottage-inspired table setting.
Want to make your own Best Wishes Table Runner? Click MORE for the full tutorial.
more.
17
February
Hi everyone,
Happy Tuesday! Hope everyone is doing well :) We’ve been launching our Winter 2015 Collections this week, and today we launched our Gypsy Lane Collection by Jane Farnham. Click here for lots of pretty designs!
Time for our How To’s Day! Today we are sharing an amazing pillow tutorial from one of our exclusive designers, Nikki Maroon of The Girl Who Quilts. She created her Diamond Cut Pillow for our Free Projects Program, and we love it! It’s pretty simple in design, but creates a fantastic and geometric look that would go well with every type of interior, from shabby chic to more modern. The diamond “cut” allows for you to choose different fabric prints with a similar color scheme, so it looks different and unique. Such a great pillow tutorial to play around with!
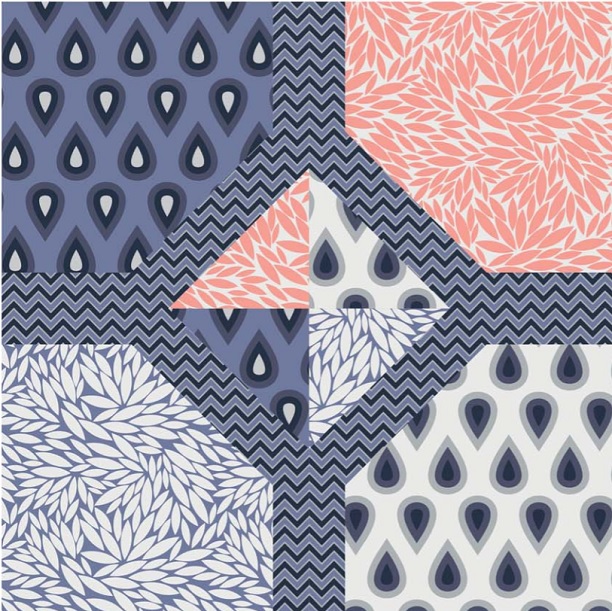
We featured our example with our Coraline Collection, a fresh and girly collection of coral and navy. Want to make your own Diamond Cut Pillows? Click MORE for the full tutorial.
more.
10
February
Hi everyone,
Happy Tuesday! We hope everyone is having a nice day. It’s super cold here today, but we’re enjoying the sunshine from indoors haha. Oh! And, as if we even needed a reason for cake, it’s National Chocolate Cake Day. Cake, we’re coming from you!
Time for this week’s How To’s Day! Today we’re bringing to you our super useful tutorial for a turning a seam to a slit, while avoiding any exposed edges. If you’ve ever wanted to create a slit at the back of a pencil skirt or simply wanted to alter a project by creating a slit, this From Seam to Slit tutorial will guide you in doing so, the easy way! The end result will be a clean seam, with the raw edges tucked away perfectly. And at the end of the tutorial, we’ve offered a cumulative jpeg of the steps that you can be printed out.

Click HERE to see the full steps for our Press Back Seam Tutorial!
more.
27
January
Hi everyone,
Happy Tuesday! Hope everyone is having a lovely day so far. Just to make your day even brighter, we’ve got our weekly Winsday on our Facebook Page. We are giving away some of our adorable Paddington Bear fabric!
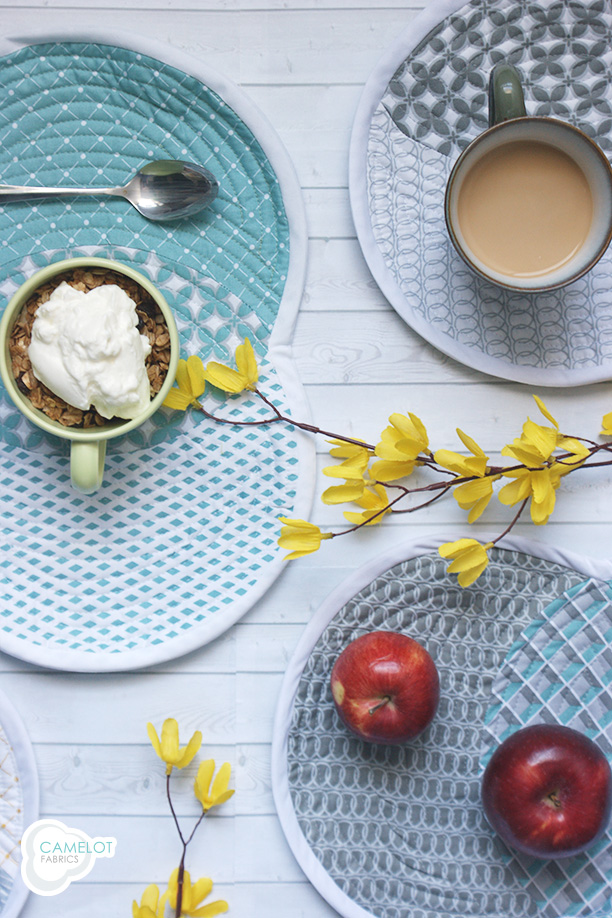
Time for our How To’s Day! Today we are featuring our tutorial for our absolutely gorgeous Venn Placemats. Our Venn Placemats are the perfect mix between clean design aesthetic and keeping your surfaces, well, clean. We know that our mathematicians and designers will especially adore the style of our placemats. Have fun choosing different and unique print combinations! The simplicity and modernity of our Venn Placemats would work in any interior space. And because they are oh-so pretty, you’ll want to leave them as added decor on your dining table.
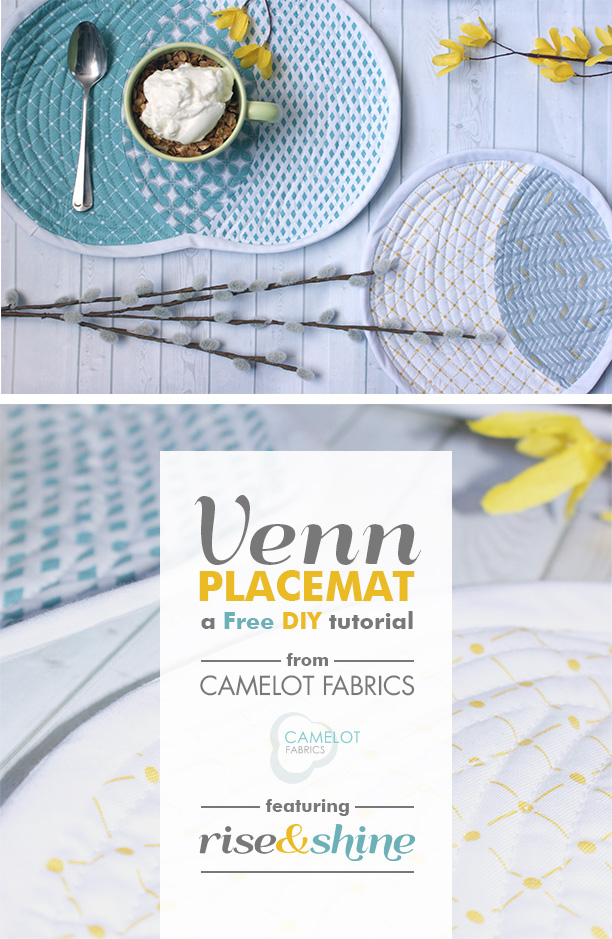
We offer two sizes of our Venn Placemat in this tutorial – a larger mat with the full Venn diagram look and a smaller mat, that is equally stunning. We chose to style ours with our Rise & Shine Collection, and think the blues, greys, and yellows would work wonderfully in any space.
Want to make your very own Venn Placemats? Click MORE to see the full tutorial!
more.
20
January
Hi everyone,
Happy Tuesday! We hope you all are having a great day. Another Tuesday, another fun DIY project for you all..
Yup, that’s right! It’s time for this week’s How To’s Day! Today we are featuring our beautiful No-Sew Pillow Tutorial. This relatively simple project is especially perfect for beginners, who are just starting to get into the crafting world. This tutorial does not require a ton of time to make, so it’s a great project for transforming any interior space. Having guests over but want to quickly spruce up your living room? Need to film a pretty, but quick DIY project for a friend? Feeling crafty, but don’t have a sewing machine? This is the project for you! (…and anyone else just looking for a fun project to try! ;))
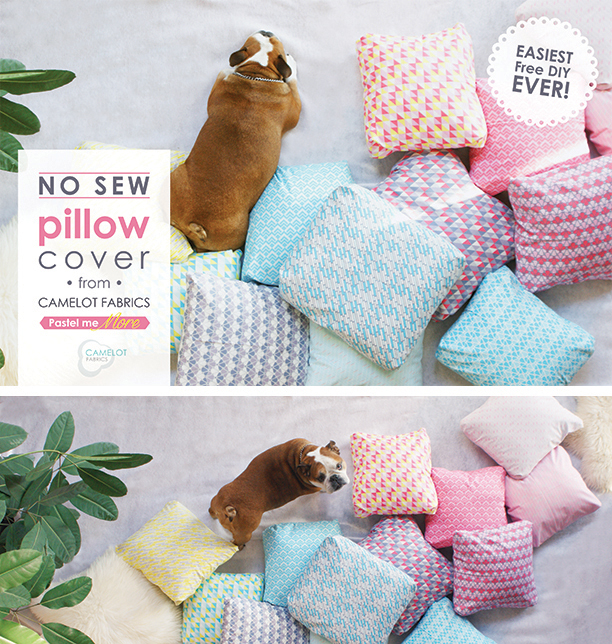
Make a plethora of them and pile them all together on the floor to lie in! So so comfy! As well, we shared our No-Sew Pillow with our Pastel Me More Collection – the colors are fresh, happy, and exuberant – but this pillow would look amazing with any print.
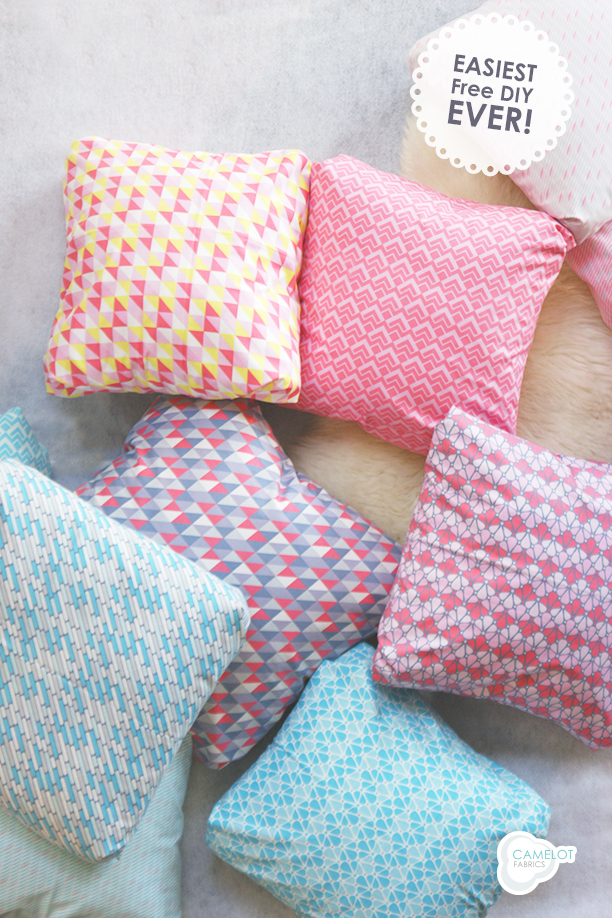
Want to make your very own No-Sew Pillow? Click MORE for the full tutorial :)
more.
13
January