How To’s Day: Diamond Sparkle Quilt by The Quilted Button
February 25th, 2014 by Camelot Fabrics
Hi everyone!
Happy Tuesday! We hope everyone is having a great day so far. Today is the last day to enter our Chalkboard Fabric Giveaway on the blog. Let us know what you would make with our chalkboard fabric for a chance to win. Enter here!
As well, one of our biggest projects as of late has been our Free Projects section on our website and blog! Since the launch of our Camelot Fabrics blog back in September 2013, we have been posting a new free project every week! From adorable baby shoes to DIY chalkboard banners to plush stegosauruses…we’ve crafted a multitude of amazing projects for you all, with free instructions, diagrams, and patterns. One of the greatest things has been the positive feedback and the pictures sent to us of our projects, from you all! So thank you, keep sending them to us! :)
Along with our free projects, we have been partnering with some very talented quilt designers to create one-of-a-kind quilt patterns for our website. Our fabric collections have a fresh and modern twist to them, and all the quilt designs reflect our style perfectly. All the free quilt designs include the instructions, diagrams, and necessary skus in PDF format which you can check out here. We wanted to thank all our wonderful quilt designers for creating some incredible quilt designs for us! You guys rock!! :)
Today we are featuring one of our quilt designs for this week’s How To’s Day. Larene Smith, from The Quilted Button, designed this sweet baby quilt called Diamond Sparkle. You can use any fabric of your choice, but we think this quilt looks especially darling with our Dream a Little Dream Collection by Heather Rosas. Today we thought we’d provide a step-by-step on how to create your very own Diamond Sparkle Quilt – the perfect blanket for all the little ones you know!
Click more to see the full tutorial! ![]()
![]()
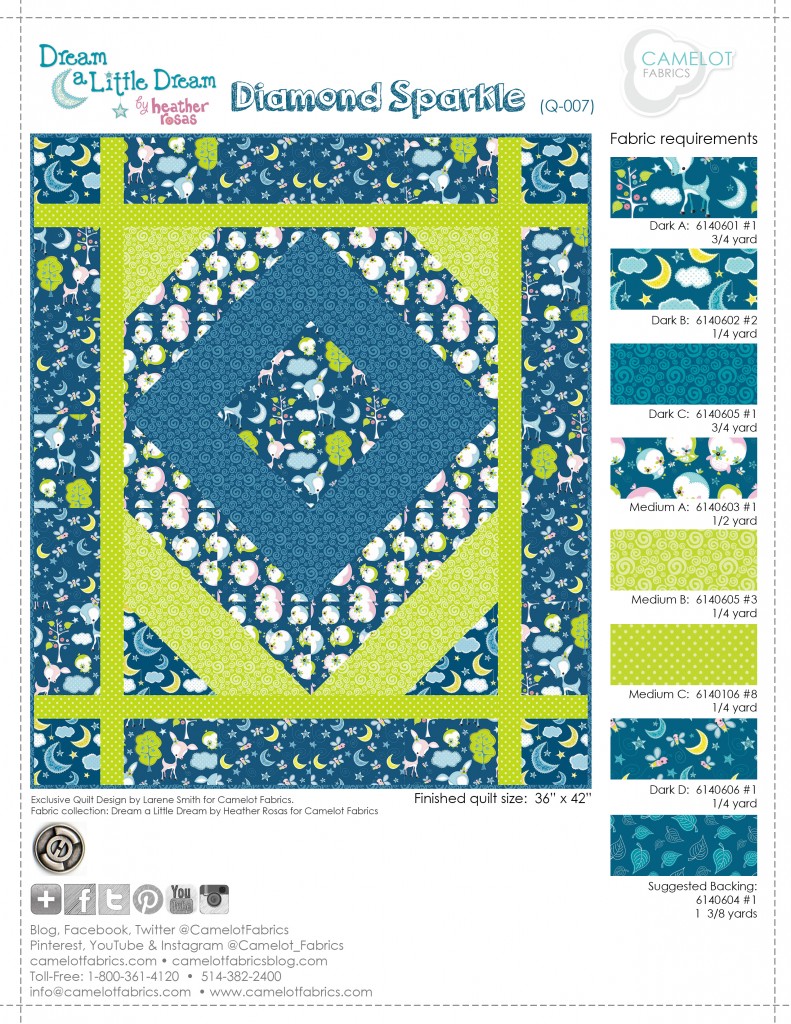
Diamond Sparkle Quilt for Camelot Fabrics
Design and Instruction by Larene Smith The Quilted Button
Other Supplies Rotary Cutter, Mat, Rulers, Straight Pins, Sewing machine, and threads to match your fabrics.
Notes
– WOF = Width of Fabric
– Please wash, dry & press your fabric before beginning.
– Sew all seams with an accurate 1/4” allowance.
– Press all seams open unless directed, to reduce bulk.
– Finished Block is 6” square; Center Block is 12” square.
Step 1: Cutting the Fabric
1. Dark A – Cut as follows:
a. (1) strip at 6-1/2” x WOF – Sub-cut into (6) 6-1/2” x 4-3/4” rectangles – Side Outer Border.
b. (1) strip at 4-3/4” x WOF – Sub-cut into (4) 4-3/4” x 6-1/2” rectangles – Top/Bottom Outer Border.
c. From the balance of the fabric, fussy cut (1) 9” square ON POINT for the CENTER.
2. Dark B – Cut as follows:
a. (1) strip at 6-7/8” x WOF – Sub-cut into (1) 6-7/8” squares then cross-cut ONCE to yield (4) triangles.
b. From the balance of the fabric cut (4) 4-3/4” squares for the Outer Border Cornerstones.
3. Dark C – Cut as follows:
a. (2) strips at 6-7/8” x WOF – Sub-cut into (6) 6-7/8” rectangles then cross-cut ONCE to yield (12) triangles.
b. (4) strips at 2-1/2” x WOF for the BINDING.
4. Medium A – Cut (2) strips at 6-7/8” x WOF – Sub-cut into (7) 6-7/8” squares then cross-cut ONCE to yield (14) triangles.
5. Medium B – Cut (1) strip at 6-7/8” x WOF – Sub-cut into (4) 6-7/8” squares then cross-cut ONCE to yield (8) triangles.
6. Medium C – Cut (4) strips at 2” x WOF – Sub-cut as follows:
a. Sub-cut (2) 2” x 30-1/2” rectangles – Inner Border Sides.
b. Sub-cut (2) 2” x 27-1/2” rectangles – Inner Border Top/Bottom.
c. From the balance of the 2” strips sub-cut (8) 2” x 4-3/4” rectangles – Frame of Outer Border Cornerstones.
7. Dark D – Cut (1) strip at 6-1/2” x WOF – Sub-cut into (8) 6-1/2” x 4-3/4” rectangles – Outer Border.
Step 2 – Sewing the Center
8. Sew (1) Dark C triangle LONG EDGE to each edge of the Dark A 9” square to finish the center block at 12-1/2” square as shown in Example A. 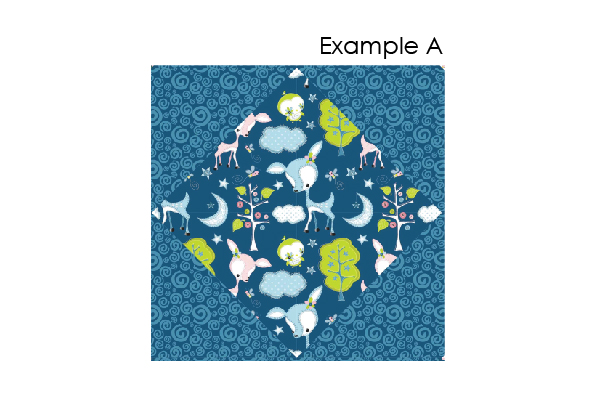
9. Set aside for use later.
Step 3 – Preparing the Half Square Triangles
10. Sew (1) Dark C triangle to (1) Medium A triangle at the LONG EDGE to make a square at 6-1/2”. Make (8) – Label Set 1.
11. Sew (1) Medium A triangle to (1) Medium B triangle at the LONG EDGE to make a square at 6-1/2”. Make (6) – Label Set 2.
12. Sew (1) Medium B triangle to (1) Dark B triangle at the LONG EDGE to make a square at 6-1/2”. Make (2) – Label Set 3. Step 2 – Sewing the Center 8. Sew (1) Dark C triangle LONG EDGE to each edge of the Dark A 9” square to finish the center block at 12-1/2” square as shown in Example A. 9. Set aside for use later.
Step 4 – Sewing the Center of the Quilt
13. Using the Layout provided, sew the blocks together, keeping in mind the direction of the triangles. NOTE: The empty space in the center is for the CENTER block. Keep in mind the direction of the triangles.
14. Sew Set 2, Set 1, Set 1, Set 2 together to finish Row 1.
15. Sew (2) of Set 1 together with the Dark C towards the inside – Make (2) and sew to each SIDE of the CENTER to complete Rows 2 and 3 and then sew to Row 1.
16. Sew Set 2, Set 1, Set 1, Set 2 together to finish Row 4 then sew to Row 3.
17. Sew Set 3, Set 2, Set 2, Set 3 together to finish Row 5 then sew to Row 4 to finish the center of the quilt at 24-1/2” x 30-1/2”.
Step 5 – Sewing the Inner Border
18. Sew (1) Medium C 2” x 30-1/2” rectangle to each side of the quilt’s Center.
19. Sew (1) Medium C 2” x 27-1/2” rectangle to each the Top and Bottom of the quilt’s Center to finish at 27-1/2” x 33-1/2”. 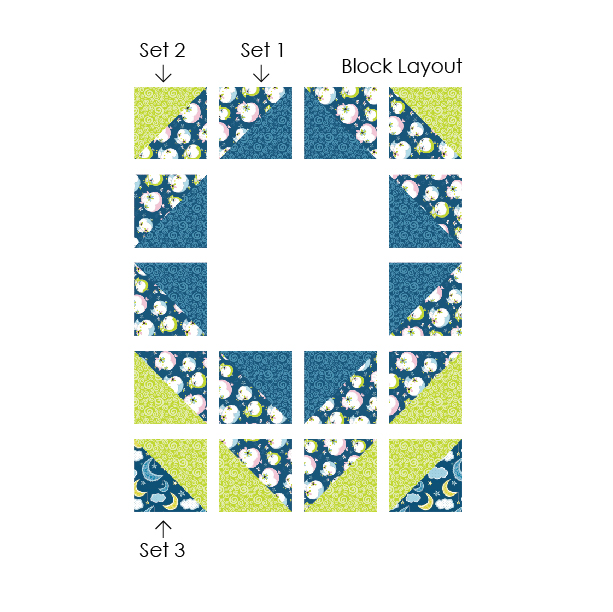
Step 6 – Sewing the Side Outer Border (Note: Refer to the quilt illustration on Page 1 as a guide when sewing the Outer Border. Keep in mind the direction of the print for Dark A.)
20. Sew the SIDE border as follows together at the 4-3/4” edge – sew from TOP to BOTTOM to measure 4-3/4” x 33-1/2”.
21. Medium C 2” x 4-3/4”, Dark A, Dark D, Dark A, Dark D, Dark A, Medium C 2” x 4-3/4” – Make (2).
22. Sew (1) to the LEFT side and (1) to the RIGHT side to finish at 27-1/2” x 36”.
Step 7 – Sewing the Top/Bottom Outer Border
23. Sew the TOP/BOTTOM borders as follows together at the 4-3/4” edge – sew from LEFT to RIGHT to measure 36” x 4-3/4”.
24. Dark B 4-3/4” square, Medium C 2” x 4-3/4”, Dark A, Dark D, Dark D, Dark A, Medium C 2” x 4-3/4”, Dark B 4-3/4” square – Make (2).
25. Sew (1) to the TOP and (1) to the BOTTOM to finish the quilt top at 36” x 42”.
Step 8 – Finishing the Quilt
26. Layer the backing, batting, and quilt top and quilt as desired.
27. Using the Dark C 2-1/2” strips sew on the binding to finish the quilt.
And there you have it! A gorgeous, baby-sized quilt that you can create at home. You can also check out the quilt pattern here, as well as all our other free quilt designs by our amazing quilt designers! Have a fantastic day!
Happy Sewing!
Comments are closed.