How To’s Day: Stegosaurus Plush Toy Tutorial
December 24th, 2013 by admin
Hi everyone!
Happy Tuesday! As well, it’s Christmas Eve!! We hope everyone is having a blissful day, taking a moment to enjoy everything even through the busy rush. Santa Claus is coming to town tonight, and we are super excited! ;) Here’s to family traditions and memories, and of course the plethora of amazing food! Yum yum yum!! “‘Twas the night before Christmas, when all through the house not a creature was stirring, not even a mouse. The stockings were hung by the chimney with care, in hopes that St. Nicholas soon would be there…”
We’ve also got a How To’s day for you! Today we are sharing an exceptionally adorable project we are sure you are going to LOVE! You might just squeal with glee when you see just how cute these stuffies are. Today’s tutorial is of these uber sweet Stegosaurus stuffed animals, perfect for any little youngin’. How precious would these be to decorate a little one’s room? They can be used as room decor, as friends, and pillows! Change up the fabric designs to match these stuffies to any room scheme. Take a peak at our black-and-white themed Steggies:
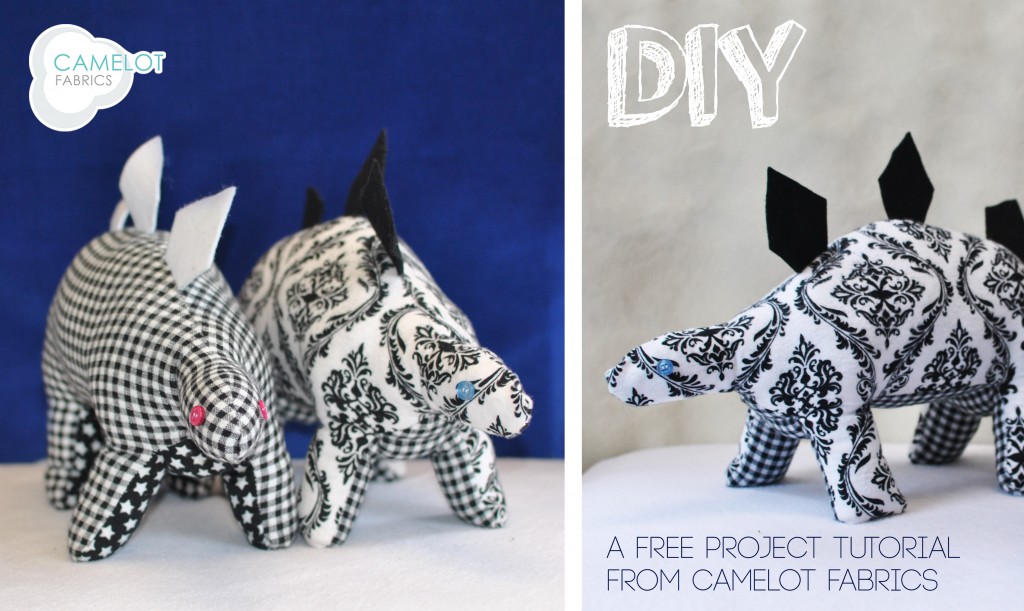
For the gingham stegosaurus, we used 9400/N #11 for the Main color and 21547 #11 for the Contrast color. For the damask stegosaurus, we used 4150003B #2 for the Main color and 9400/N #11 for the Contrast color.
So precious right?! You can make your very own Stegosaurus stuffed animals with our tutorial today. The project isn’t too difficult, and in not too much time…you’ll have a steggie friend of your own! Click more to see the full tutorial :)
Stegosaurus Tutorial
Supplies (to make one Stegosaurus)
– 1/3 yard of flannel from Camelot Fabrics (44” wide) in Main color
– Fat eighth yard of flannel from Camelot Fabrics (44” wide) in Contrast color
– Scraps of felt in coordinating color
– Bag of fiber stuffing
– About a cup of rice, beans, etc. (we used flax seeds)
– Paper printer
– 2 small buttons or embroidery thread (for eyes)
– Basic sewing supplies
– Sewing machine
– Needle & coordinating thread
– Scissors & fabric shears
– Straight pins
– Fabric marker
Notes
– Please wash, dry & iron your flannel before beginning.
– Unless otherwise noted, sew all seams with a 1/2” allowance.
– Finished size: 16” Tall x 10” Long x 4 1/2” Wide.
Cutting & Preparation
1. Print the Stegosaurus Template at 100% size. Cut along the marked border and tape the pieces together according to the numbered triangles. Cut out the template.
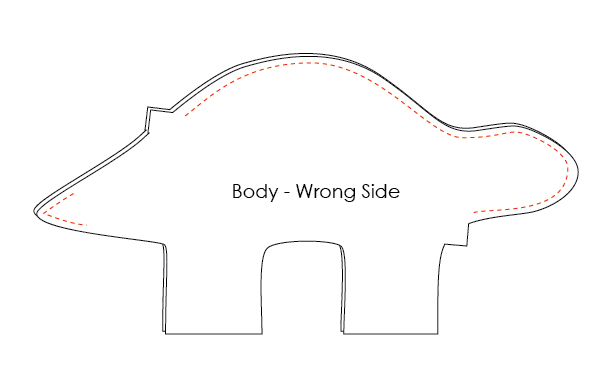
2. Fold your Main fabric in half, Right Sides together, and trace the Body template onto the double layer of fabric. Cut out both layers at once.
3. Trace the Belly template onto the Wrong Side of a single layer of your Contrast fabric and cut it out. Trace the Leg template four times onto the Contrast fabric and cut out these four Legs. Trace the Plate template three times onto your felt and cut out these pieces, being sure to trim off any marks on the felt.
Assembly
1. Baste the Plates to the upper edge of one Body piece between the asterisks with a 1/4” seam allowance as shown, against the Right Side of the Main flannel.

2. Sew the two Body pieces, Right Sides together, between the notches. Also sew the end of the tail closed, to about an inch from the tip on top and bottom. Backstitch at the beginnings & ends of these seams.
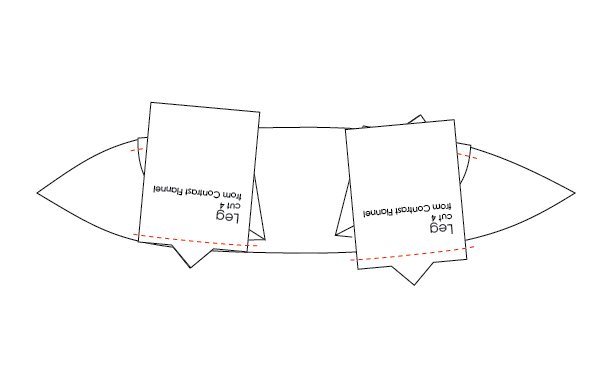
3. Sew the Legs to the Belly, Right Sides together, with the notches aligned.
4. Pin the Belly & Legs unit to the bottom of the Body pieces, beginning by lining up the Legs, then the neck & tail, and finally pinning the space between the Legs on either side. You may have extra Belly fabric where it joins the neck or tail of the dinosaur; this is fine. Just trim any excess before your begin to sew. Stich the Belly & Legs to the Body with one seam for the left side and a second one for the right. Clip your corners & curves, and turn the stegosaurus Right Side out.
5. Spoon some of your rice/beans into your stegosaurus’ feet until they are about half full. Stuff the rest of the dinosaur very tightly with fiber stuffing; being very full helps him stand up straight.
6. Whipstitch the gap in your stegosaurus’ back closed.
7. Embroider or sew small buttons to either side of the dino’s head to give him eyes.
And voila! You now will have your very own Stegosaurus stuffie…and you’ll probably want to make a couple of friends for him/her too. Just too cute!!
We hope you have enjoyed this week’s How To’s day. We would love to hear your feedback. If you decide to give this tutorial a try, please be sure to send us a picture to info@camelotfabrics.com – We would LOVE to see! :) Wishing everyone a fantastic Christmas Eve from the Camelot Fabrics team!
Happy Sewing!
February 25, 2015 at 3:14 pm, Ludie said:
With neew appreciation for economic unpredictability, many Americans have abandoned the idea of upgrading to larger homes as their families grow.
With just a feew easy home design tips, you can turn a boring home intro
one thwt dazzles. A reat interior design tip is to start checking out design magazines.
January 07, 2016 at 3:04 pm, news said:
Chiropractic is taken into account one of the efficient
and most secure types of different health management techniques.
Chiropractors offer to help you lead a pain free life for certain types
of pain. While treating for these problems, chiropractors offer lifestyle advice too.