How To’s Day: Christmas Stocking Tutorial
December 3rd, 2013 by admin
Hi everyone!
Happy Tuesday! We hope everyone is doing super well on this third day of December. We’ve got something extra special planned for today’s post…we’re bringing up the holiday spirit notch even higher with our festive How To’s Day! Today we share with you our Christmas stocking tutorial!! “The best way to spread Christmas cheer is singing loud for all to hear.” – Buddy, Elf movie.
We’ve also got another holiday question for you! Today’s question is: What is your favorite holiday song? Tell us in the comments below, we’d love to know (…so that we can also add it to our office Christmas playlist! ;))
As one who wears her first Christmas sweater as soon as socially acceptable, choosing one favorite holiday song is no easy feat. However, there are two that mean the most to me. The first is The Christmas Song by Nat King Cole, it’s a classic and a wonderful reminiscence to me of the wonders of Christmas. It’s the Most Wonderful Time of the Year by Andy Williams reminds me of my Christmas mornings: those first couple of notes and I can’t help but smile…it reminds me of those magical moments. Now let’s see what the design studio’s favorite holidays songs are:
Shannen: I, again, have 2 favorites that I can’t choose between…First is ‘Rockin’ Around the Christmas Tree’ by Brenda Lee because it was my grandmother’s favorite holiday song. The other would be ‘Santa Baby’ by Madonna because my 3 sisters & I would play this every day leading up to Christmas.
Valeria: Once Upon a December!! – Love that one! ♥
Marion: I’m torn – a big part of me adores Corinne Bailey Rae & Herbie Hancock’s take on River by Joni Mitchell. But at the end of December, my heart belongs to Bing Crosby singing White Christmas.
Juan: Feliz Navidad and Little Drummer Boy!
Andra: Sarah McLachlan & Barenaked Ladies singing God Rest Ye Merry Gentlemen/We Three Kings
Office Bonus: As a group, we would like to share with you Lady Gaga & Joseph Gordon-Levitt’s version of Baby, It’s Cold Outside. You’re welcome :)
Christmas stockings are a fun holiday tradition to make with your family, as it creates lots of wonderful and cherished memories. There is no written proof of how Christmas stockings came about, but they are now an added wonder to Christmas morning: running down the stairs at the crack of dawn to an abundance of glittering presents, eagerly awaiting for your parents to wake up, so you excitedly delve into your stocking…added, wonderful memories!
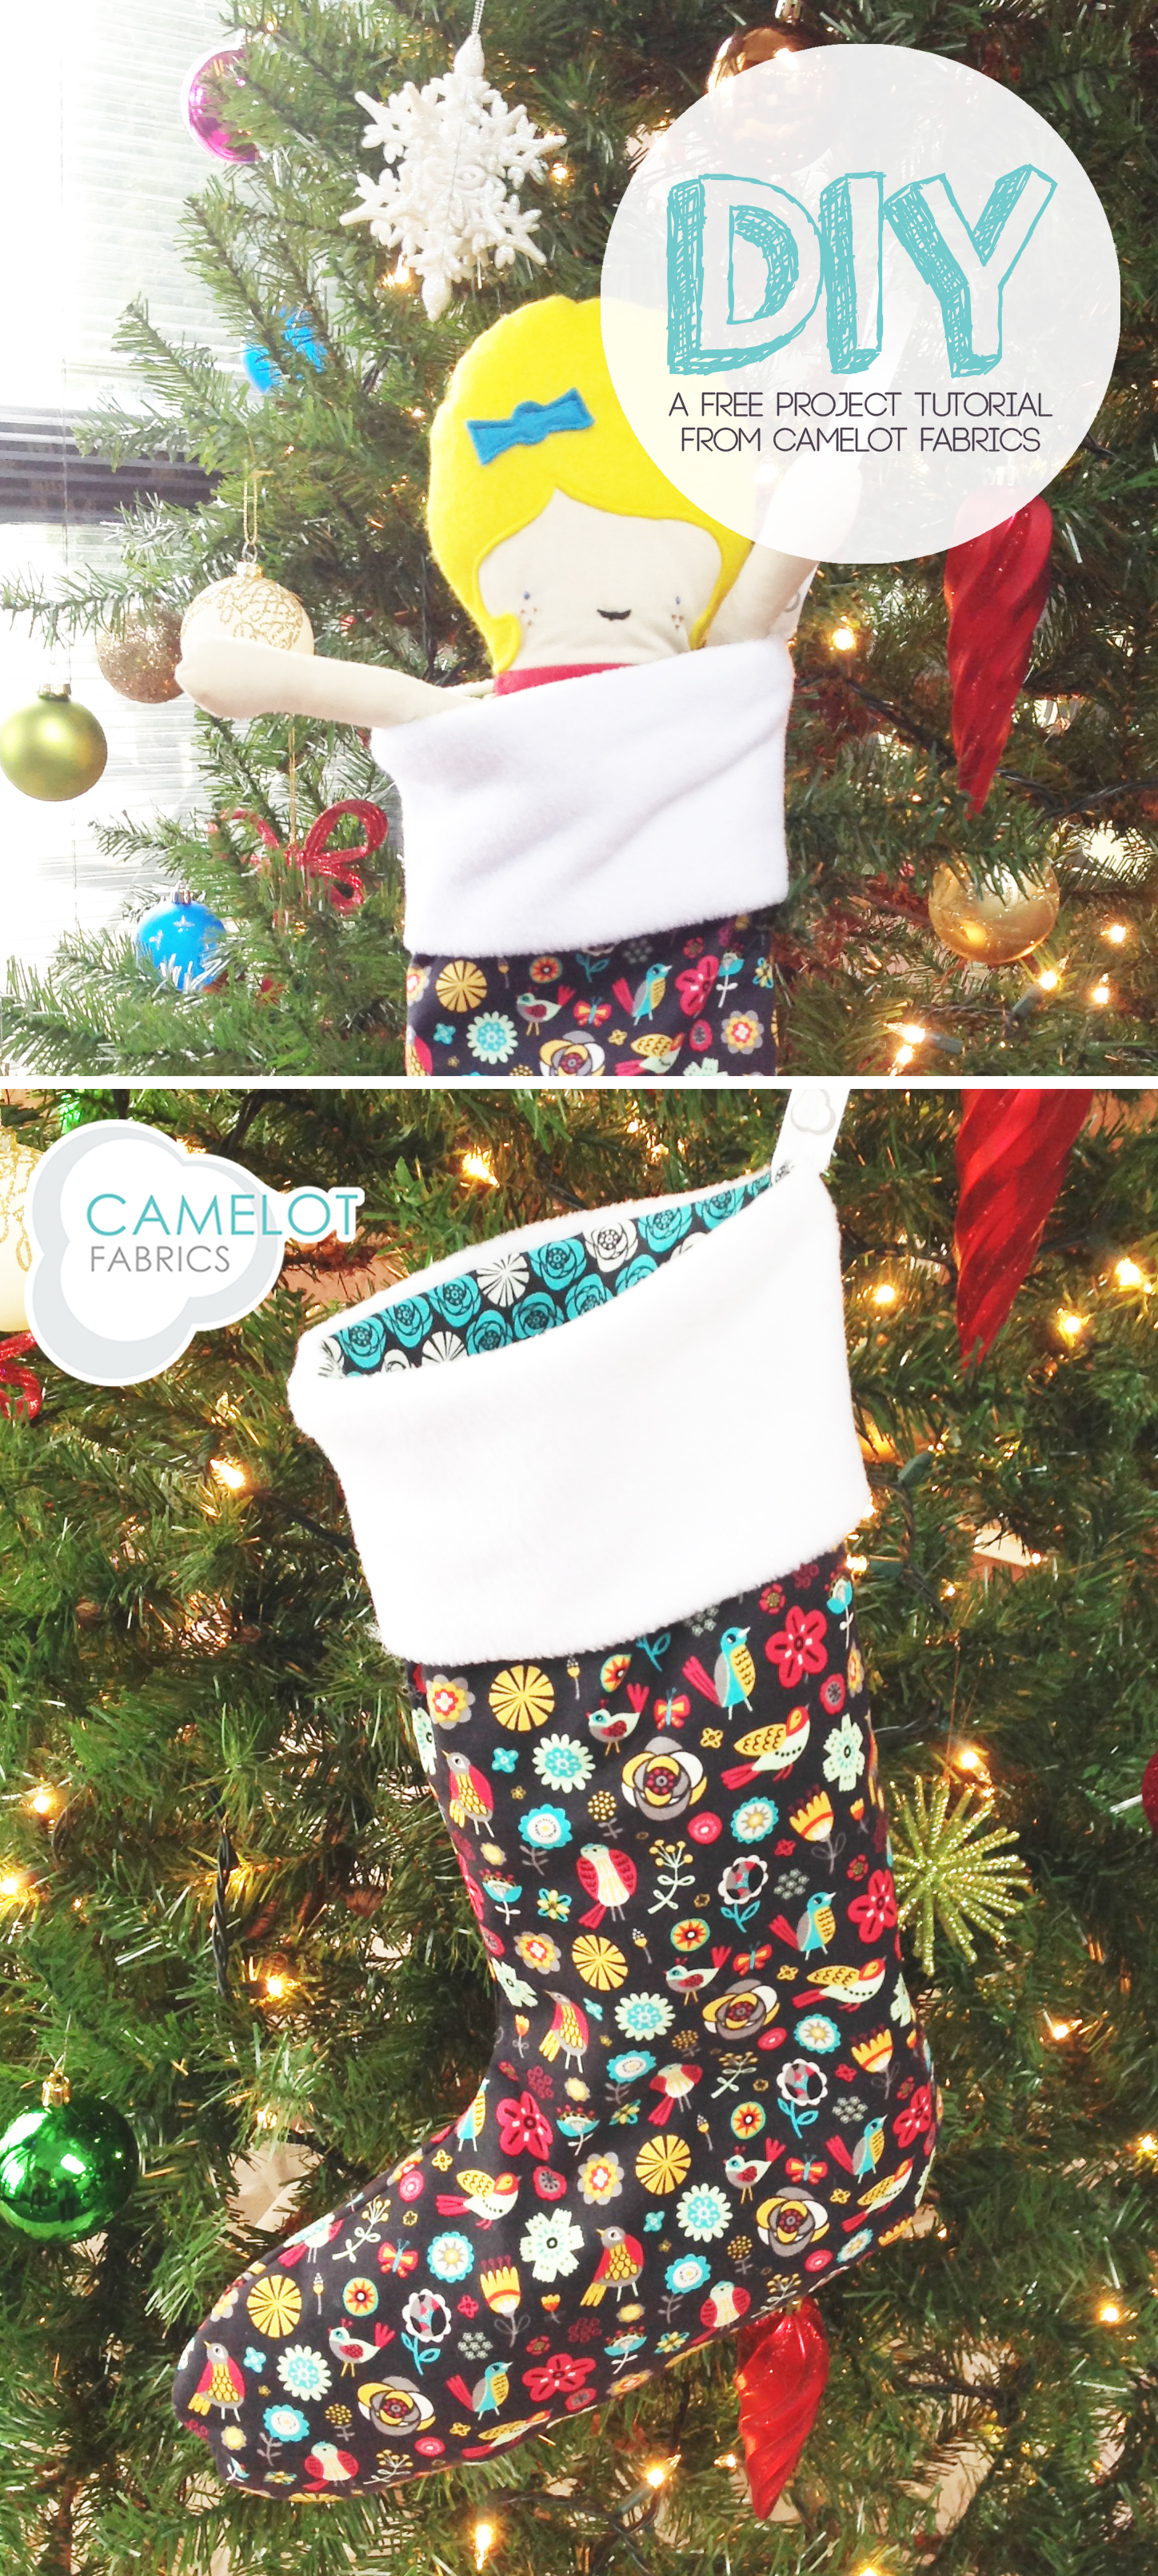
For the pictured stocking, we used Graphite Birds & Flowers and Graphite Roses from our Birds of a Feather by Allison Cole collection.
There is much nostalgia attached to this holiday tradition, but they also add such a beautiful and festive look to any holiday decor around the house, especially lined along the fireplace (the perfect spot for Santa to find!). With our simple Christmas stocking tutorial, you can now create your stockings in any fabric that you desire to match your decor. Now, let’s get sewing!!
Click more to see the full tutorial!
Christmas Stocking Tutorial:
Supplies & Tools:
– For the shell: 5/8 yard of 8140301 #3, Graphite Birds & Flowers, from Birds of a Feather by Allison Cole for Camelot Fabrics
– For the lining: 5/8 yard of 8140305 #1, Graphite Roses, from Birds of a Feather by Allison Cole for Camelot Fabrics
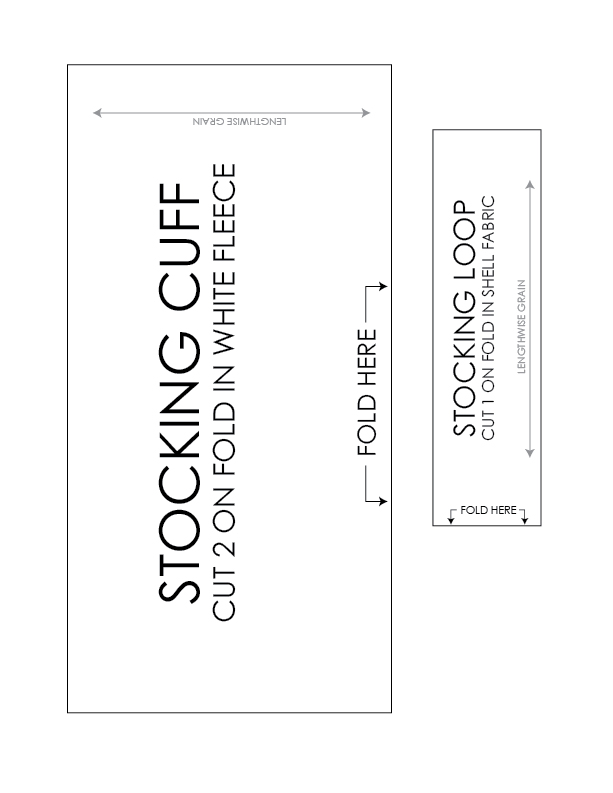
– 1/4 yard white fleece
– Paper printer
– Basic sewing supplies: sewing machine, needle & coordinating thread, straight pins, scissor & fabric shears, iron & pressing surface, fabric marker
(Note: Please wash & dry your fabric before starting. Unless otherwise stated, sew all seams at 1/2″ wide)
Finished dimensions: 19” tall by 8” wide
CUTTING:
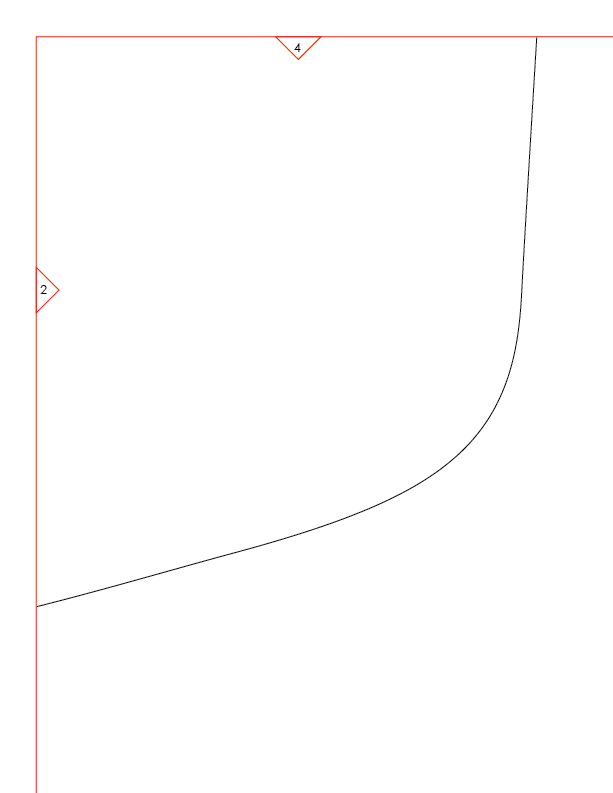
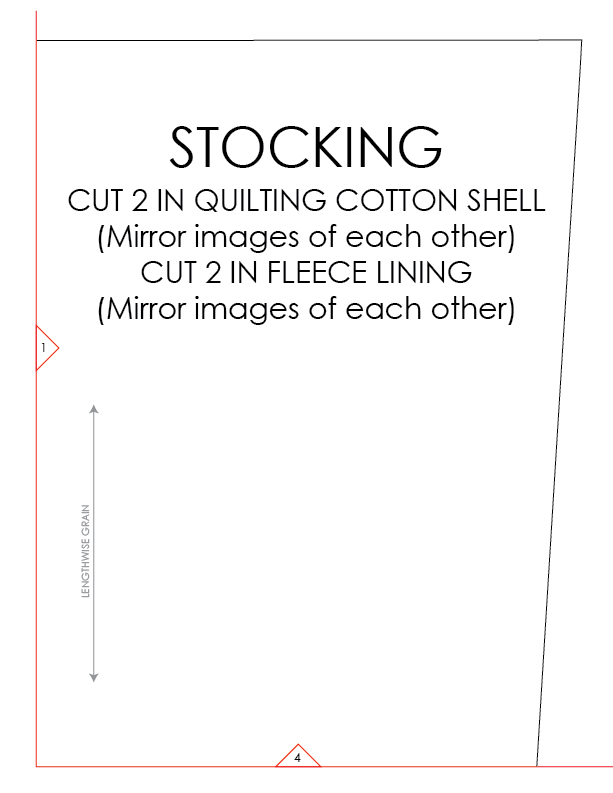
1. Print out the stocking patterns (found at the end of the tutorial) at 100% of actual size. Cut or fold the edges of your main Stocking template along the red lines and tape its four pieces together, matching up the numbered triangles as indicated on the template. Cut out all your pattern pieces.
2. After ironing your cotton fabric, trace each pattern piece onto the corresponding fabric. Your 2 stocking pieces should be mirror images of each other; the same goes for your 2 lining pieces. Cut out the fabric pieces.
ASSEMBLING YOUR STOCKING:
1.

Fold one stocking cuff in 2 lengthwise, wrong sides together, and pin it to the top of the right side of one stocking shell piece. The raw ends of the cuff should sit against the top edge of the stocking piece. Baste the cuff to the stocking at the top and sides, 1/4” from the stocking edge. Trim off any excess fleece from the sides. Repeat this step for your remaining cuff and stocking shell pieces.
2.
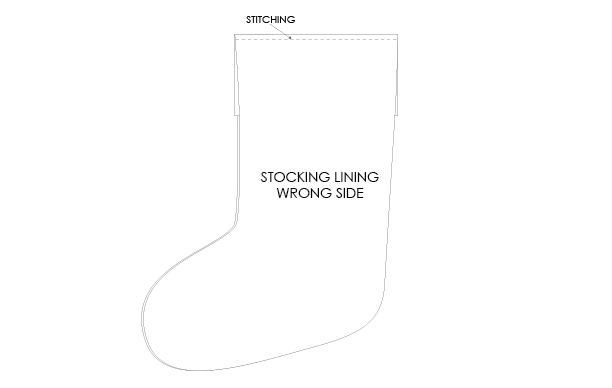
Place a lining piece on its corresponding stocking piece, right sides together with the cuff sandwiched between them. Make sure the pieces align all around, and stitch them together along the top edge.
3.
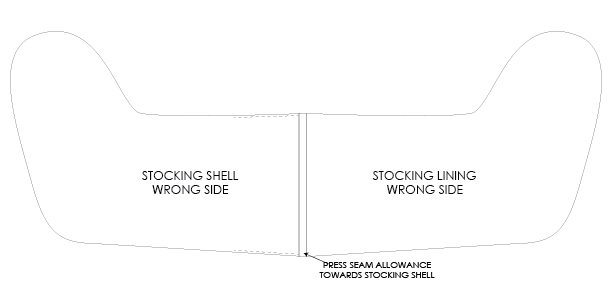
Press the seam allowance towards the stocking piece; this will ensure that your lining will not peek over the top of your stocking. Repeat step 2 for your remaining stocking and lining pieces.
4.

Fold your loop in half lengthwise, right sides together, and sew it closed along the long edges. Press your seam. Turn this piece right side out and press it flat with the seam in the middle of one side. Fold the loop in half widthwise with the seam on the inside of the fold.
5.
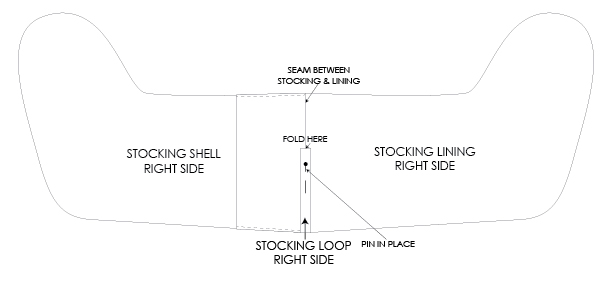
Place your loop on the seam between one stocking and lining on their right side, and pin it in place.
6.
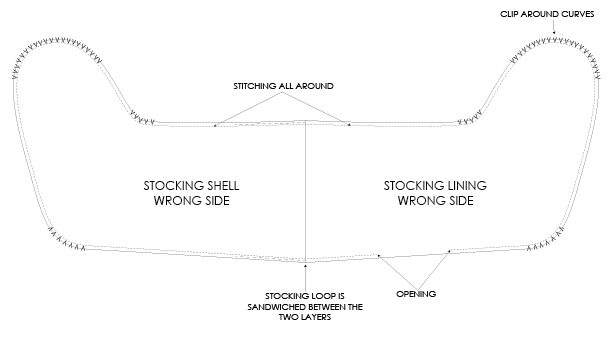
Overlay the 2 stocking units, right sides together. Make sure all the seams match up, that the loop is sandwiched between the two pieces and that the stocking & lining pieces align all around. Pin together. Stitch all around, starting with the linings. Leave a 5 inch opening on the lining to turn the stocking right side out. Clip the seam allowance around the curves and at the thick seam between the stocking and the lining. Turn your work right side out and shape the stocking trough the opening. Press your project flat and topstitch the opening closed. Stuff the lining inside the stocking, press down, avoiding the fleece, and you’re done!
Templates:


We hope you enjoyed today’s How To’s Day! If you decide to give this tutorial a try, be sure to send us a picture on twitter or at info@camelotfabrics.com – We love seeing all your fantastic projects!
Have you entered our Star Trek fabric giveaway yet? We are giving away 6 yards of our Star Trek fabric. Let us know who your favorite Star Trek character is here. Good Luck! We are announcing the winner this Wednesday, so be sure to enter before then ![]()
Happy Sewing!
December 03, 2015 at 4:19 am, Israel said:
What’s up to every body, it’s my first visit of this website; this web
site contains remarkable and really excellent stuff in support of readers.