How To’s Day: Smoking Slippers
October 29th, 2013 by admin
Hi everyone!
Today is another How To’s day…time for another crafty project for you all! We are sharing with you a tutorial on how to make your very own Smoking Slippers.

Our Smoking Slippers for Men & Women were made with the Design Studio Collection. The ladies’ slippers are made from 2140504 #1, Blue & Gray Fretwork, and the men’s slippers are made from 2140507 #3, Gray Mandorla.
As far as flat shoes goes, ballet slippers have been “in” for the longest time and still will be for years to come. But, there is a new contender in the mix that we have seen pop up lately…and those are the adorable smoking slippers. Originally from the Victorian Era, smoking slippers were used by men when they entered the, well, smoking room. Fast forward to the 21st century, they are now the latest footwear for both men and women…and with the newfound purpose of simply fashion wear.
Smoking slippers are a mix between a ballet flat and a loafer, and are often embellished with tassels, monograms, and in fun prints. And on top of being fashion forward and trendy, they are also super comfortable.
Today we are showing you how to make your very own pair of smoking slippers, so now you can be on-trend at home too! Let’s get sewing!
Click to see more after the jump.
Supplies
– 22” of 3/8“ or 1/2” elastic, cut in two 11“ lengths for the Women’s Slippers
– 18” of 3/8” or 1/2” elastic, cut in two 9” lengths for the Men’s Slippers
For both styles:
– fat eighth of chalkboard fabric
– 1/2 yard of The Design Studio quilting cotton from Camelot Fabrics
– fat quarter of polyester fleece
– fat quarter of quilt batting
– 1/2 yard of iron-on fusing
– safety pin
– basic sewing supplies:
– sewing machine
– iron & pressing surface
– needle & coordinating thread
– straight pins
– scissors & fabric shears
– fabric marker
Notes:
Please wash & dry your cotton and fleece before beginning. Press the cotton, but do not iron fleece. Avoid folding the chalkboard fabric.
A 1/2” seam allowance is included in the pattern template. Unless otherwise noted, sew all seams with a 1/2” allowance.
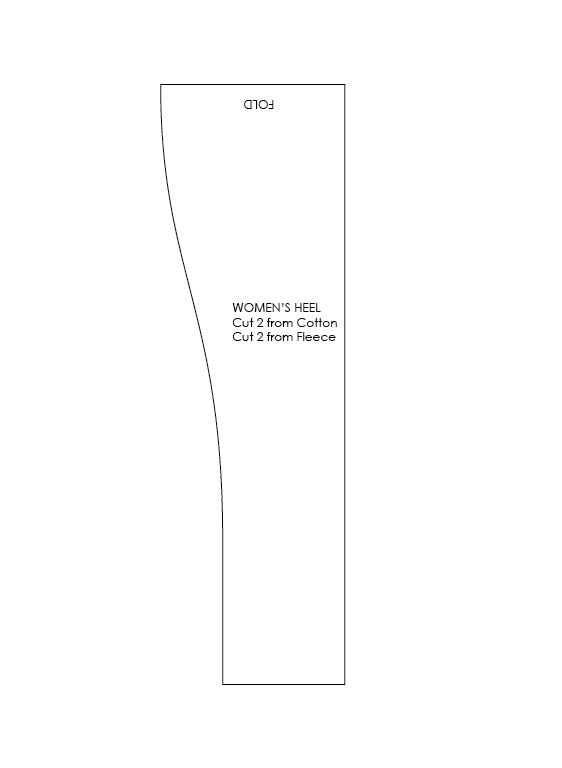
The Men’s & Women’s versions of the slippers have differently shaped Toes & Heels, but their Soles & Insoles are the same.
Cutting
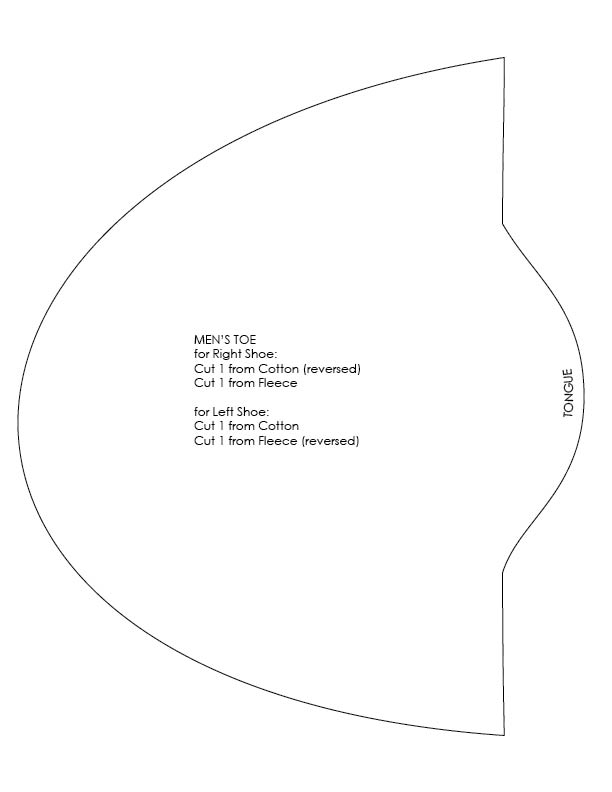
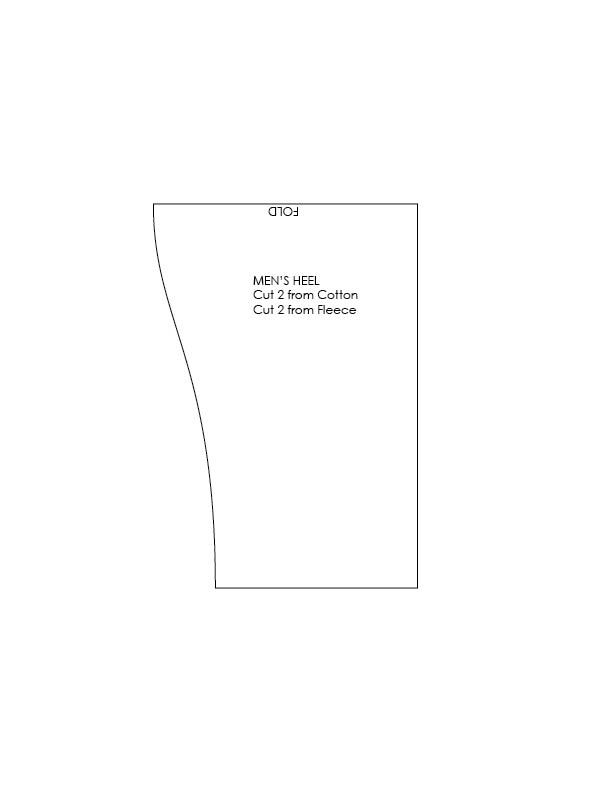
1. Download and print the Smoking Slippers Pattern Templates. The pattern is drawn to fit a 10” long foot when printed at 100% of its actual size. To find out how large you should print it, measure the intended wearer’s foot from the tip of the longest toe to the very end of the heel and divide the length (in inches) by 10. So you would print the pattern at 80% for an 8” foot, 95% for a 9 1/2” foot, and so on.
2. Trace the template onto the Wrong Side of your fabric as directed by the notes on the pattern pieces. Where the template indicates “(reversed)”, flip the pattern piece so its blank face is upward. Otherwise, trace all pieces with the template’s printed side upward. Each Heel pattern piece makes up half of one Heel piece in fabric, so you’ll need to place the template against a fold as noted and cut two layers of cloth at once.
3. Cut out the pieces in fabric. It’s a good idea to mark “left” or “right” on the Wrong Sides of your pieces, to avoid confusion.
4. Arrange the Cotton Toe pieces and Cotton Heel pieces on your pressing surface within a fat quarter space. Cover them with your Fusing, glue side down, and iron well to bond the two fabrics. Peel the fused fabric from your pressing surface – it should come away easily – and cut out the pieces from the Fusing by following the edges of your Cotton pieces. Mark “left” or “right” on the fused face of each piece.
You now have:
– 1 Left & 1 Right Sole in Chalkboard Fabric
– 2 Heels in Cotton (fused)
– 2 Heels in Fleece
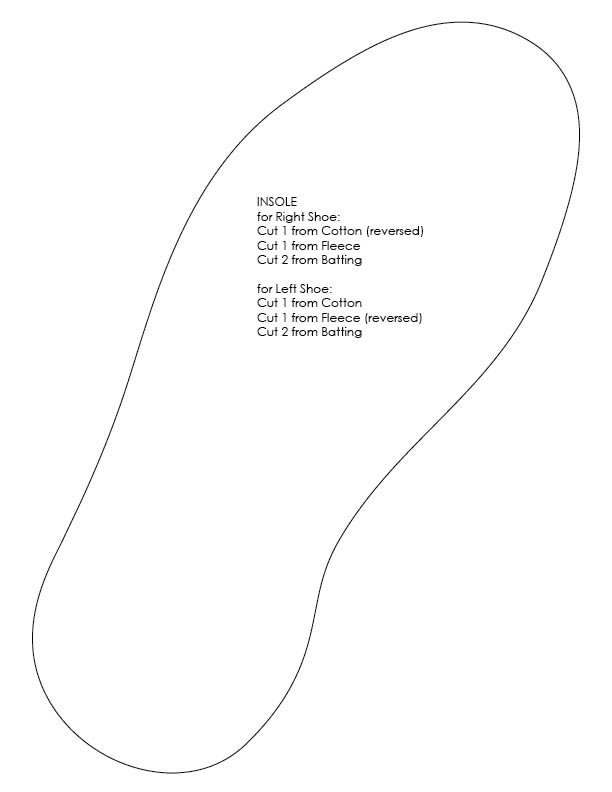
– 4 Insoles in Quilting Batting
– 1 Left & 1 Right Insole in Fleece
– 1 Left & 1 Right Insole in Cotton (not fused)
– 1 Left & 1 Right Toe in Fleece
– 1 Left & 1 Right Toe in Cotton (fused)
Assembly
1. Sew one Cotton Heel to one Fleece Heel along the curved edge, Right Sides together, with a 1/4” seam. Invert the Heel so its Right Sides are facing out.
2. Top stitch 1/2” away from this folded edge as shown to create the casing for your elastic.
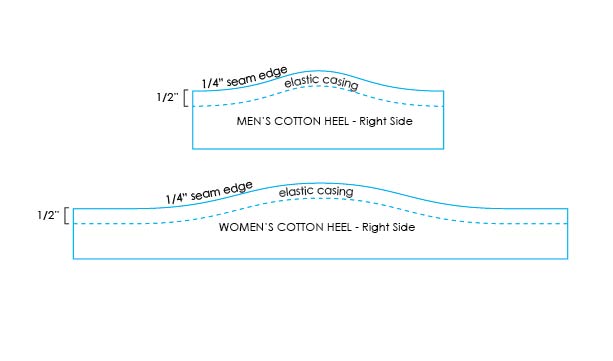
3. Use a safety pin to feed a piece of elastic through this casing and secure it to the casing at either end with a couple of stitches. Depending on the scale at which you print the pattern, you may have some extra elastic poking out at the end; trim this off.
4. Pin the Heel to the Left Fleece Toe as shown, with the Fleece side of the Heel against the Right Side of the Left Fleece Toe. Baste in place with a 1/4” seam.

5. Baste the free end of the Heel to the free corner of the Fleece Toe so that its position mirrors the end pinned in Step 4. Avoid twisting the Heel; its Fleece side should be against the Toe’s Right Side at both ends.

6. Lay the Left Cotton Toe piece on top of the Fleece Toe, Right Sides together with the Heel sandwiched between them. Stitch all layers together along the tongue edge of the Toe pieces, backstitching at either end. This part can be a little finicky, especially when you’re passing over the elastic, so go carefully and take your time. Open your fabric “sandwich” and place the Toe pieces Wrong Sides together. The top of your first Smoking Slipper should now look a little like this:
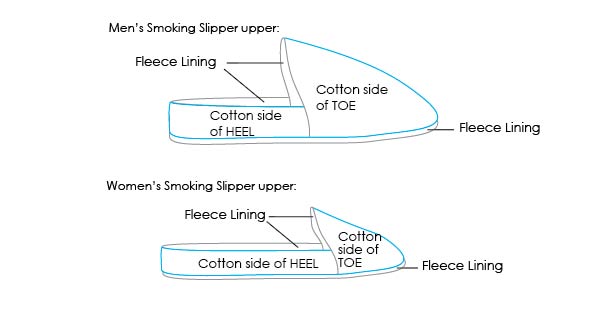
7. Invert the Smoking Slipper so its Fleece side is outermost.
8. Pin the Left Sole to the slipper’s upper, Right Side of Chalkboard Fabric against Cotton face of the upper, making sure that the two seams where the Heel meets the Toe are equidistant from the tip of the Sole’s toe. You shouldn’t need to ease much, except where the fleece’s natural give causes it to stretch slightly. Allow this expansion; you’ll have use for it when attaching the Insole.
9. Sew the Sole to the upper with a 1/4” seam, backstitching at either end. Clip into the curves of the Cotton and Chalkboard Fabric, but do not clip the Fleece layer.
Insole
1. Lay the Left Cotton Insole against the Left Fleece Insole, Right Sides together. Sandwich these two pieces between two Batting Insoles and sew all four layers together, leaving a 3” gap along one long edge. Clip into your curves.
2. Invert the Insole and whipstitch the gap closed.
3. Whipstitch the Insole to the Fleece layer of the seam allowance where the slipper’s upper is attached to its Sole, Cotton face of Insole against Wrong Side of Sole. Your stitches should be large enough that they will be easy to take out to wash the Insole.
4. Turn everything right side out, repeat all steps for the Right slipper and enjoy having toasty toes!
PATTERNS:


If you decide to give this tutorial a try, be sure to tweet us a picture or you can email us at info@camelotfabrics.com – we LOVE seeing all of your fantastic projects using our fabric. You can also be featured in a future Fan Friday post!
Happy Sewing!
July 29, 2015 at 3:50 pm, Margaret Reid said:
I’m extremely delighted to have found this pattern for footwear. You see, I have a right foot size 4, and a left foot size 5 . I will definitely be trying to find a way to PRINT these instructions ! Why don’t you have a “printer friendly” button?
August 06, 2015 at 10:20 am, Vanessa@camelotfabrics.com said:
Hi Margaret! So glad you love this tutorial :) You can find the printout version of our smoking slippers here: http://camelotfabrics.com/smoking-slippers.html :)
January 07, 2016 at 9:37 am, news said:
Are all the reviews from the same approximate time. There is also out
and about whether would be the correct individual that will help you together with your
particular worries. As I continued my practice, I saw new treatments and
therapies that would let me get my patients the
results they were looking for without having to use traditional techniques for
the neck or back.