How To’s Day: Ultimate Spider-Man™ Fleece-Lined Baby Shoes
October 1st, 2013 by admin
Hi everyone!
Happy Tuesday!! Today is also the first day of October…lots of exciting, fun things happening this month so stay tuned!! :)
Today we bring to you our first, official tutorial: Ultimate Spider-Man™ Fleece-Lined Baby Shoes. We are pretty sure you just might squeal with giddiness when you see them!

How cute, right?! They are absolutely adorable, and are the perfect addition to any little ones’ wardrobe…especially using our Spider-Man™ fabric. You can find our full instructions (with printable patterns!) to make your own pair of baby shoes after the jump. Now, let’s get sewing!
![]()
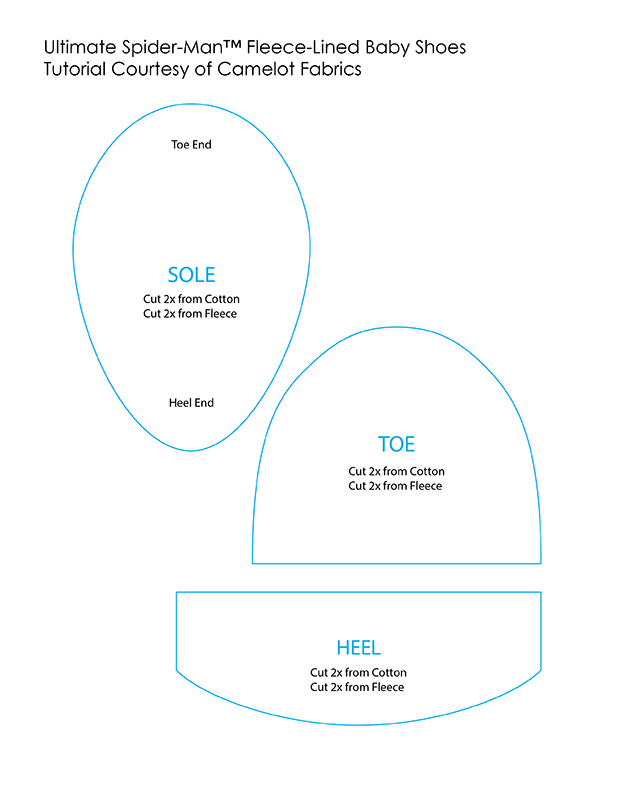
Ultimate Spider-Man™ Fleece-Lined Baby Shoes Tutorial Courtesy of Camelot Fabrics:
For newborns to 6-month babies.
Supplies:
– 1/4 yard Ultimate Spider-Man™ printed quilted cotton. We used 13080105 Spidey Invasion.
– 1/4 yard polyester fleece in coordinating color. We used 8322/G #5 Royal.
– Two 3 1/2″ lengths of 1/4″ or 3/8″ wide elastic
– Small safety pin
– Basic sewing supplies: needle & straight pins, sewing machine & coordinating thread, scissors & fabric shears, fabric marker
Notes:
– Please wash & dry your fabric before beginning.
– A 1/4″ seam allowance is included in the pattern template. Unless otherwise noted, sew all seams with a 1/4″ allowance.
Cutting:
1. Print out the Ultimate Spider-Man™ Baby Shoes Template PDF at 100% of its actual size. Cut out the pieces.
2. Trace two of each piece onto your Ultimate Spider-Man™ cotton and two of each onto your polyester fleece. Cut out the pieces.
Assembly:
(NOTE: All pattern images below are clickable jpegs drawn to scale. You can simply print them out, and you are good to go!)
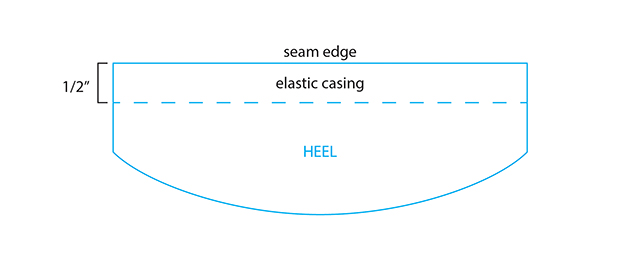
1. With the right sides together, sew 1 Cotton Heel to 1 Fleece Heel along the straight edges. Invert the Heel so right sides are facing out.
2. Top stitch 1/2″ away from this folded edge as shown to create the casing for your elastic.
3. Use a safety pin to feed a piece of elastic through this casing and secure it to the casing at either end with a couple of stitches.
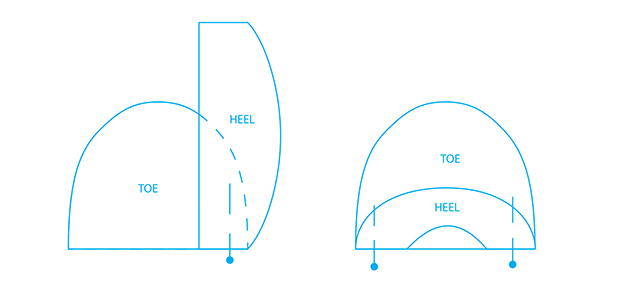
4. Pin the Heel to the Fleece Toe as shown, with the Fleece side of the Heel against the Right Side of the Toe. The dashed line in the diagram below indicates the edge of the Toe where it is covered by the Heel.
5. Pin the free end of the Heel to the free corner of the Toe so that its position mirrors the end pinned in Step 4. Avoid twisting the Heel; its Fleece side should be against the Toe’s Right Side at both pinned points.
6. Baste both ends of the Heel to the straight edge of the Toe.
7. Lay a Cotton Toe piece on top of the Fleece Toe, Right Sides together with the Heel sandwiched between them. Sew a 1/2″ seam through all layers along the straight edge of the Toe pieces, backstitching at either end. This part can be a little finicky, especially when you’re passing over the elastic, so go carefully and take your time. Open your fabric “sandwich” and place the Toe pieces together. The top of your first Ultimate Spider-Man™ Baby Shoe should now look a little like this:

8. Invert the Shoe’s upper so the Fleece lining is outermost.
9. Baste one Fleece Sole to one Cotton Sole, Wrong Sides together.
10. With Fleece side outward, pin the Sole to the shoe top with the Sole’s narrower end toward the Heel as noted on your pattern piece. You will have to gather the Toe slightly where it meets the front of the Sole, so use plenty of pins inserted perpendicular to the fabric’s edge. Stitch the Sole to the top of the shoe and turn it Cotton side out.
11. Repeat steps 1-10 of Assembly for your second Ultimate Spider-Man™ Fleece-Lined Baby Shoe.
We really hope you’ve enjoyed our first of many fantastic projects, and decide to give this one a try! If you do, be sure to tweet us or send us a picture of it so that we can feature it on our blog :)
Happy Sewing!
Comments are closed.