How To’s Day: Cracker Lattice Quilt by Meadow Mist Designs
October 20th, 2015 by Camelot Fabrics
Hi everyone,
Happy Tuesday! I hope you all are having a fantastic day so far!! If you’re headed to Fall QM, we’ll be there too – be sure to by booth #414 :)
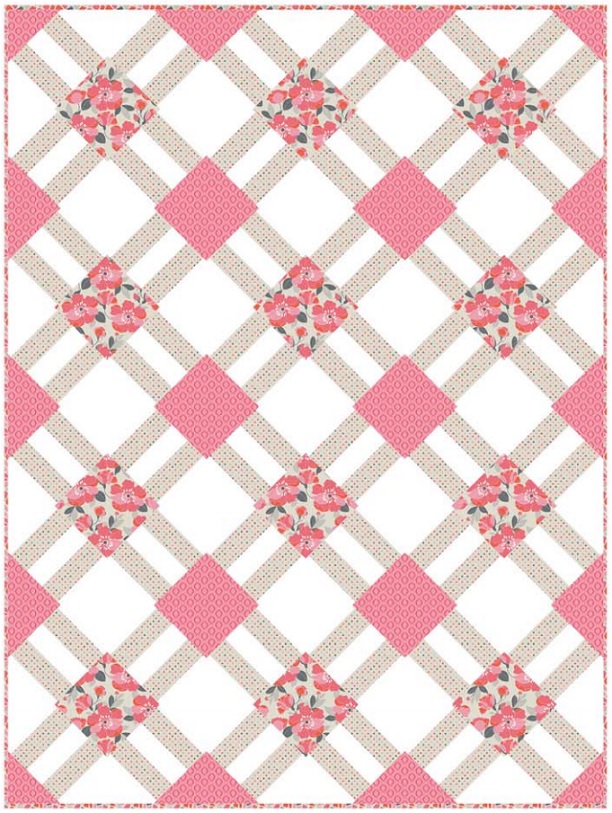
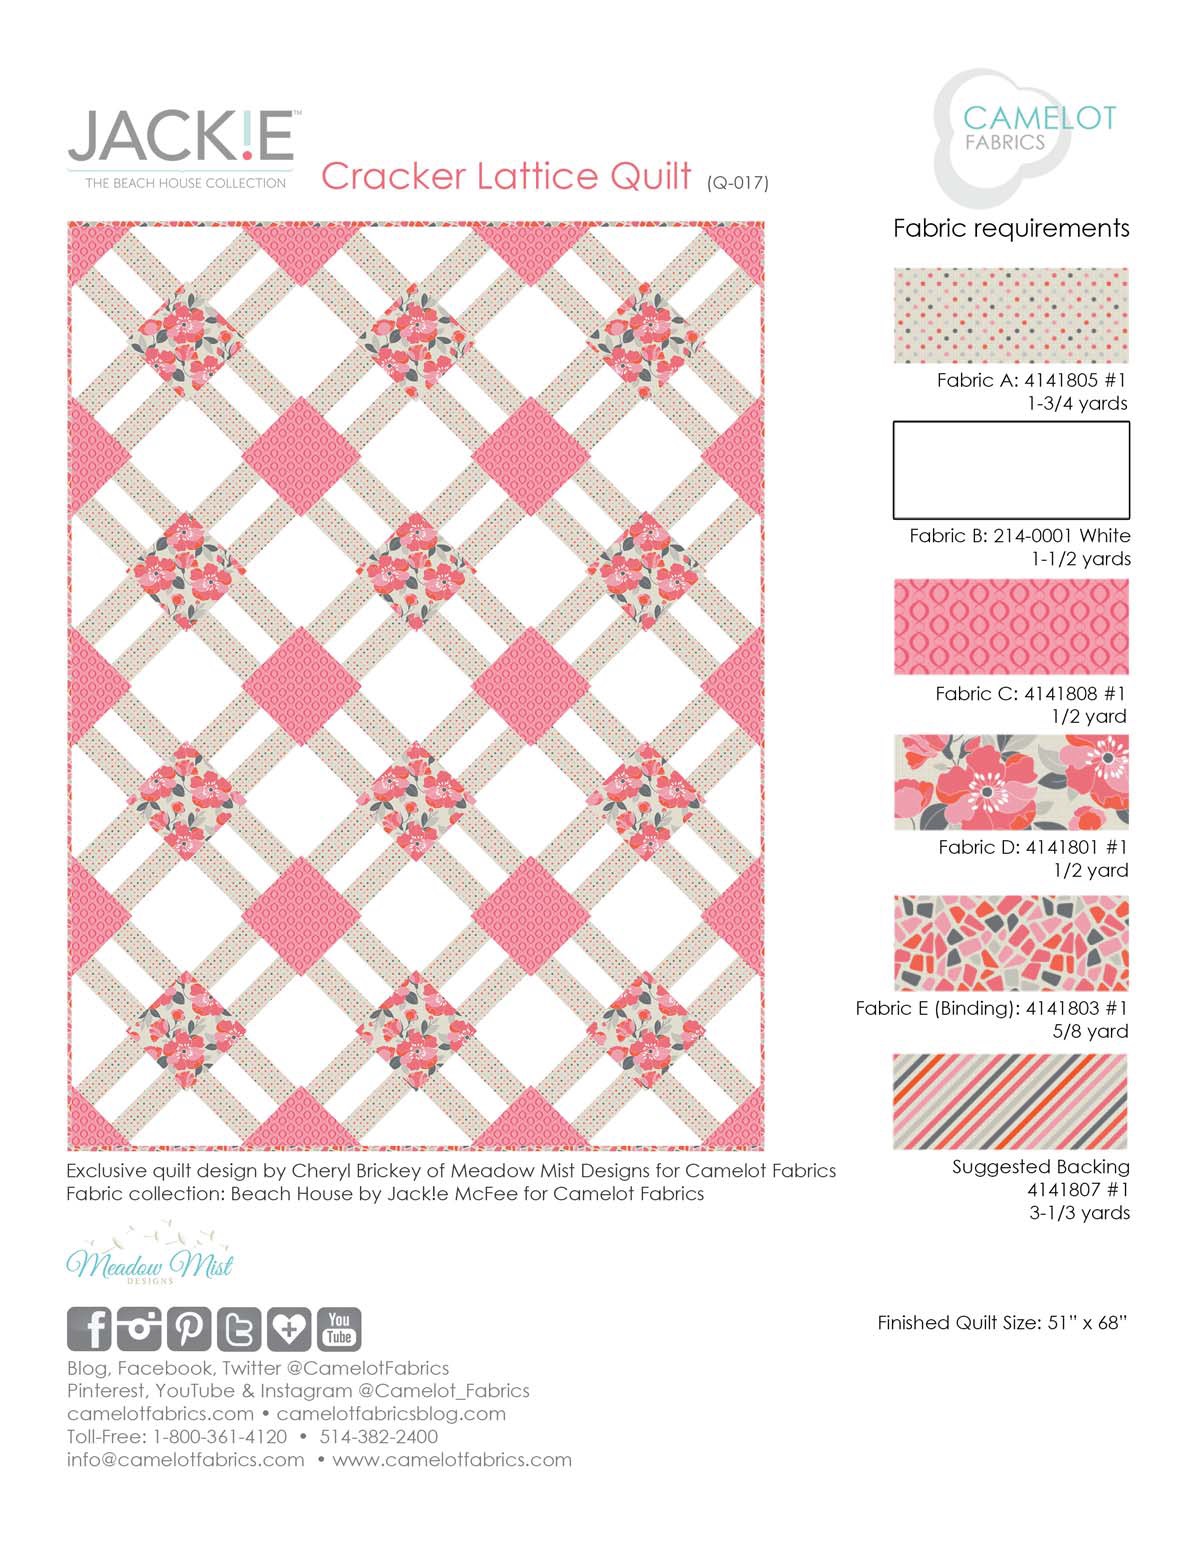
Time for this week’s How To’s Day! Today we are featuring our Cracker Lattice Quilt by Meadow Mist Designs. Cracker Lattice is a very pretty design of double lattices along the whole quilt. To add a fun twist, each intersection of lattices is a diamond block, which creates a look of interlocking squares and rectangle shapes. We chose to showcase Cracker Lattice with our Beach House Collection by Jack!e McFee. The mixing of coral prints keep the quilt feminine and sweet – perfect for a nursery or little girl’s bedroom!
Want to design your own Cracker Lattice Quilt? Click MORE to see the full tutorial.
CRACKER LATTICE QUILT
Pattern Designer: Cheryl Brickey of Meadow Mist Designs
Fabric Featured: The Beach House Collection by Jack!e McFee
OTHER TOOLS & SUPPLIES
– Rotary cutter & mat
– Sewing machine & coordinating thread
– Iron & pressing surface
– Pencil
– 2 yds quilt batting (58” wide)
Notes:
• WOF = width of fabric (42”)
• Unless otherwise directed, sew all seams with a scant 1/4” seam allowance.
• Please wash, dry & iron your fabric before beginning, and trim selvages.
THE DESIGN
Cracker Lattice is a modern take on a classic quilt block, the cracker block. With a different block arrangement and coloration, a lattice pattern is created. The cracker block measures 9” x 9” (8-1/2” x 8-1/2” finished) and the finished quilt measures at 51” x 68”.
CUTTING
Fabric A:
Cut (16) 2-1/2” x WOF strips
Fabric B:
Cut (8) 2-1/2” x WOF strips
Cut (6) 5-1/8” x WOF strips
– Sub-cut (48) 5-1/8”x 5-1/8” squares (8 from each strip)
– Cut each square on the diagonal, for 96 triangles total
Fabric C
Cut (3) 5-1/8” x WOF strips
– Sub-cut (24) 5-1/8”x 5-1/8” squares (8 from each strip)
– Cut each square on the diagonal, for 48 triangles total
Fabric D
Cut (3) 5-1/8” x WOF strips
– Sub-cut (24) 5-1/8”x 5-1/8” squares (8 from each strip)
– Cut each square on the diagonal, for 48 triangles total
Fabric E – Binding
Cut (7) 2-1/2” x WOF strips.
BLOCK ASSEMBLY
1. Form (8) tri-layer strips, each using (2) Fabric A 2-1/2”x WOF strips sandwiching (1) Fabric B 2-1/2” x WOF strip. Press seams open.

2. Sub-cut each tri-layer strip into (6) tri-layer squares (6-1/2” x 6-1/2”) for a total of (48) tri-layer squares.

3. Center (1) Fabric B triangle on the Fabric A side of a tri-layer square. Sew along the edge with a scant 1/4” seam (shown as the dotted line).

4. Sew a second Fabric B triangle onto the opposite side of the tri-layer square, and press both seam allowances away from the center square.

5. Continue by sewing a Fabric C triangle and a Fabric D triangle onto the tri-layer square, pressing the seams outward.
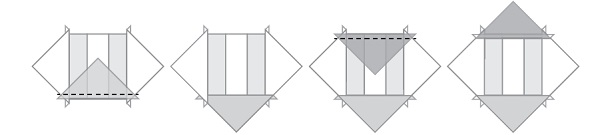
6. Trim off the tabs formed by the sewn-on triangles and square the block to 9” x 9” (if necessary) making sure there is 1/4” between the corner of the inner square and the outer side of the unit.

QUILT TOP ASSEMBLY
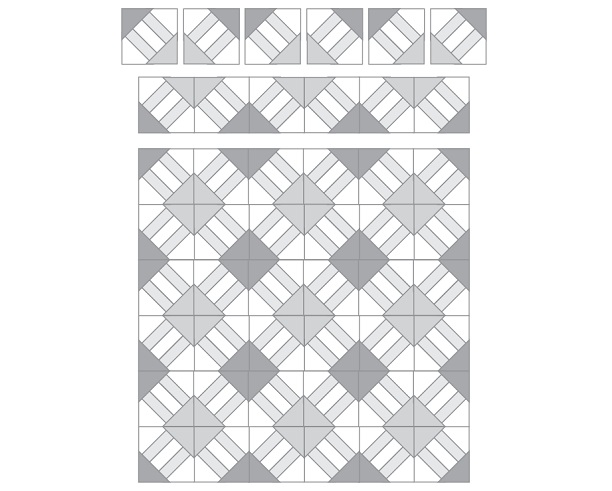
1. Lay out the (48) quilt blocks in (6) columns by (8) rows, turning each block to match the illustration below.
2. Sew the blocks together in rows. Press all seams open, or press alternating rows in opposite directions.
3. Sew the rows together to form the quilt top, and press the seams open.
FINISHING THE QUILT
1. Join the backing fabric pieces along the trimmed selvage edges & press the seam open. Backing should measure approximately 60” x 84”.
2. Layer the quilt top, batting & backing. Baste and quilt as desired.
3. Sew (7) 2-1/2“ x WOF Fabric E strips end-to-end to make the binding. Bind as desired and enjoy your quilt!
I hope you have enjoyed this week’s How To’s Day! If you decide to make this quilt, we’d love to see! You can always send your project photos to us by email or tag us on Instagram. Have a fantastic day!!
Happy Sewing!
Comments are closed.