How To’s Day: Deco Ritz Quilt by The Fat Quarter Gypsy
September 22nd, 2015 by Camelot Fabrics
Hi everyone,
Happy Tuesday! I hope you all are having an awesome day :) It’s the last day of Summer… but it’s also National Ice Cream Cone Day. Oh my!
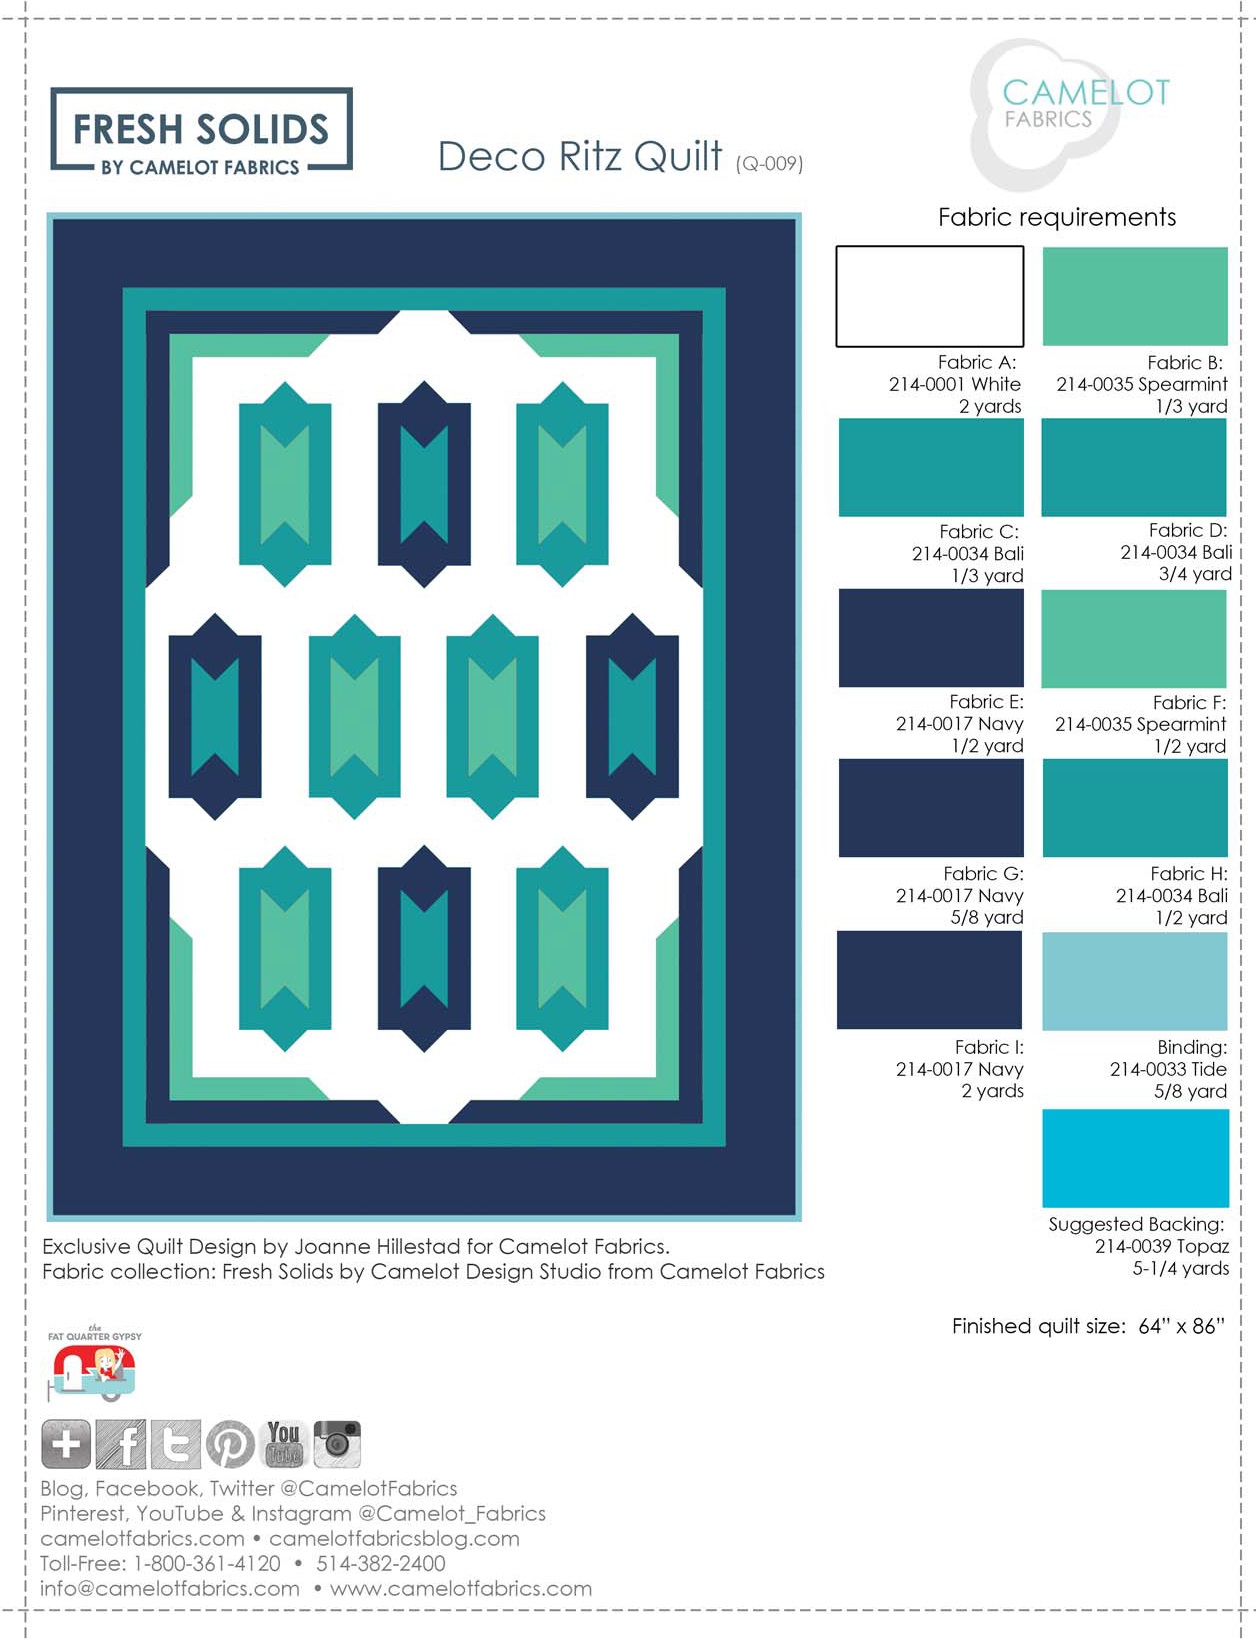
It’s time for this week’s How To’s Day! Today we are featuring one of our free quilt patterns, our Deco Ritz Quilt by The Fat Quarter Gypsy. Deco Ritz is just as the name suggests – a super unique and glam quilt pattern that would fit very well in the 1920s, with its graphic and angular shapes. We first introduced Deco Ritz with our Nightfall collection, which the quilt pattern was inspired by, but we adore it with our other collections as well! With our Fresh Solids, this quilt pattern has a fresh and pop art-like feel. Love!

Want to make your own Deco Ritz Quilt? Click MORE to see the full tutorial. PS: We recommend this quilt pattern for a more experienced sewer.
DECO RITZ QUILT
Pattern Designed by: Joanne Hillestad of The Fat Quarter Gypsy
Collection Featured: Fresh Solids by Camelot Design Studio
Notes
– Please wash, dry & iron your fabric before beginning.
– Sew all seams with an accurate 1/4” seam allowance.

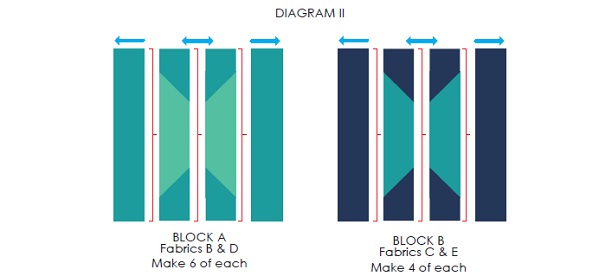
BLOCK CONSTRUCTION
<—- ¼” SEAM ALLOWANCE THROUGHOUT INDICATES PRESSING DIRECTION
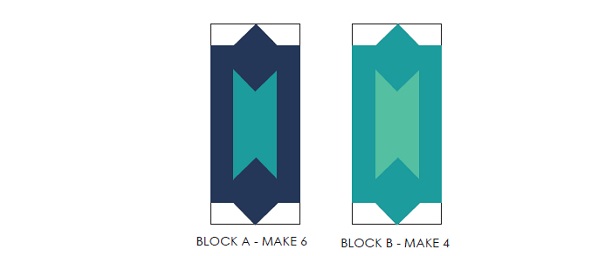
BLOCK A: FABRICS A, B & D
BLOCK B: FABRICS A, C & E
Step 1:
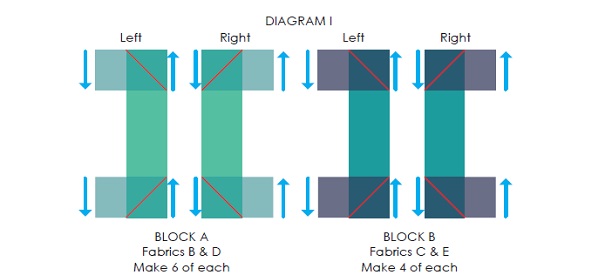
Make a right and a left center section for each:
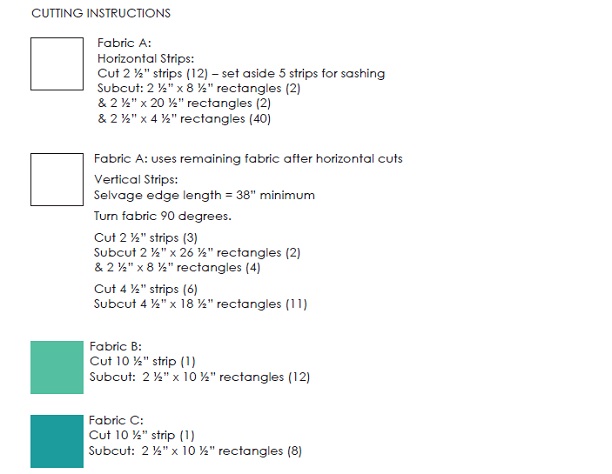
Sew a 2 ½” x 4 ½” rectangle on each end of a 2 ½” x 10 ½” rectangle.
Place each 2 ½” x 4 ½” rectangle, right sides together, as shown in Diagram I. Stitch on the diagonal, trim excess fabric corner to ¼” from stitching and press.
Make 6 Right and 6 Left sections for Block A.
Make 4 Right and 4 Left section for Block B.
Tip:
Before you stitch on the diagonal, either mark the stitching line with a pencil OR fold the corner exactly how you want it to end up, press and then unfold. Place the piece and stitch a needle’s width from the fold on the side that will be trimmed off and Presto… a pre-pressed and perfect corner!
Step 2:
For each block,
Sew a Right and Left rectangle from Step 1 together for each block. Angled seams were pressed opposite so they would line up nicely when sewn. Press center seam open.
Next, sew a 2 ½” x 14 ½” rectangle on each long edge. Press seam towards outer rectangle.
Step 3:
Make a top and a bottom section for each block:
Sew a 2 ½” x 4 ½” white rectangle on each end of a 2 ½” x 4 ½” rectangle (Fabrics D & E).
Place a white 2 ½” x 4 ½” rectangle, right sides together, as shown in Diagram III (Block B shown). Stitch on the diagonal, trim excess fabric corner to ¼” from stitching and press towards white.
Place a white 2 ½” x 4 ½” rectangle, right sides together, as shown in Diagram IV (Block B shown). Stitch on the diagonal, trim excess fabric corner to ¼” from stitching and press towards white.
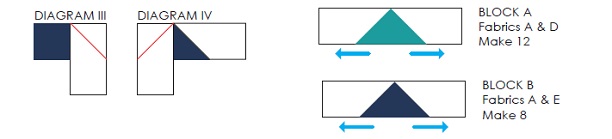
Step 4:
Assemble blocks:
Sew top and bottom pieces onto each block center as shown in Diagram IV (Block B shown). Press towards top/bottom.

CORNER CONSTRUCTION:
<— ¼” seam allowance throughout
Indicates pressing direction
All diagonal corner seams use the same diagonal corner technique used in the block construction.
Inner Corner: Fabrics A & F
Outer Corner: Fabrics A & G

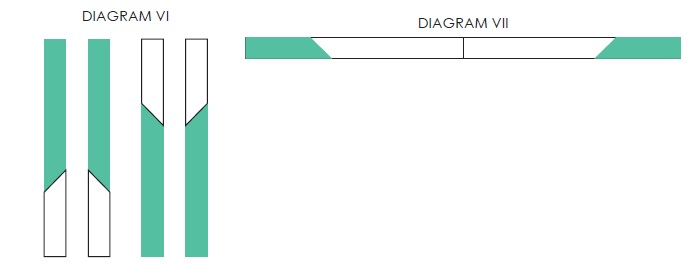
Step 1:
Make inner corner sections:
Diagram VI:
Sew a 2 ½” x 14 ½” Fabric F rectangle on each Vertical 2 ½” x 8 ½” Fabric A rectangle. Make
a top left side, top right side, bottom left side and bottom right side.
Diagram VII:
Sew a 2 ½” x 14 ½” Fabric F rectangle on each end of a Horizontal 2 ½” x 20 ½” Fabric A
rectangle.
Step 2:
Make outer corner sections:
Diagram VIII:
Sew a 2 ½” x 22 ½” Fabric G rectangle on each end of a Horizontal 2 ½” x 8 ½” Fabric A
rectangle.
![]()
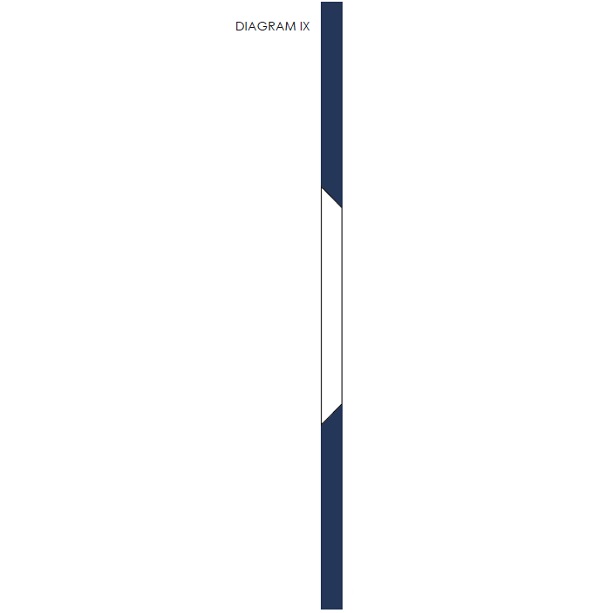
Diagram IX:
Sew a 2 ½” x 22 ½” Fabric G rectangle on each end of a Vertical 2 ½” x 26 ½” Fabric A rectangle.
ASSEMBLING SASH STRIPS
Use the following fabric:
2 ½” Fabric A strips (5) – set aside for sashing.
Sew strips together end-to-end.
From assembled sashing strip:
Cut 2 ½” x 40 ½” sashing (2)
Cut 2 ½” x 44 ½” sashing (2)
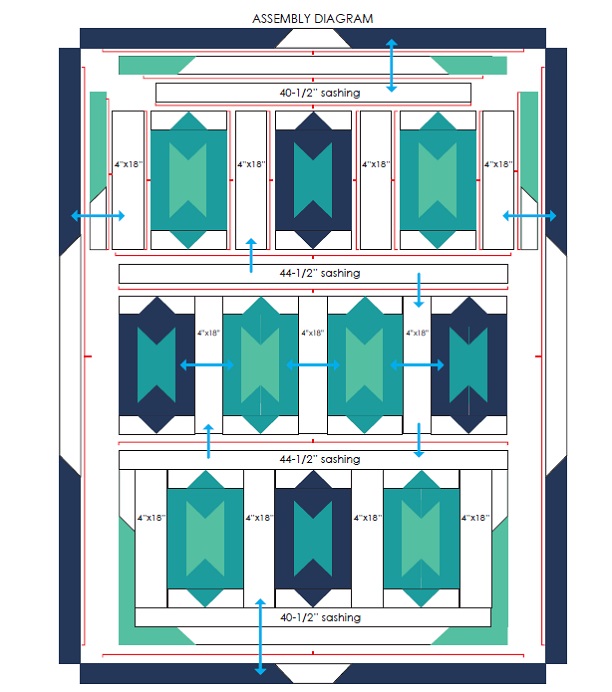
Press all seams towards blocks. Refer to Assembly Diagram on page 10.
Step1:
Sew blocks into rows with 4 ½” x 18 ½” white rectangles (W4x18):
Row 1: W4x18 + Block A + W4x18 + Block B + W4x18 + Block A + W4x18
Row 2: Block B + W4x18 + Block A + W4x18 + Block A + W4x18 + Block B
Row 3: W4x18 + Block A + W4x18 + Block B + W4x18 + Block A + W4x18
Step 2
Add sashing and vertical inner corners to rows 1 & 3.
Pin, ease/stretch sashing pieces as needed. Press towards blocks.
Sew 2 ½” x 40 ½” sashing to the top of Row 1.
Sew top left and top right inner corner sections to sides (from Diagram VI).
Sew top inner corner section (from Diagram VII) to 40 ½” sashing – note direction of angles.
Sew 2 ½” x 44 ½” sashing to the bottom of Row 1.
Sew 2 ½” x 40 ½” sashing to the bottom of Row 3.
Sew bottom left and bottom right inner corner sections to sides (from Diagram VI).
Sew bottom inner corner section (from Diagram VII) to 40 ½” sashing.
Sew 2 ½” x 44 ½” sashing to the top of Row 3.
Step 3
Sew 3 rows together: Pin, ease/stretch sashing pieces as needed. Press towards blocks.
Sew top of Row 2 to 44 ½” sashing of Row 1.
Sew bottom of Row 2 to 44 ½” sashing of Row 3.
Step 4
Add outer corner sections. Pin, ease/stretch as needed. Press towards blocks.
Sew side outer corner sections (from Diagram IX) to side inner corner sections.
Sew top outer corner section (from Diagram VIII) to top inner corner section.
Sew bottom outer corner section (from Diagram VIII) to bottom inner corner section.
ASSEMBLE BORDER STRIPS
Use the following fabric groups:
2 ½” Fabric H strips (7) – Border 1
6 ½” Fabric I Horizontal strips (4) – Border 2 Top and Bottom
6 ½” Fabric I Vertical strips (5) – Border 2 Sides
Sew each group of strips together end-to-end.
BORDER INSTRUCTIONS
FINISHING
The following ‘averaging’ technique will help you square up your quilt top.
Border 1 Sides (Fabric H):
Measure both sides of your quilt center.
Add measurements together and divide by 2.
Cut 2 strips at this length. For each strip, pin border to side of quilt center in the middle, both ends and several places in between. Ease/Stretch border as you stitch. Repeat with other side. Press all seams towards quilt center.
Border 1 Top and Bottom (Fabric H):
Measure top and bottom of your quilt center after attaching both sides of Border 1.
Add measurements together and divide by 2.
Cut 2 strips at this length. For each strip, pin border to top/bottom of quilt center in the middle, both ends and several places in between. Ease/Stretch border as you stitch.
Repeat with other strip. Press all seams towards quilt center.
Border 2 Sides (Fabric I Vertical strips):
Measure both sides of your quilt center after attaching Border 1. Add measurements together and divide by 2.
Cut 2 strips at this length. For each strip, pin border to side of quilt center in the middle, both ends and several places in-between. Ease/Stretch border as you stitch. Repeat with other side. Press all seams towards quilt center.
Border 2 Top and Bottom (Fabric I Horizontal strips):
Measure top and bottom of your quilt center after attaching both sides of Border 2. Add measurements together and divide by 2.
Cut 2 strips at this length. For each strip, pin border to top/bottom of quilt center in the middle, both ends and several places in between. Ease/Stretch border as you stitch.
Repeat with other strip. Press all seams towards quilt center.
Cut 2 pieces of backing Fabric at 2-5/8 yards each. Trim off selvages. Seam pieces together vertically and press seam open.
Layer top, batting and backing fabrics. Baste and quilt as you desire.
Sew binding strips end-to-end on a diagonal (optional). Fold in half and press along length. Attach to quilt edge as you prefer.
Hope you enjoyed this one! If you decide to give it a try, we’d love to see. You can send all your photos to info@camelotfabrics.com or tag us on Instagram! Have a fantastic day!
Happy Sewing!
Comments are closed.