How To’s Day: Box Trot Quilt by Whirligig Designs
August 4th, 2015 by Camelot Fabrics
Hi everyone,
Happy Tuesday! I hope you all are having a great day so far. If there’s a food holiday, you know we’re going to share about it. Today happens to be National Chocolate Chip Day. Well I guess we’ll have to eat some chocolate chip cookies then, in doing our part to celebrate the day ;)
Time for this week’s How To’s Day! Today we are sharing a beautiful tutorial for our Box Trot Quilt, designed by the incredibly talented Chris Hoover of Whirligig Designs. The box-like pieces in our Box Trot Quilt are perfect for highlighting a multitude of different fabric patterns, overall giving a very fun and whimsical look. Each “box” is bordered, which we chose to keep neutral and uniform with the background in the quilt below. We chose to feature our Beach House by Jack!e McFee collection, mixing the coral and tide colorways for a relaxing ocean feel. We love how the bright colors pop against the white background; such a modern and feminine quilt!
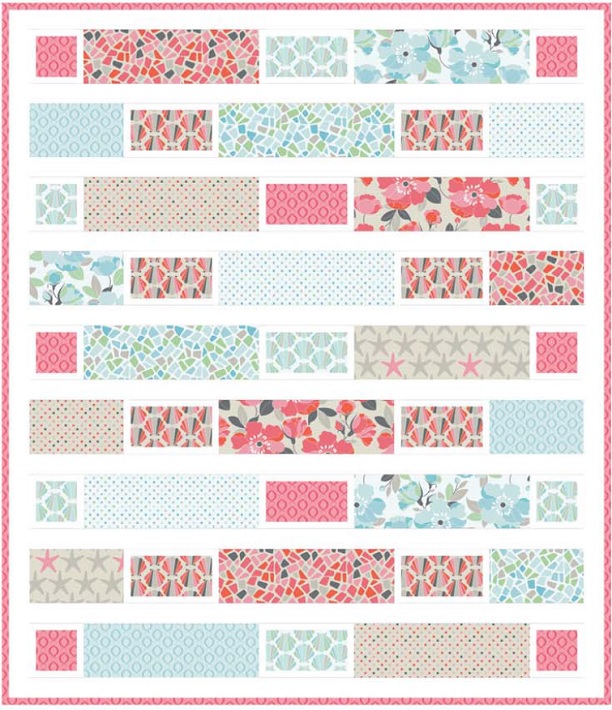
Want to create your very own Box Trot Quilt? Click MORE to see the full tutorial.
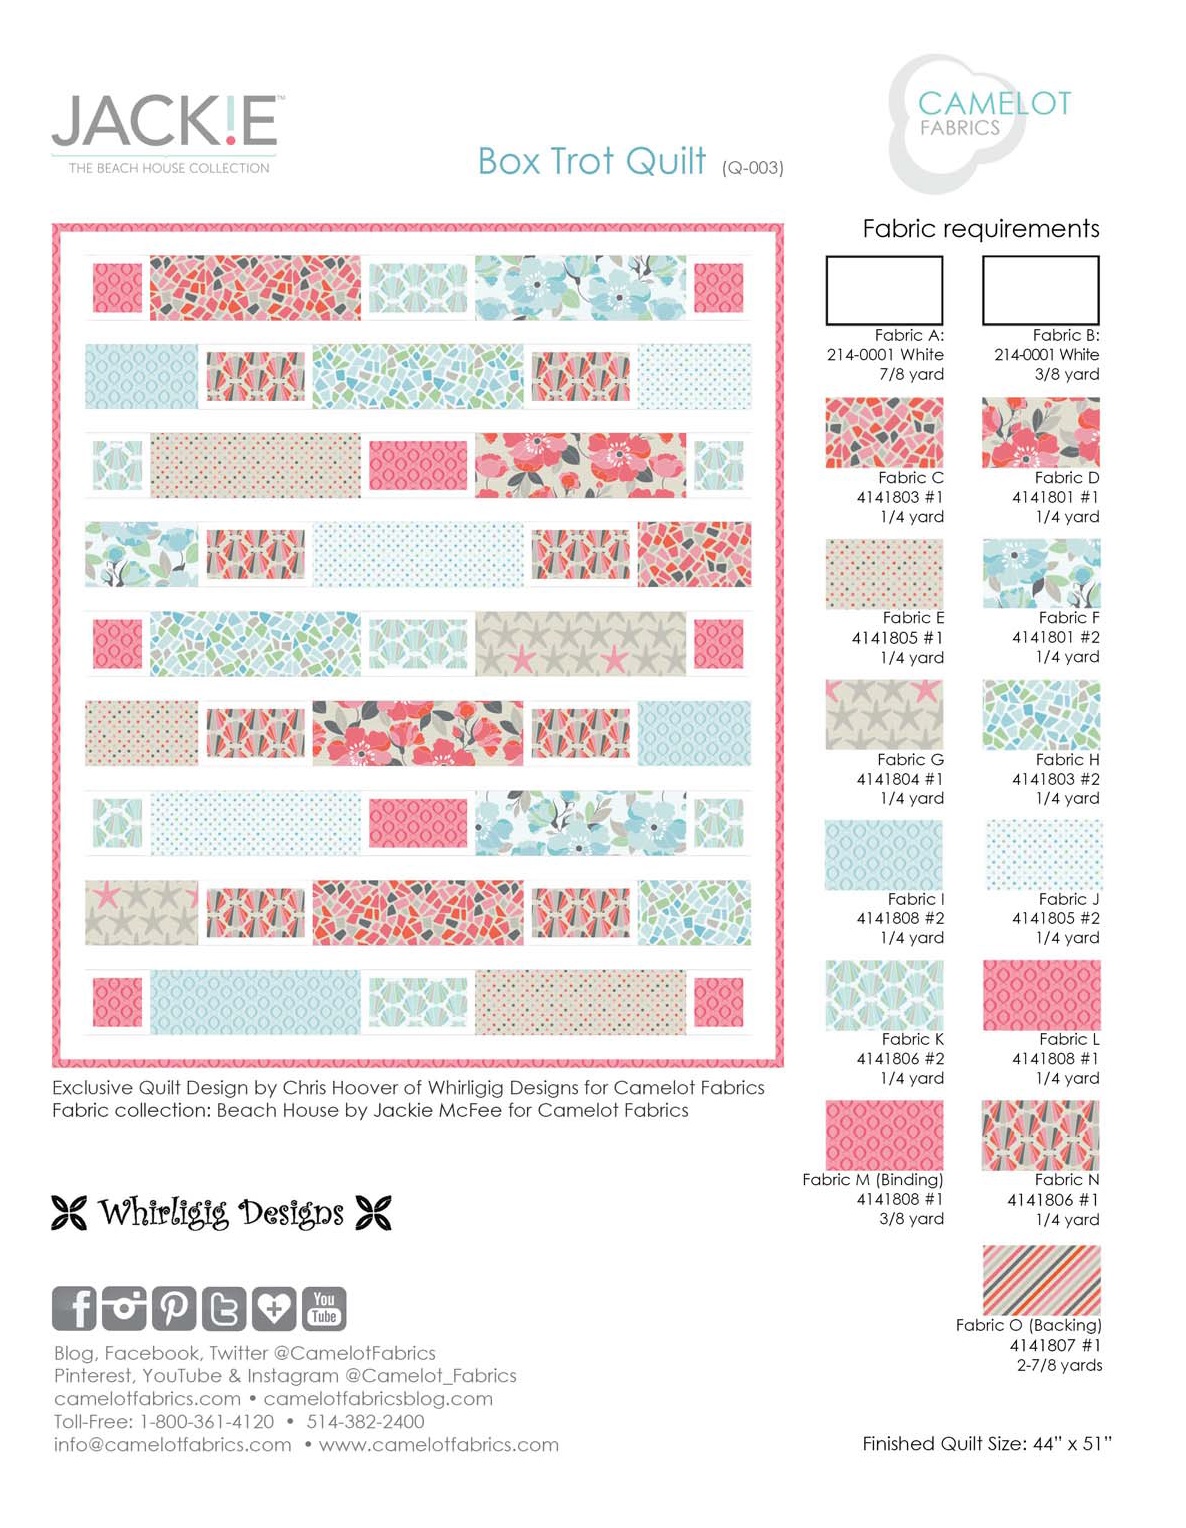
BOX TROT QUILT
Pattern Designed By: Chris Hoover of Whirligig Designs
Fabric Featured: The Beach House Collection by Jack!e McFee
OTHER TOOLS & SUPPLIES:
– Rotary Cutter, Mat, Rulers, Straight Pins, Sewing machine, and threads to match your fabrics.
– 1-1/3 yards of quilt batting (58” wide)
GENERAL INSTRUCTIONS:
For best results, read all directions before beginning.
Use an accurate ¼” seam allowance for all sewing.
WOF = width of fabric.
CUTTING:
Fabric A:
Cut 13 – 2” strips WOF for sashing.
From 10 strips, cut 10 – 2” x 41 ½” rectangles.
Fabric B:
Cut 12 – 1” strips WOF.
From strips, cut 26 – 1” x 6 ½” rectangles, 46 – 1” x 4 ½” rectangles and 20 – 1” x 3 ½” rectangles.
Fabric C, Fabric E, Fabric F, Fabric H and Fabric J:
From each fabric, cut 1 – 4 ½” strip WOF.
From each strip, cut 2 – 4 ½” x 13 ½” rectangles and 1 – 4 ½” x 7 ½” rectangle. You will have extras.
Fabric D:
Cut 1 – 4 ½” strip WOF.
From strip, cut 2 – 4 ½” x 13 ½” rectangles.
Fabric G and Fabric I:
From each fabric, cut 1 – 4 ½” strip WOF.
From each strip, cut 1 – 4 ½” x 13 ½” rectangle and 2 – 4 ½” x 7 ½” rectangles. You will have extras.
Fabric K:
Cut 1 – 3 ½” strip WOF.
From strip, cut 4 – 3 ½” squares and 3 – 3 ½” x 6 ½” rectangles.
Fabric L:
Cut 1 – 3 ½” strip WOF.
From strip, cut 6 – 3 ½” squares and 2 – 3 ½” x 6 ½” rectangles.
Fabric M:
Cut 5 – 2 ¼” strips WOF for binding.
Fabric N:
Cut 2 – 3 ½” strips WOF.
From strips, cut 8 – 3 ½” x 6 ½” rectangles.
PIECING:
1. For 3 ½” Fabric K and Fabric L squares:
Sew two 1” x 3 ½” Fabric B rectangles to opposite sides of a Fabric K square. Sew two 1” x 4
½” Fabric B rectangles to the remaining two sides of the Fabric K square; Make 4. Repeat
process for Fabric L squares; Make 6.

2. For 3 ½” x 6 ½” Fabric K, Fabric L and Fabric N rectangles:
Sew two 1” x 6 ½” Fabric B rectangles to the top and bottom of the fabric K rectangle. Sew two 1” x 4 ½” Fabric B
rectangles to the remaining two sides of the fabric K rectangle; Make 3. Repeat process for Fabric L rectangles;
Make 2. Repeat process for Fabric N rectangles; Make 8.

PUTTING IT ALL TOGETHER:
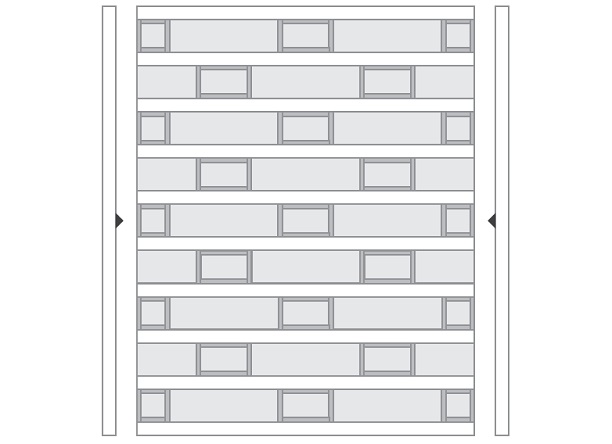
1. Arrange squares and rectangles from last 2 steps, 4 ½” x 7 ½” and 4 ½” x 13 ½” assorted rectangles and
10 – 2” x 41 ½” Fabric A rectangles, referring to the quilt illustration on Page 1. Sew together in rows. Sew rows
and Sashing strips together, top-to-bottom, as shown below.
2. Sew remaining 3 – 2” Fabric A strips together end to end. Cut 2 – 2” x 51 ½” rectangles and
sew to sides of quilt center.
3. Cut Fabric O (backing) into two equal lengths (approximately 51 ¾”) and seam together
along the selvedge. Layer quilt top with batting and backing. Baste and quilt as desired, and
bind with 2 ¼” Fabric M strips.
I hope you had fun reading today’s tutorial! You can also find the full PDF printout for Box Trot on our website. We also have it available in a couple of other collections! With that, have a great day!! :)
Happy Sewing!
Comments are closed.