How To’s Day: Saybrook Island Pillow by Stephanie Palmer of Late Night Quilter
June 30th, 2015 by Camelot Fabrics
Hi everyone!
Happy Tuesday! I hope everyone is having a lovely afternoon!! Feeling crafty? Well we’ve got the perfect project for you today…
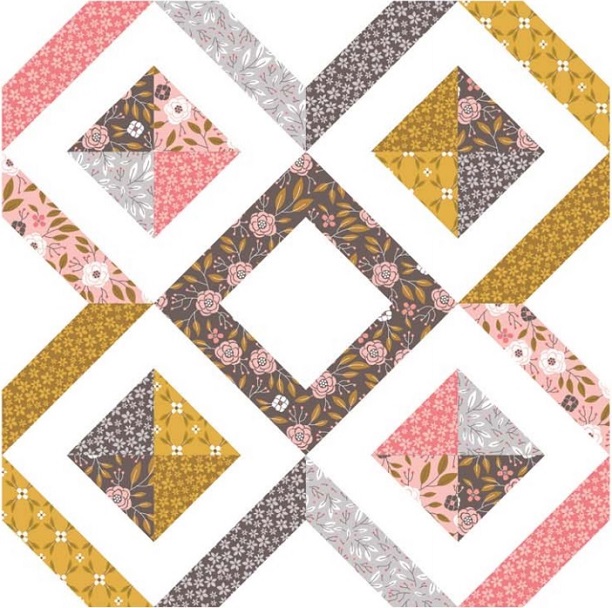
Because it’s Tuesday, which means it’s DIY day on the blog! This week, we are featuring our gorgeous Saybrook Island Pillow by Stephanie Palmer of Late Night Quilter! Saybrook Island is a modern, “scrappy” pillow design that allows you to have fun with mixing different prints together. This is a great pillow to use the “extra” fabric pieces that have been carefully stored “because you never know when you’ll need that strip for something” ;)
Well, crafty friends, Saybrook Island was made for all of those lone rangers. You can match different prints together, or choose a solid color palette too, but in the end you’ll have a pillow that is as pretty to look at as it is comfy. We chose to feature our Magnolia by Alisse Courter collection and love the feminine touches of the dainty flowers together.
Want to make your own Saybrook Island Pillow? Click MORE to see the full tutorial.
SAYBROOK ISLAND PILLOW
Designed By: Stephanie Palmer of Late Night Quilting
Fabric Featured: Magnolia by Alisse Courter
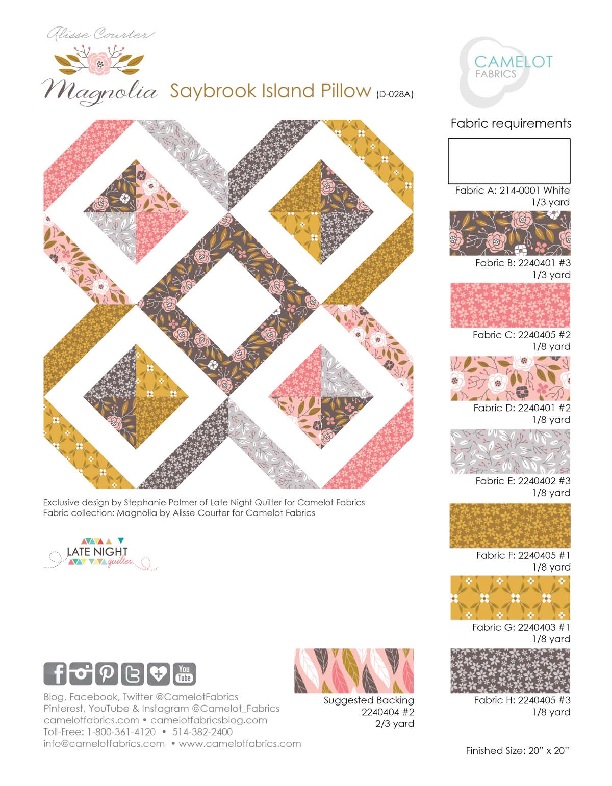
OTHER TOOLS & SUPPLIES
– 2/3 yard of quilt batting (58” wide)
– 20” square pillow form (these ones are great!)
– (1) letter-sized sheet of clear plastic or acetate for templates
– Template (Includes A and B)
– Sewing machine & coordinating thread
– Rotary cutter & mat
– Scissors & fabric shears
– Straight edge ruler & measuring tape
– Straight pins
– Fabric marker or pencil
NOTES:
– For best results, read through all instructions before beginning.
– WOF = width of fabric (42”)
– RST = right sides together
– Unless otherwise directed, sew all seams with an accurate 1/4” seam allowance, and press
seams open as you go.
– Please wash, dry & iron your fabric before beginning, and trim selvages.
CUTTING:
Fabric A (Background) & Fabric B
From each: Cut (4) 2-1/4” x WOF strips
– trace & cut (16) Template A parallelograms.
– trace & cut (16) Template B triangles.
Print the Saybrook Island Pillow Template at 100% size (page 4). Since this is a “scrappy” pillow, you may use as many as (16) different accent fabrics for the remaining pieces, or as few as (2). Just make sure to have enough fabric to cut a total of (16) Accent parallelograms using Template A and (16) Accent triangles using Template B. You can fit up to (5) parallelograms & (5) triangles on a 2-1/2” x WOF strip:
![]()
You’ll need a total of (4) strips’ worth – 1/4 yard – of Accent fabric, or more if you’re using more than (4) different fabrics. In this version, we’ll be making a pillow using (6) different Accent fabrics.
Fabrics C – H (Accent)
Cut (1) 2-1/4” strip from each
– Trace & cut (2) Template A parallelograms and (2) Template B triangles.
Backing
– Cut (2) 20” x 17” rectangles.
MAKING THE BLOCKS:
1. Sew each Accent fabric triangle to the top of a Background fabric parallelogram.
2. Sew each Background fabric triangle to the top of an Accent fabric parallelogram.
Make (2) of each with each Accent fabric
– (32) triangles total.

3. Sew (2) Accent/Background triangles together along their longest edges as shown. Use (1) triangle unit which has a Background fabric parallelogram & an Accent fabric triangle, and (1) unit which has a Background fabric triangle and a different Accent fabric parallelogram.
You may pair the units up at random, or use to combinations pictured in the pillow illustration on Page 1.

Make (16) in various Background/Accent combinations.
4. Trim the blocks to 5-1/2” square, as needed.
ASSEMBLY
1. Sew the blocks together in (4) rows of (4) as shown, referring to Page 1 for block orientation & placement. Sew the rows together top-to-bottom to complete the pillow front.

FINISHING THE PILLOW:
1. Turn & topstitch a 1/2” rolled hem on (1) 20” edge of each Backing rectangle.
2. Place the pillow front Right Side up on your work surface, and line up the Backing panels with the edges of the pillow front, Right Sides together. The Backing panels’ hemmed edges should overlap at the center of the pillow.
3. Pin & sew around the entire perimeter, clip the corners and press the seam open.
4. Turn the pillow Right Side out through the gap between the overlapping Backing panels, poke out the corners, and insert the pillow form.
Hope you enjoyed this week’s tutorial! If you decide to give it a try, we’d love to see. You can always send your project pictures to info@camelotfabrics.com or tag us on Instagram. Have a fabulous rest of the day!
Happy Sewing!
July 01, 2015 at 5:56 pm, Doris said:
Love this pattern
July 03, 2015 at 8:19 pm, Pamela said:
Love the pattern, am going to try it in brights and solids!