How To’s Day: Butterfly Quilt by Lilac Lane Patterns
June 2nd, 2015 by Camelot Fabrics
Hi everyone,
Happy Tuesday! I hope you all are having an amazing day!!
For today’s How To’s Day, we are featuring one of our exclusive quilt patterns from our Free Projects Program. The Butterfly Quilt was created by the incredibly talented Melissa Stramel, of Lilac Lane Patterns. Melissa has now expanded her patterns to clothing and accessories, for women and little girls…and their dollies! But, we are obsessed with her Butterfly Quilt, which gives a unique flair to a quilt pattern. The little triangles throughout the pattern look like butterflies, which may seem complicated, but in the end – a super neat effect.
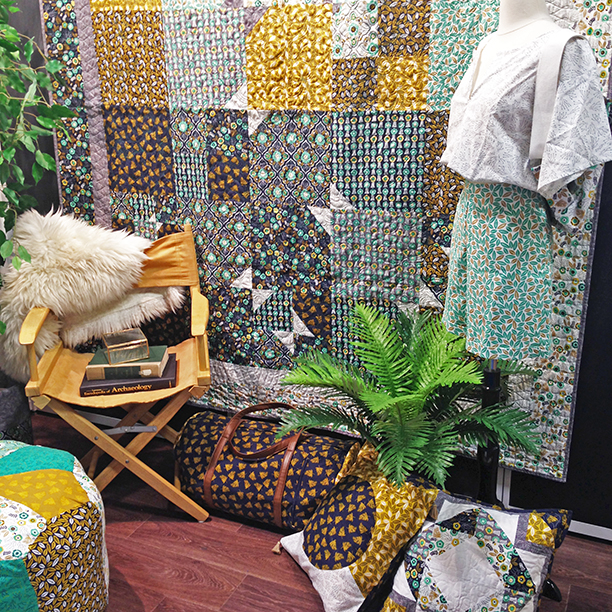
We love a contrast between the butterflies and the background, so that the butterflies really pop! Imagine a white quilt with solid colored butterflies?! That would be so so coooool. We decided to feature the Butterfly Quilt at our booth for Spring Quilt Market, in our popular Botanical room. The quilt displayed as a backdrop to the room (and because of its size, was a real showstopper!). It really made everything come together.
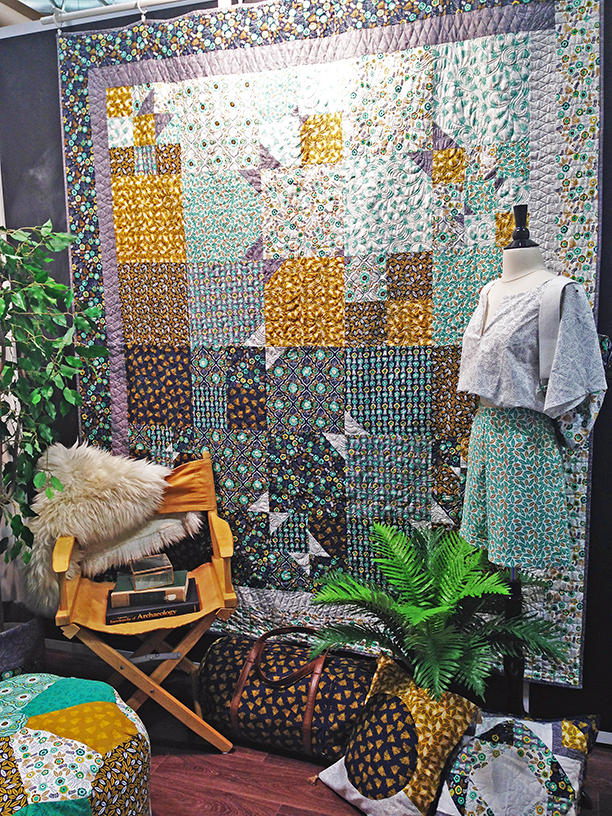
Vicki Reubel of Orchid Owl Quilts did such an incredible job quilting the Butterfly Quilt. We received so many compliments on the design and quilt work – so thank you to both Melissa and Vicki! You both rock!! Now… want to make your own Butterfly Quilt? Click MORE to see the full instructions.
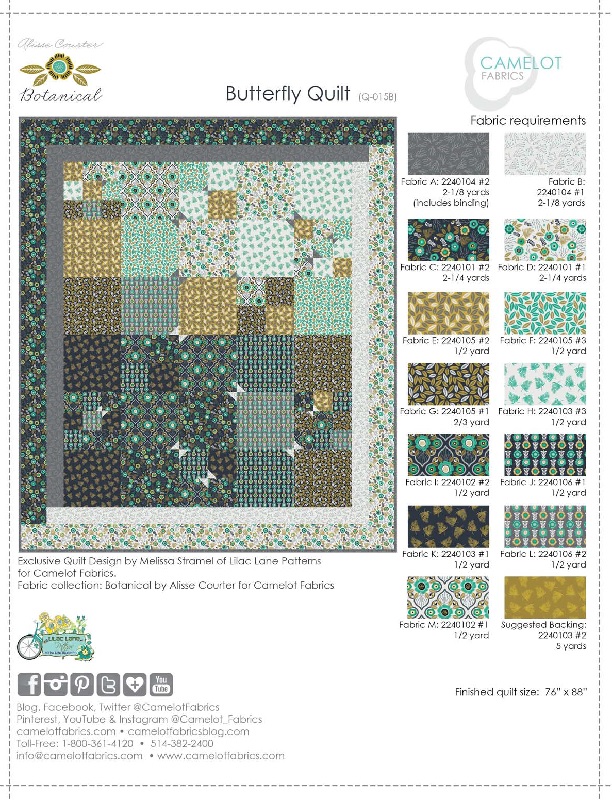
BUTTERFLY QUILT
Pattern Designed By: Melissa Stramel of Lilac Lane Designs
Quilted By: Vicki Reubel of Orchid Owl Quilts
Collection Featured: Botanical by Alisse Courter for Camelot Fabrics
Other Supplies
– rotary cutter & fabric shears
– sewing machine
– iron & pressing surface
– needle & coordinating thread
– measuring tape/ruler
Notes
– Please wash, dry & iron your fabric before beginning, and trim your selvages.
– Use the quilt layout on page 1 as your guide for all block composition.
– WOF = width of fabric.
– Use an accurate 1/4” seam allowance for all seams.
– Press your seams as you go; press open or toward the darker fabric, whichever you prefer.
ASSEMBLY
Butterfly Wings
We’re using a small wing and Fabric E in our examples, but the method for adding the butterfly wings is the same for all wing/square combinations.

1. Place a Fabric A square on top of a Fabric E square as shown, Right Sides together. Draw a diagonal line between two opposite corners of the Fabric A square.

2. Sew along the marked line and trim the excess, leaving a 1/4” seam allowance.

3. Open up your Fabric A-E unit and press the seam.

You may choose to place the butterfly wings exactly as we did, in which case you can use the quilt layout on page 1 as a guide, or you may want to place them differently. In this case, take care that each half-wing has a matching half-wing across from it when your put the blocks together.
4. Sew the 4-1/2” squares together in rows of three.
5. Assemble the 3-square rows into3-row blocks. Make (4) 9-square blocks, finished size 12-1/2” square.

6. Sew the 6-1/2” squares together in pairs; sew the pairs together to make 4-square blocks. Make (4) 4-square blocks, finished size 12-1/2” square.

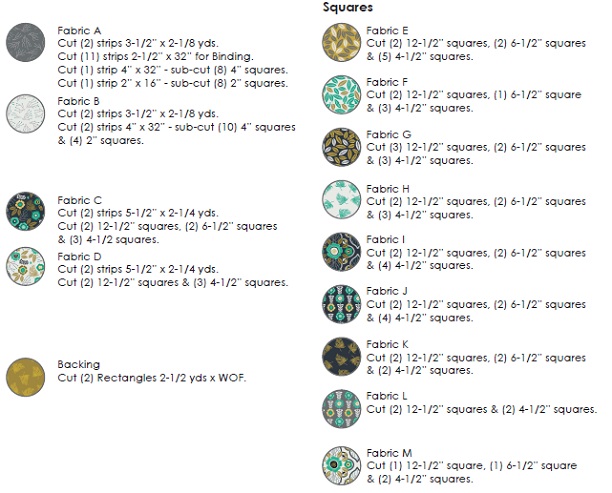
You should now have the following (30) 12-1/2” units:
(4) 9-squares composed of 4-1/2” squares.
(5) 4-squares composed of 6-1/2” squares.
(21) 12-1/2” squares.
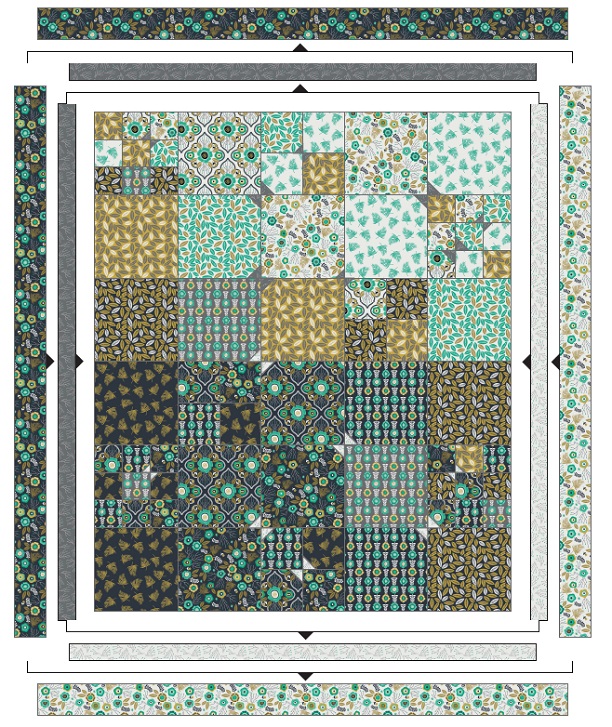
7. Sew the 12-1/2” blocks together in rows of (5), according to the quilt layout on page 1.
8. Sew the (6) 5-block rows together to complete the center of the quilt. Adding the Borders – please see the diagram on the following page.
9. Measure the height of the quilt center through the middle. It should be about 72-1/2” tall, but use your own measurement for a perfect fit. Cut (1) 3-1/2” wide Fabric A strip to this length and sew it to the left-hand side of the quilt center. Cut (1) 3-1/2” wide Fabric B strip to this length and sew it to the right-hand side of the quilt center.
10. Measure the width of the quilt center through the middle, including the Inner Border pieces you just attached (about 67” wide). Cut (1) 3-1/2” wide Fabric A strip to this length and sew it to the top of the quilt center. Cut (1) 3-1/2” wide Fabric B strip to this length and sew it to the bottom of the quilt center.
11. Measure the height of the quilt center through the middle, including the Inner Border – it should be about 79” tall. Cut (1) 5-1/2” wide Fabric C strip to match this height and sew it to the left-hand side of the quilt center. Cut (1) 5-1/2” wide Fabric D strip to match this height and sew it to the right-hand side of the quilt center.
12. Measure the width of the quilt, including the Outer Border strips. Cut (1) 5-1/2” wide Fabric C strip to this length and sew it to the top of the quilt. Cut (1) 5-1/2” wide Fabric D strip to this length and sew it to the bottom of the quilt.
13. Piece the two Backing panels along their long edges with a 1/2” seam.
14. Sew the 2-1/2” wide Fabric A strips together end to end for the binding.
15. Quilt and bind your work as desired.
ADDING THE BORDERS
I hope you all have enjoyed this week’s How To’s Day! You can also find the free printout PDF version of the quilt on our website. If you decide to make your own Buttefly Quilt, we’d love to see too. You can send your pictures to info@camelotfabrics.com. Have a wonderful day!
Happu Sewing!
Comments are closed.