How To’s Day: Hang Time Quilt by Happy Quilting Designs
April 28th, 2015 by Camelot Fabrics
Hi everyone,
Happy Tuesday! I hope you all are having a lovely day. It’s the last day to enter our Sea Life FQB Giveaway on our Facebook Page, so be sure to enter! :)
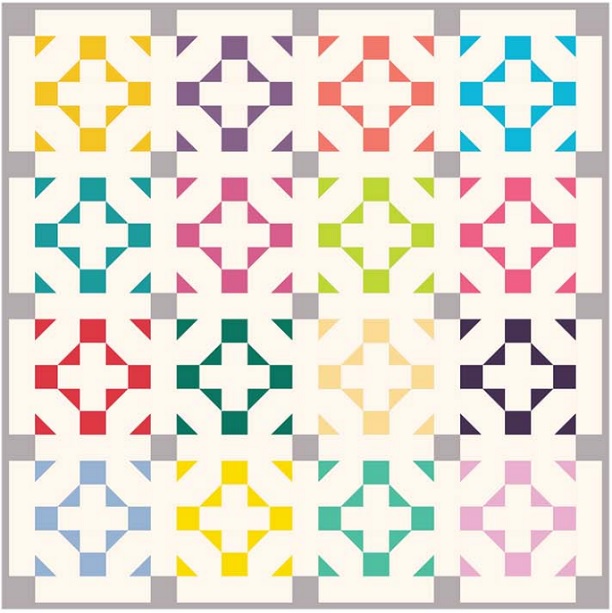
It’s How To’s Day time! Today we are featuring one of our wonderful free project quilt patterns by Melissa Corry of Happy Quilting Designs. Melissa created a couple of projects for us, one being her Hang Time Quilt. Hang Time is a very cool looking quilt, with 16 blocks together to create a window-like effect. If you choose one colour for the lattice design, it looks almost like “stained glass”. Sometimes with an intricate-looking design, less is more when it comes to patterns…so we love the look of Hang Time with our Fresh Solids. The bright colours gives the right amount of oomph to the quilt, and would look incredible on top of a bed or on a wall. It’s pretty much art! You can also find the full pdf printout here.
Want to make your own Hang Time Quilt? Click MORE for the full instructions.
HANG TIME QUILT
Pattern Designer: Melissa Corry of Happy Quilting Designs
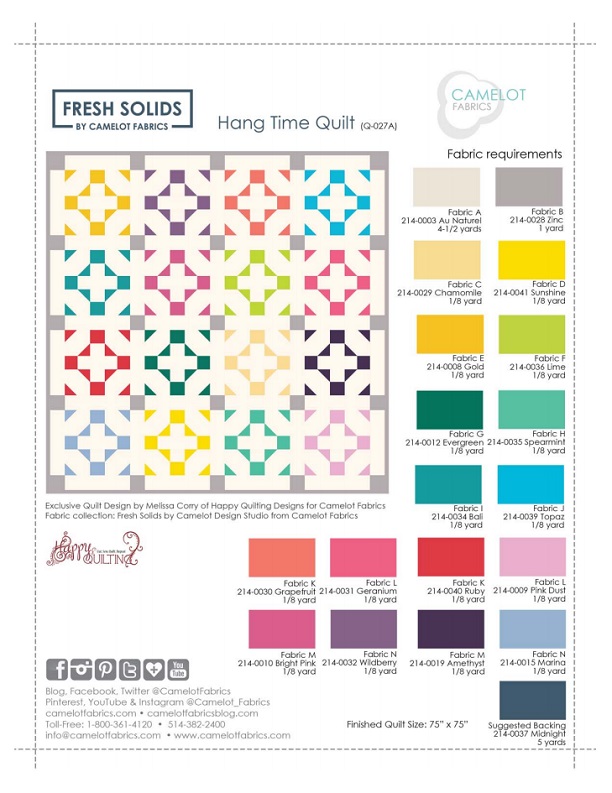
Fabric Collection: Fresh Solids
OTHER TOOLS & SUPPLIES
– 2-1/2 yards of extra wide quilt batting (at least 80” wide)
– Sewing machine & coordinating thread
– Rotary cutter & mat
– Fabric shears
– Straight edge ruler & measuring tape
– Straight pins
– Fabric marker or pencil
NOTES:
– For best results, read through all instructions before beginning.
– WOF = width of fabric (42”)
– RST = right sides together
– Unless otherwise directed, sew all seams with an accurate 1/4” seam allowance, and press
seams open as you go.
– Please wash, dry & iron your fabric before beginning, and trim selvages.

MAKING THE BLOCKS
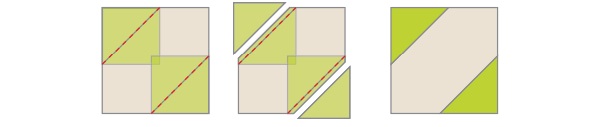
1. Draw a diagonal line through the center of (8) squares of each Accent fabric, on the Wrong Side as shown.
Make (8) from each Accent fabric.

2. Sew (2) matching squares to opposite corners of each 6-1/2” Background fabric square, RST, along their diagonal lines. Trim of the excess fabric, 1/4” from the seams as shown.
Make (4) with each Accent fabric – (64) units total.
3. Sew a 3-1/2” Accent fabric square to a 3-1/2” Background fabric square as shown, and press the seam toward the Accent fabric.
Make (2) with each Accent fabric – (32) units total.

4. Sew (2) matching Accent squares to the end of a 3-1/2” x 9-1/2” Background rectangle as shown, and press the seams toward the Accent fabric.
Make (1) with each Accent fabric – (16) units total.

5. Sew matching units from Steps 1 & 2 in rows as shown.
Make (2) with each Accent fabric – (32) units total.

6. Sew matching rows from Step 5 together with a matching unit from Step 4, as shown, to complete the Blocks.
Make (1) with each Accent fabric – (16) Blocks total.

MAKING THE QUILT TOP
Note: We show the blocks in a certain arrangement in the diagrams & quilt illustrations, but the order of blocks in the quilt top is entirely up to you, since all the blocks are the same dimensions. So play around, and choose an arrangement that makes your eyes happy!
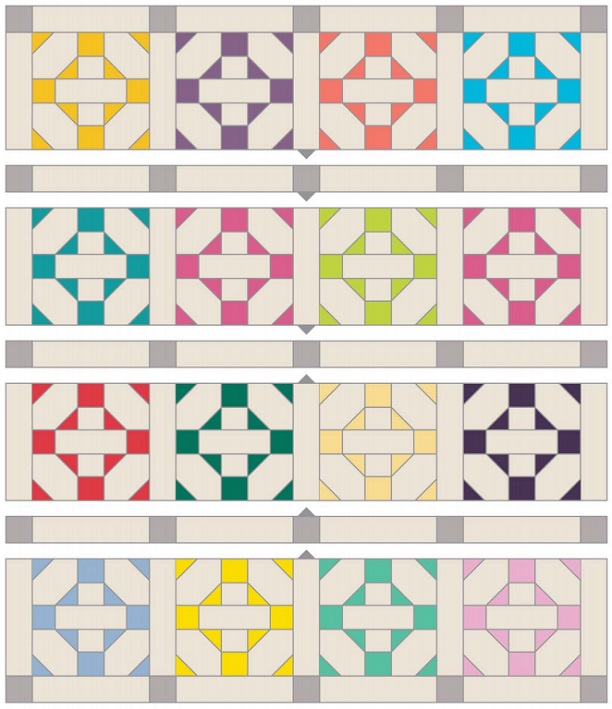
1. Sew the blocks together in rows of (4) as shown, with a 15-1/3” x 3-1/2” Background fabric rectangle on either side of each block.
 Make (4) rows.
2. Sew (4) 15-1/2” x 3-1/2” Background fabric rectangles together in rows with (5) 3-1/2” Sashing fabric squares as shown.
![]()
Make (5) rows.
3. Sew the rows of blocks & sashing together top-to-bottom as shown in the Assembly Layout,
to complete the quilt top.
FINISHING THE QUILT
1. Join the Binding fabric strips end-to-end and press to make the binding.
2. Join the Backing fabric rectangles along their 90” edges to make (1) 90” x 83” rectangle.
3. Layer the backing, batting & quilt top, with the fabrics’ Right Sides facing outward. Baste &
quilt as desired.
4. Trim excess batting & backing, and bind.
ASSEMBLY LAYOUT
We hope you enjoyed this week’s How To’s Day! You can find more from Melissa on her website, Facebook Page, Twitter, Instagram, and Pattern Shop. And, you can also find the printout for Hang Time here. Have an awesome day!
Happy Sewing!
Comments are closed.