How To’s Day: Echo Pillow by Kristy Daum
March 31st, 2015 by Camelot Fabrics
Hi everyone,
Happy Tuesday!! We hope you all are having a fantastic day so far. It’s the last day to enter our Coraline FQ Bundle Giveaway, so be sure to head on over to our Facebook Page to enter!
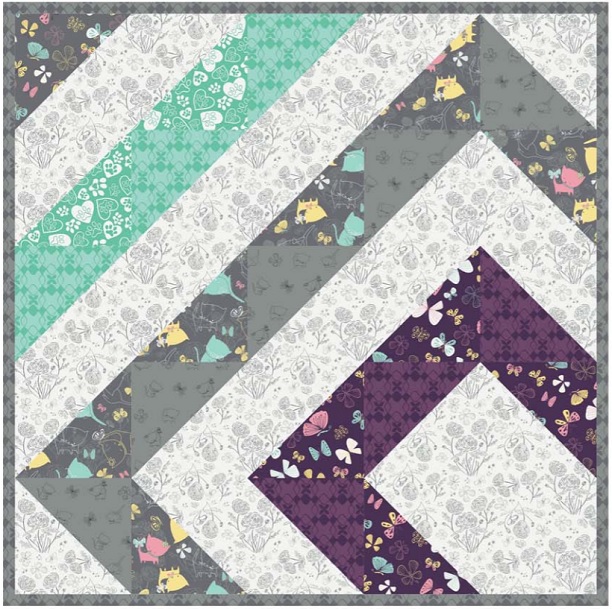
Time for our How To’s Day! Today we are featuring our Echo Pillow Tutorial by Kristy Daum, from our Free Projects Program. Our Echo Pillow has an architectural feel to it, with the fabrics creating angular lines throughout. We love how the linear designs stand out against a more neutral background, to really give that pop of color to any space. We chose to feature Echo with our The Kitten’s Meow Collection, to showcase how versatile this pillow is. How adorable would this pillow look in a little girl’s room? Another fabulous design by one of our faves, Kristy!!
Want to make your own Echo Pillow? Click MORE to see the full tutorial!
ECHO PILLOW TUTORIAL
Designed By: Kristy Daum
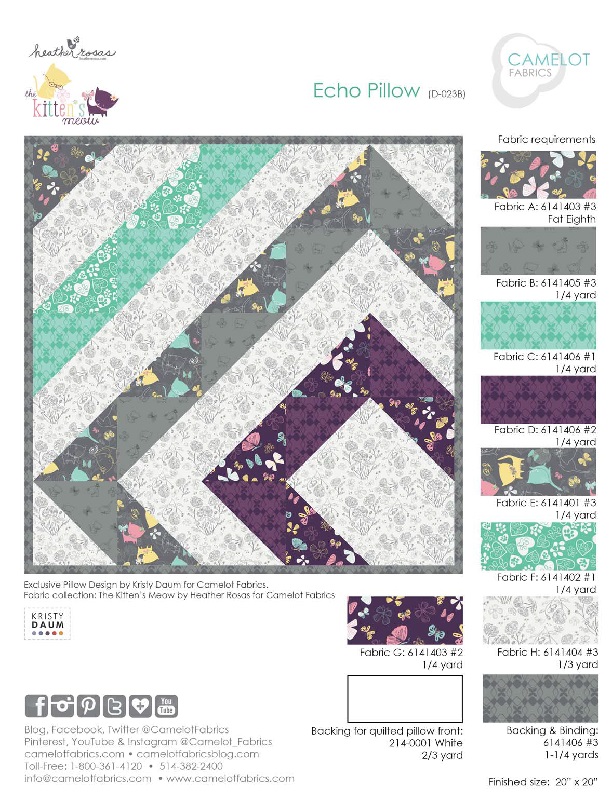
Featured Collection: The Kitten’s Meow by Heather Rosas for Camelot Fabrics
OTHER TOOLS & SUPPLIES
– 2/3 yard of quilt batting (58” wide)
– 20” square pillow form
– sewing machine & coordinating thread
– rotary cutter & fabric shears
– straight edge ruler & measuring tape
– straight pins
– fabric marker or pencil
NOTES:
– For best results, read through all instructions before beginning.
– WOF = width of fabric (42”)
– RST = right sides together
– Unless otherwise directed, sew all seams with a scant 1/4” seam allowance, and press
seams open as you go.
– Please wash, dry & iron your fabric before beginning, and trim selvages.
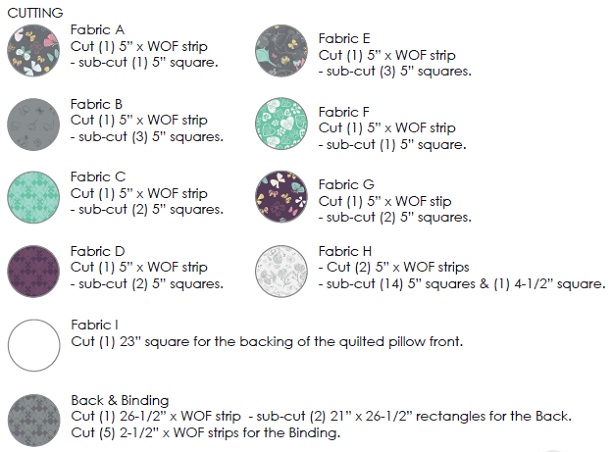
PIECING THE BLOCKS – MAKING HSTS
1. Take (1) Fabric H 5” square and (1) Fabric A 5” square, and place them RST.

2. With a pencil, mark a diagonal line between opposite corners.

3. Sew a scant 1/4″ away from the pencil line on both sides.
 4. Cut on the line, separating the two halves; this creates (2) HST units.


5. Repeat the process above using the following fabric combinations to yield all the HST units
you need for this pillow. Note: each pair of squares yields (2) HST units, so you’ll have an
extra unit in cases where the pillow needs an odd number of them.
6. Trim all HST units to 4-1/2” square.
Make (2) A/H units.
Make (6) B/H units.
Make (4) C/H units.
Make (4) D/H units.
Make (6) E/H units.
Make (4) G/H units.
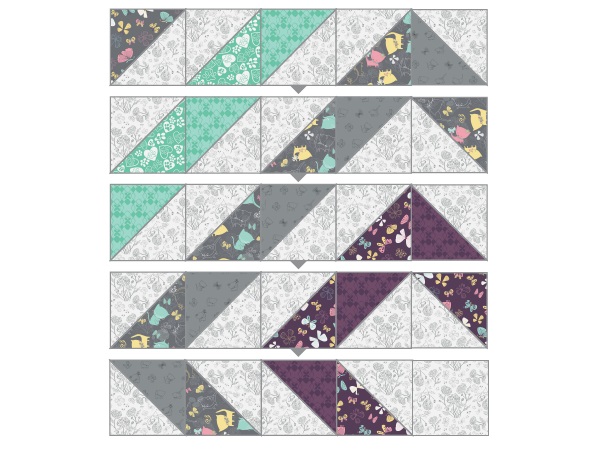
MAKING THE PILLOW FRONT
1. Sew your HST units together in rows, referring to the Assembly Layout.
2. Sew the rows together.
3. Layer the Fabric I square, batting & pillow front, with the fabrics’ Right Sides facing out.
Baste & quilt as desired.
ASSEMBLY LAYOUT
FINISHING THE PILLOW
1. Fold each 21” x 26-1/2” Backing rectangle in half, Wrong Sides Together, to create (2)
13-1/4” x 21” rectangles.
2. Topstitch (2) seams, 1/2” and 1” from the rectangles’ folded edges, for a decorative finish.
3. Trim the Backing rectangles to match the width of the Pillow Top.
4. Place the Pillow Top face down on your work surface.
5. Line up the Backing rectangles with the outer edges of
the Pillow so that their folded edges overlap at the center
of the pillow.
6. Baste the Backing rectangles to the Pillow Top, around all
(4) edges.

7. Join your Binding strips end-to-end and use to bind your pillow.
8. Insert the 20” square pillow form and relax!
We hope you have enjoyed this week’s How To’s Day! Be sure to check out our website for lots more projects in our Free Projects Program. Have a beautiful last day of March!!
Happy Sewing!
March 31, 2015 at 11:32 am, BARBARA MERKLEY said:
beautiful