How To’s Day: Beaded Clutch Tutorial
December 10th, 2013 by admin
Hi everyone!
Happy Tuesday! We hope everyone is having an amazing day so far. There are 15 more days till Christmas and there is still so much to do (eek!). As much as I adore the holidays, I always tend to plan to do too much (Pinterest…I’m looking at you!) and as a result, some things may be put to the last minute. DIY projects are perfect for those meaningful, yet fun and simple gifts to give to all your loved ones. We’ve got lots of free projects on our website and blog that you can use this holiday season; be sure to have a look around our sites for your favorites! We’ve got a stunning DIY project for you today, one that would be perfect for that friend who is always on trend. “If you really love Christmas, come on and let it snow.” – Billy Hack, Love Actually
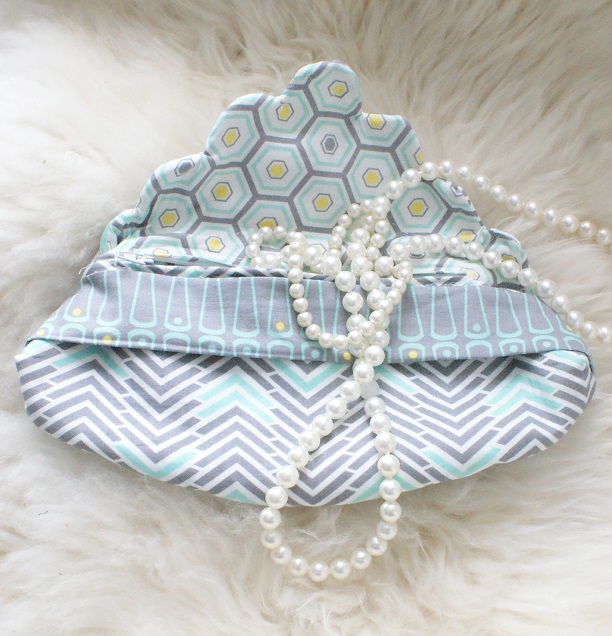
Today’s free project is our Beaded Clutch Tutorial, using our Mint to Be collection. We also created this clutch in a couple of other collections, including our Penelope Collection! A clutch is a wardrobe essential; it can be used as a bag divider for all your loose products and then interchanged for nighttime. The style of this clutch is beautiful and elegant, especially with the scalloped edges and added beads for that extra touch of glam. If you’re thinking of making this clutch for a friend this Christmas, we definitely suggest getting some extra fabric…we’re pretty sure you’ll want to make one for yourself too. Let’s get sewing!

Now let’s get to the tutorial! Click here for more.
Beaded Clutch Tutorial:
Supplies:
• Fat Quarter of Mint to Be quilting cotton from Camelot Fabrics (44” wide) in 2140603 #2
• Fat Quarter of Mint to Be quilting cotton from Camelot Fabrics (44” wide) in 2140604 #1
• Fat Quarter of fusible interfacing
• Fat Quarter of medium weight quilting batting
• 7” zipper
• small beads in coordinating color (about 50 – 75)
• paper printer
• basic sewing supplies:
• sewing machine
• needle & coordingating thread
• straight pins
• scissors & fabric shears
• iron & pressing surface
• fabric marker
Notes on materials:
• Please wash, dry & iron your quilting cotton before beginning. Do not iron batting.
• Unless otherwise noted, all seams are sewn with a 1/2” allowance.
Preparation:
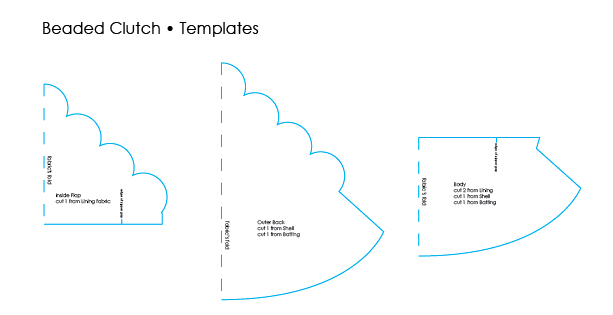
1. Print out the templates at 100% of actual size and trace them onto folded double layers of your fabric as directed on the pattern pieces, with the dashed lines against the folds in your cloth. Mark lines for the ends of the zipper gap on your Inner Flap and Front Panel Pieces.
2. Cut a rectangle 16” wide and 4” tall from your Lining fabric for the clutch’s Band.
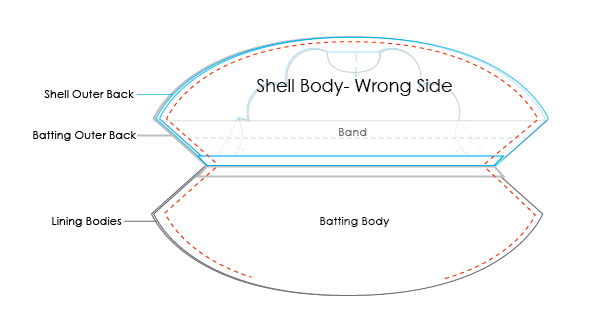
3. Place your Outer Back Shell and Lining Body pieces on your pressing surface, Wrong Sides facing up, and cover them with fusible interfacing. Iron well to bond the fusing to the quilting cotton and trim your pieces so that the edges of the interfacing are flush with the edges of the Shell & Lining pieces.
Band:
1. With its Right Sides facing, sew the long edges of the Band together. Press the seam open and turn the work Right Sides out. Press the Band flat, with the seam at the center of one side. (Click on templates for printable PDF)
Assembly:
1. Lay the Outer Back Shell on top of the Inside Flap, Right Sides together. Place the Outer Back Batting piece on top of the Outer Back Shell and sew these three layers together along their scalloped edges with a 1/4” seam. Clip into the curves, trim any excess allowance from the Batting layer, and turn the work Right Side out.
2. Layer your two Lining Body pieces together, Right Sides facing, and place the Batting body piece on top of them. Sew these three layers along their top edge, leaving the zipper gap open and backstitching to either side of it.
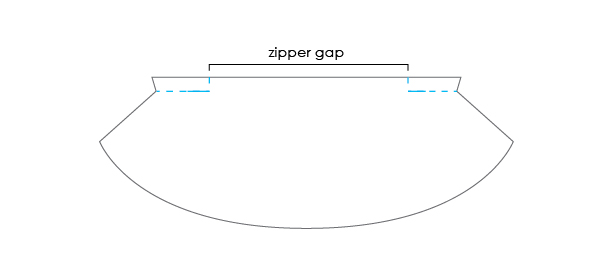
3. Sew the Inside Flap to the Shell Body along their horizontal edges, leaving the gap for the zipper open and backstitching to either side of it.
4. Install your zipper in the gap between the Inside Flap & Shell Body. We have a tutorial for that here.
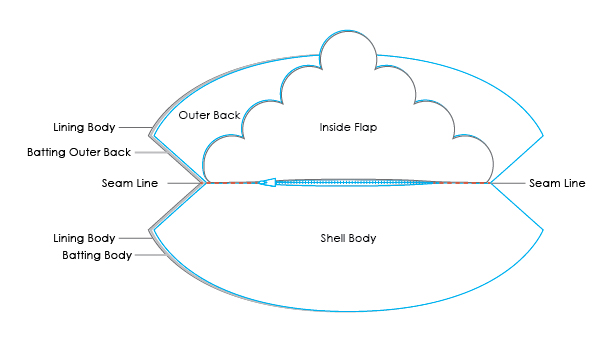
5. Stitch your Lining unit to the Flap & Shell unit, Wrong Sides together, sewing exactly along the top-edge seams your created in Steps 3 & 4 as shown by the red dashed line. The Batting Body should be sandwiched between one Lining Body and the Shell Body.
6. Working from the inside, sew the seam allowances of the Lining & Batting Body pieces to the seam allowances & zipper tape of the Inside Flap and Shell Body. Stitch as closely as possible to the center of the existing seam.
7. Place the Band on the Shell Body, with the Band’s seam against the Shell Body’s Right Side. The Band’s ends should be centered on the side edges of the Body. Baste the Band in place with a 1/4” seam allowance and trim its ends to be flush with the Body’s sides.
8. Fold the top and outermost scallops toward the center of the Flap and pin them down. This keeps them safely out of the way for the next step.
9. With the zipper open, fold back the bottom half of the Outer Back and the Shell body so that the Flap & Band are sandwiched between them and the zipper seam is between them & the Lining pieces.
10. Stitch the two Lining Body Pieces together and the Shell Body to the Outer Back, as shown. Leave a 5” gap at the bottom of the Lining and backstitch at each end of the seam. Clip your corners and trim any excess batting allowance.
11. Pinch one of the outer corners so that the side seam is pressed against the bottom seam. Mark a line across the corner where the angle is 1 1/2” wide and sew on this line, backstitching at either end, to box the corner. Trim the corner 1/4” from the seam and clip the seam allowance at both ends. Repeat this step for the clutch’s three remaining corners.
12. Turn the clutch Right Sides out through the gap in the Lining.
13. Whipstitch the gap closed and hand-tack the corners in place, with the Lining sitting snugly against the Shell.
Finishing Touches:
Using the pattern on your quilting cotton as a reference, you’re going to stitch the tiny beads to the back of your clutch through both the Lining and the Shell. We set a cluster of three beads at the center of each ikat diamond.
1. Thread your needle and knot the end; trim the excess thread very close to the knot. Feeding your needle from the inside of your clutch, tack the Shell to the Lining with two or three stitches on the spot at the center of the diamond nearest to one bottom corner of the purse.
2. With the needle on the outside of the clutch, feed three tiny beads onto your thread and sew back through the Shell & Lining. Secure this stitch with two knots, but do not cut your thread.
3. Pass your needle between the Lining & Shell of your clutch to the center of the next diamond along the bottom of the purse. Again, tack the Shell to the Lining, sew on a trio of beads and secure the stitch with a double knot.
4. Repeat Steps 1 – 3 until you have sewn a trio of beads into the center of each ikat diamond.
And there you have it! The perfect DIY clutch for all your upcoming holiday affairs or as gifts for all your girlfriends. If you decide to give this tutorial a try, be sure to send us a picture at info@camelotfabrics.com or by tweeting us! We love seeing all your creative projects. Happy Holidays everyone!
Happy Sewing!
January 07, 2016 at 9:36 am, Chiropractor Syracuse said:
Are all the reviews from the same approximate time.
They turn to medications that come along with a variety of different
side effects and they take risks with their overall health when they actually don’t have to.
It is important to feel at ease whenever you talk to this particular individual, and observe symptoms not
related to the problem.