How To’s Day: Quilt Bars by Tamarinis
November 3rd, 2015 by Camelot Fabrics
Hi everyone,
Happy Tuesday! I hope you all are having a fantastic day. The weather is absolutely gorgeous here this week, and we are loving it!
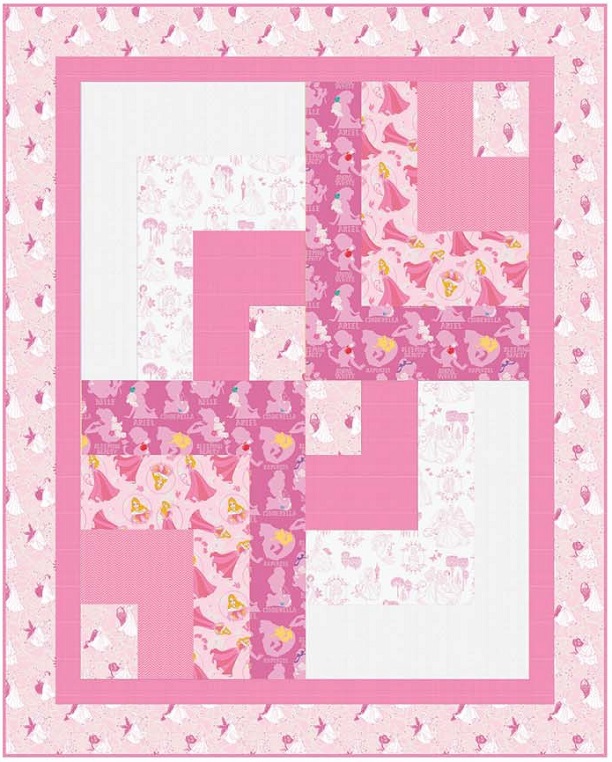
It’s time for this week’s How To’s Day! Today we are featuring our Quilt Bars quilt by Tammy Silvers of Tamarinis. Quilt Bars is a modern and clean quilt design of layered rectangles to create a “multiplying” illusion of symmetrical space. It’s a great pattern for featuring a multitude of different fabric designs, because of the separating blocks. We chose to feature our Disney Princess collection with this quilt, and adore how the pink hues blend together. This would be such a sweet quilt for a little princess-in-training, tucked in and ready to dream about fairytales!
Want to design your own Quilt Bars quilt? Click MORE to see the full tutorial.
QUILT BARS
Pattern Designer: Tammy Silvers of Tamarinis
Fabric Featured: Disney Princess by Camelot Design Studio
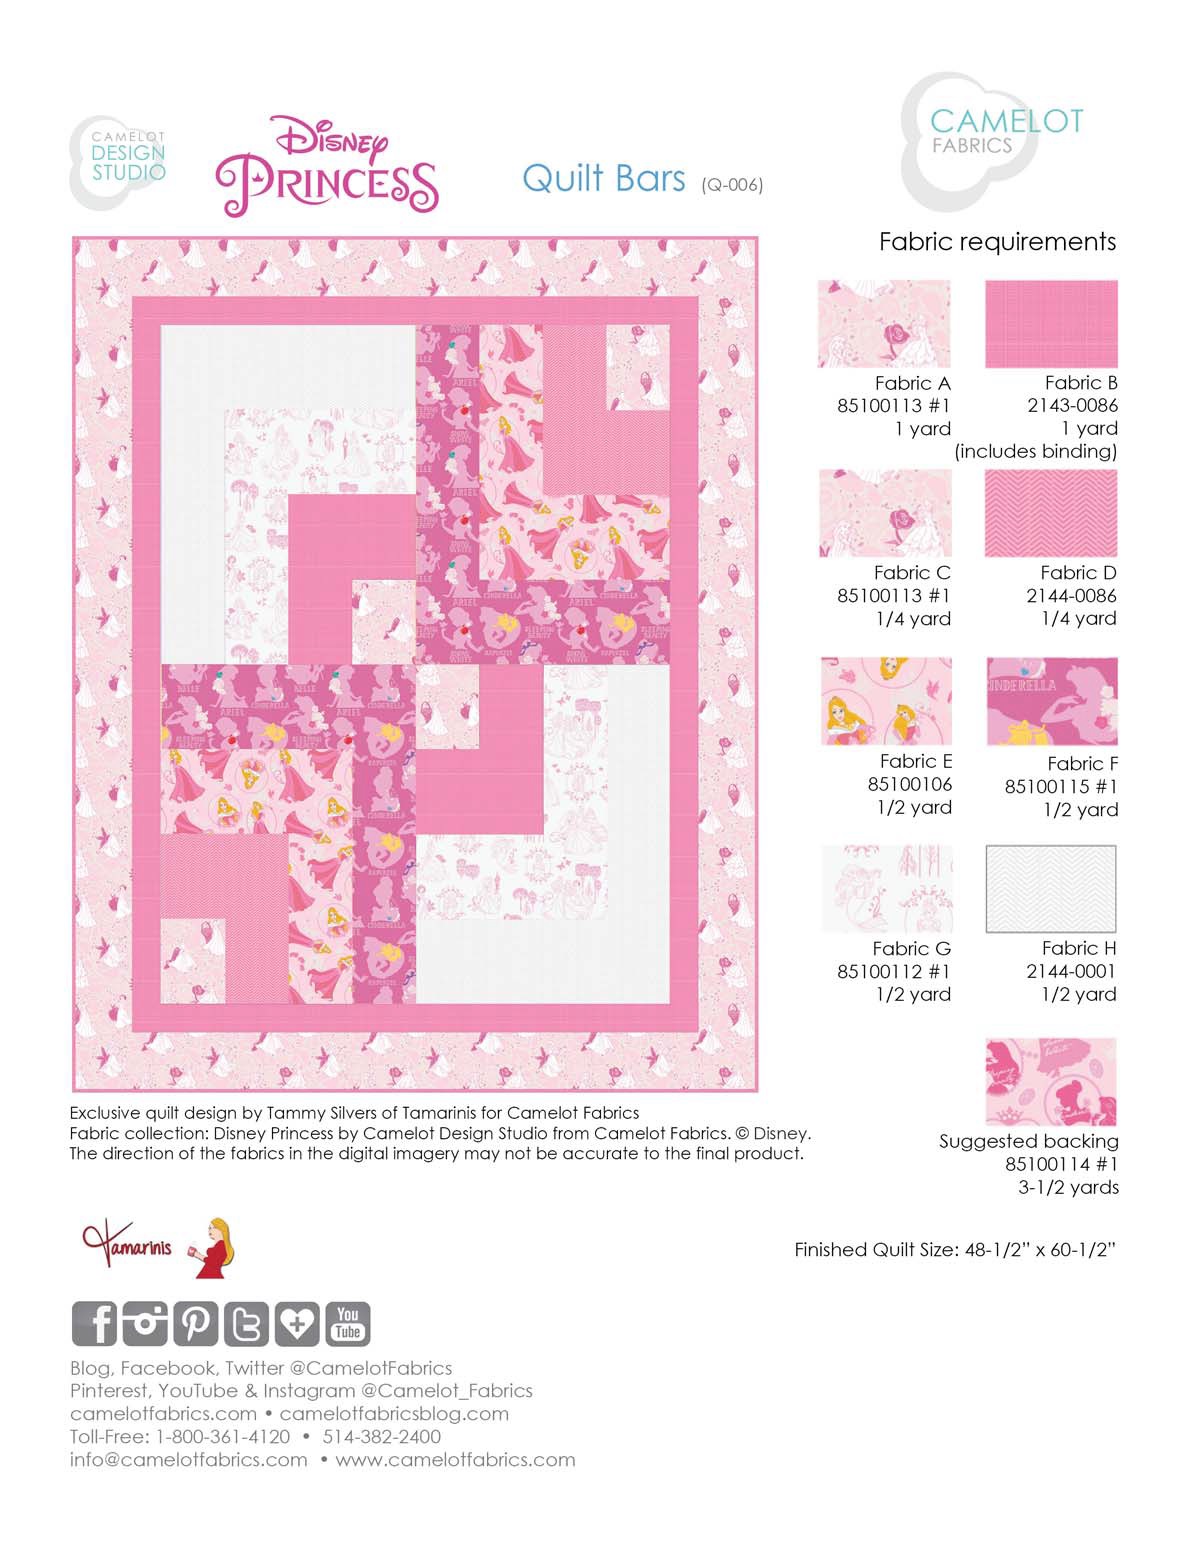
OTHER TOOLS & SUPPLIES:
– Rotary Cutter, Mat, Rulers, Straight Pins, Sewing machine, and threads to match your fabrics.
– 1-1/4 yards of quilt batting (58” wide)

NOTES:
1. Read all instructions before cutting fabrics.
2. All seams are accurate ¼” seam allowance.
3. Cut fabrics according to cutting chart on Page 2.
4. HST = Half Square Triangle QST = Quarter Square Triangle
5. Unless otherwise notes, strips are considered to be width of fabric (selvage to
selvage)
6. Fabrics and Diagrams are not to scale.
BLOCK 1
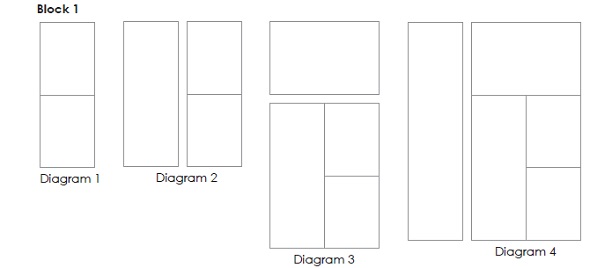
1. Sew (1) 5” x 6 ½” Fabric B rectangle to (1) 5” x 6 ½” Fabric C rectangle (Diagram 1). Repeat to make (2) units.
2. Sew (1) Fabric B/C unit to (1) 5” x 12 ½” Fabric B rectangle (Diagram 2). Repeat to make (2) units.
3. Sew (1) Fabric B/C/B unit to (1) 6 ½” x 9 ½” Fabric G rectangle (Diagram 3). Repeat to make (2) units.
4. Sew (1) Fabric B/C/B/G unit to (1) 5” x 18 ½” Fabric G rectangle (Diagram 4). Repeat to make (2) units.
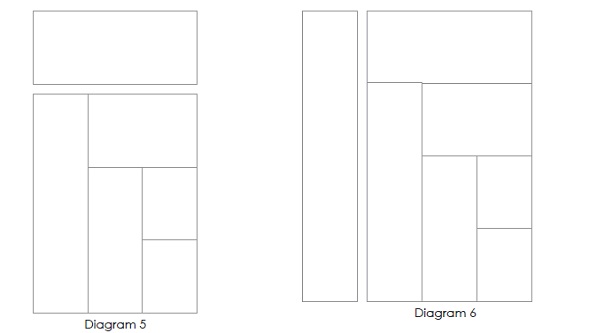
5. Sew (1) 6 ½” x 14” Fabric H rectangle to the unit created in Step 4 (Diagram 5). Repeat to create (2) units.
6. Sew (1) 5” x 24 ½” Fabric H rectangle to the unit created in Step 5 (Diagram 6). Repeat to create (2) Block 1.
Each block should measure 18 ½” x 24 ½” unfinished.
BLOCK 2
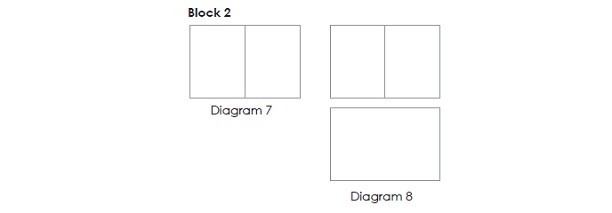
1. Sew (1) 5” x 6 ½” Fabric D rectangle to (1) 5” x 6 ½” Fabric C rectangle (Diagram 7). Repeat to create (2) D/C units.
2. Sew (1) 6 ½” x 9 ½” Fabric D rectangle to the D/C unit (Diagram 8). Repeat to create (2) D/C/D units.
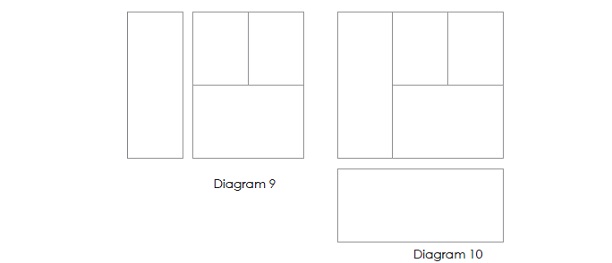
3. Sew (1) 5” x 12 ½” Fabric E rectangle to the D/C/D unit (Diagram 9). Repeat to create (2) D/C/D/E units.
4. Sew (1) 6 ½” x 14” Fabric E rectangle to the unit created in Step 3 (Diagram 10). Repeat to create (2) units.
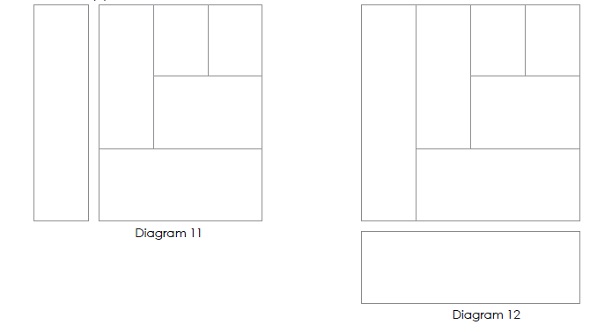
5. Sew (1) 5” x 18 ½” Fabric F rectangle to the unit created in Step 4 (Diagram 11). Repeat to create (2) units.
6. Sew (1) 6 ½” x 18 ½” Fabric F rectangle to the unit created in Step 5 (Diagram 12). Repeat to create (2) Block 2. Each block should measure 18 ½” x 24 ½”.
PUTTING THE QUILT TOGETHER
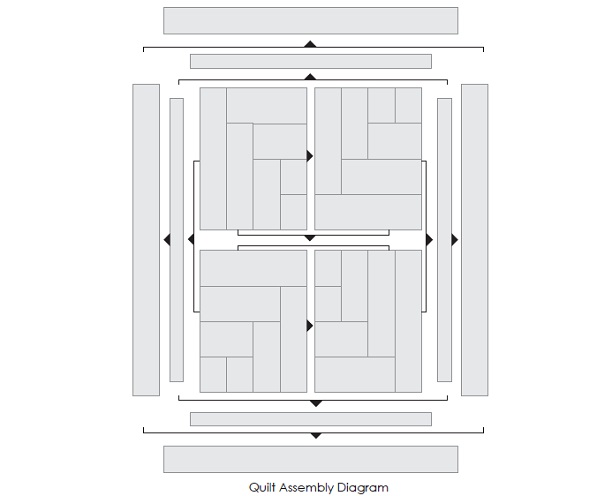
1. Using the Quilt Assembly Diagram as a guide, sew (1) Block 1 to (1) Block 2, noting the orientation of the blocks.
2. Rotating the blocks, sew the remaining Block 1 to the remaining Block 2 (again, note the orientation of the blocks).
3. Sew (3) of the 2 ½” Fabric B strips together end to end; trim to (2) 2 ½” x 48 ½” rectangles (left and right inner borders). Trim the remaining (2) strips to 2 ½” x 40 ½” (top and bottom inner borders).
4. Sew (1) 2 ½” x 40 ½” Fabric B rectangle to the top and bottom of the quilt center. Press away from the quilt center.
5. Sew (1) 2 ½” x 48 ½” Fabric B rectangle to the left and right side of the quilt center. Press away from the quilt center.
6. Sew the (6) 4 ½” Fabric A strips together in sets of (3). Cut (2) 4 ½” x 48 ½” rectangles (top and bottom borders) and (2) 4 ½” x 52 ½” rectangles (left and right borders).
7. Sew (1) 4 ½” x 52 ½” Fabric A rectangle to the left and right side of the quilt center. Press away from the quilt center.
8. Sew (1) 4 ½” x 48 ½” Fabric A rectangle to the top and bottom of the quilt center. Press away from the quilt center.
FINISHING THE QUILT
1. Cut the backing into (2) 63” long pieces.
2. Using a ¼” – ½” seam allowance, sew the two pieces of backing fabric together, along the long side. Press the seam open.
3. Center and lay the batting on top of the wrong side of the backing fabric.
4. Center and lay the pieced quilt top on top of the batting.
5. Pin or baste the quilt sandwich using your preferred method for securing the layers.
6. Quilt as desired.
7. Trim the edges of your quilt.
8. Use the Fabric B binding strips to bind the quilt.
We hope you have enjoyed today’s How To’s Day! If you decide to give this project a try, we’d love to see. You can send your project photos to info@camelotfabrics.com or tag us on Instagram! Have a great day!
Happy Sewing!
Comments are closed.