How To’s Day: Diamonds Quilt by Nikki Maroon
August 25th, 2015 by Camelot Fabrics
Hi everyone,
Happy Tuesday! I hope you all are having a lovely day… and today is National Banana Split Day, everyone. Oh, that sounds so appeeling right now haha!
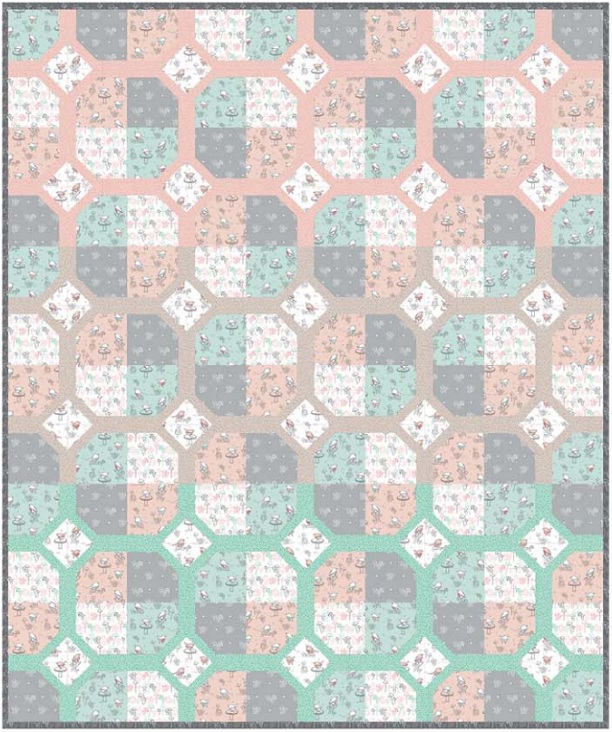
Time for our How To’s Day! Today we are featuring our Diamonds Quilt by Nikki Maroon of The Girl Who Quilts. Our Diamonds Quilt is one of our beloved favorites. Bordered octagon shapes are blocked together in rows to create a modern quilt design. As well, there is an ombre effect created with different fabric patterns which is a simple, but fun detail. We chose to highlight our Little Bird by Camelot Design Studio collection, with its soft pink, mint, and grey hues. The gentle gradient makes for a gorgeous, showstopping bed or wall quilt!
Want to create your own Diamond Quilt? Click MORE to see the full tutorial.
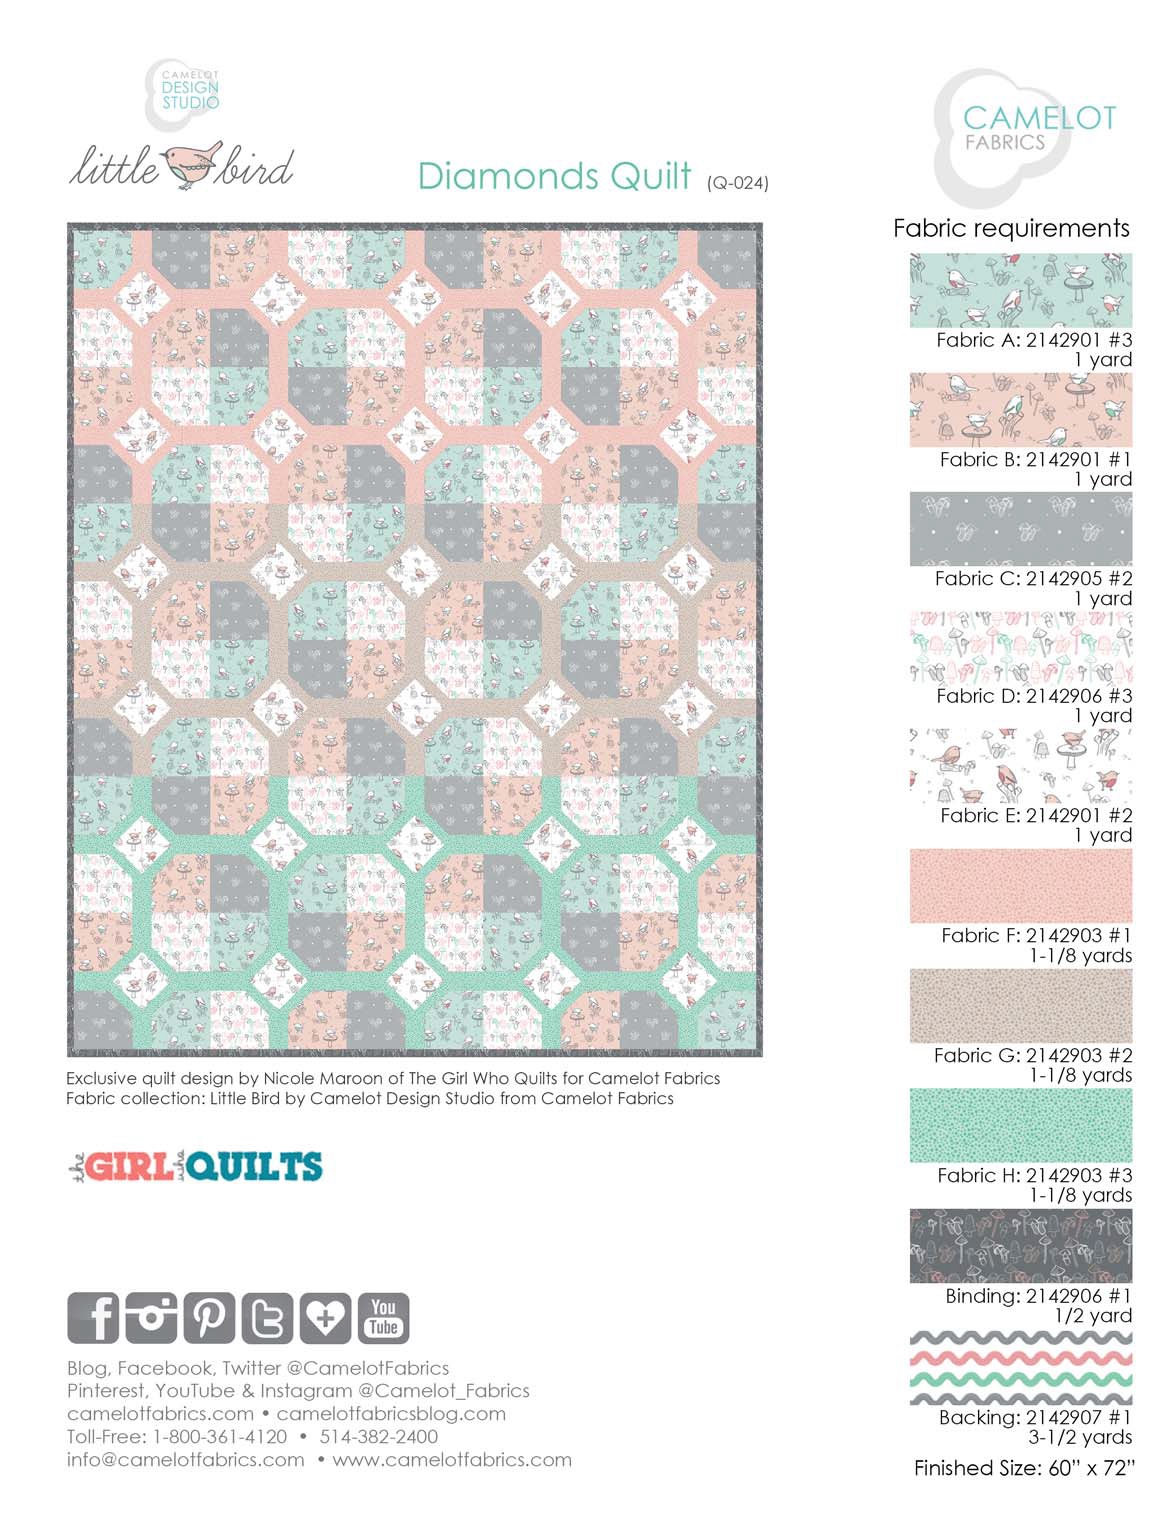
DIAMONDS QUILT
Pattern Designer: Nikki Maroon of The Girl Who Quilts
Fabric Collection: Little Bird by Camelot Design Studio
OTHER TOOLS & SUPPLIES:
– Rotary Cutter & Mat
– Sewing Machine & Coordinating Thread
– Iron & Pressing Surface
– Pencil
– 65″ x 80″ Quilt Batting
NOTES:
– For best results read through all the instructions before starting.
– Please wash, dry & iron your fabric before beginning, and trim selvages.
– Unless otherwise directed, sew all seams with a scant 1/4” allowance and the fabrics’ Right
Sides together, and press seams open as you go.
– WOF = Width of Fabric
– FQ = Fat Quarter

Fabric E
Cut (9) 3” x WOF strips.
Sub-cut (120) 3” squares.
Fabric F
Cut (6) 1” x WOF strips – sub-cut (40) 1” x 6” rectangles.
Cut (7) 1” x WOF strips – sub-cut (40) 1” x 6-1/2” rectangles.
Cut (5) 4-1/2” x WOF strips – sub-cut (40) 4-1/2” squares.
Fabric G
Cut (6) 1” x WOF strips – sub-cut (40) 1” x 6” rectangles.
Cut (7) 1” x WOF strips – sub-cut (40) 1” x 6-1/2” rectangles.
Cut (5) 4-1/2” x WOF strips – sub-cut (40) 4-1/2” squares.
Fabric H
Cut (6) 1” x WOF strips – sub-cut (40) 1” x 6” rectangles.
Cut (7) 1” x WOF strips – sub-cut (40) 1” x 6-1/2” rectangles.
Cut (5) 4-1/2” x WOF stips – sub-cut (40) 4-1/2” squares.
Binding
Cut (7) 2-1/2” x WOF strips.
Backing
Cut (2) 63” x WOF rectangles.
PREPARATION
Draw diagonal lines across the Wrong Sides of all Fabric E, F, G & H squares as shown.

MAKING THE BLOCKS
1. Sew a 1” x 6” Fabric F rectangle to the left-hand side of a 6” Fabric A square.
2. Sew a 1” x 6-1/2” Fabric F rectangle to the top edge of the F-A unit.

3. Sew a 4-1/2” Fabric F square to the top-left corner of the F-A unit as shown, RST, stitching along the diagonal line you drew on the Fabric F square.
4. Trim the excess fabric as shown, 1/4” from the seam, and open up the seam.
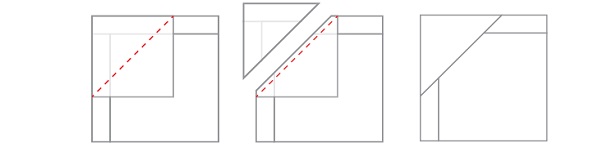
5. Sew a 3” Fabric E square to the white corner of the unit as shown, in the same manner that you used to add your Fabric F square.
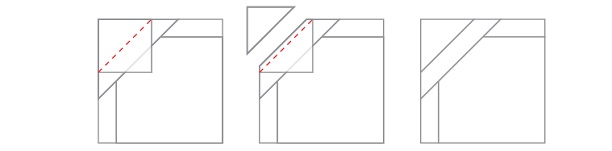
Repeat Steps 1-5 to make (10) Fabric A units, (10) Fabric B units, (10) Fabric C units & (10) Fabric D units – (40) total.
6. Sew the Fabric A & C units, and Fabric B & D units, in pairs as shown.
7. Sew the pairs together to make (10) blocks.

Repeat Steps 1-7, using Fabrics G & H in place of Fabric F. Make (10) blocks with Fabric G, and (10) blocks with Fabric H.
ASSEMBLY
1. Sew the blocks together in rows, referring to the quilt illustration on Page 1.
2. Sew the rows together top-to-bottom to complete the quilt top
FINISHING
1. Join the Backing rectangles along their 63” edges.
2. Join your Binding strips end-to-end and press to make the binding.
3. Layer your Backing, batting & quilt top with the fabrics’ Right Sides facing outward. Baste, quilt & bind as desired.
I hope you have enjoyed today’s tutorial! If you decide to make your own Diamonds Quilt, we’d love to see! You can send all your photos to info@camelotfabrics.com or tag us on Instagram. Have an awesome rest of the day!
Happy Sewing!
Comments are closed.