How To’s Day: Modern Cross Pillow by VeronicaMade
May 26th, 2015 by Camelot Fabrics
Hi everyone,
Happy Tuesday! I hope you all are having a brilliant day! It’s the last day to enter our #GypsyLane Giveaway, so be sure to head on over to our Facebook Page to enter!!
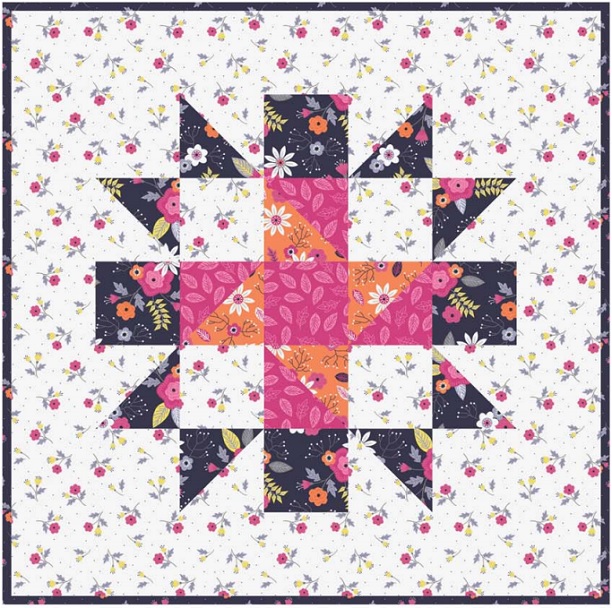
Time for our How To’s Day! Today we are featuring a beautiful pillow pattern for our Free Projects Program, made by the lovely Veronica Koh Eischeid of VeronicaMade. Modern Cross is a fun take on a flower/star cross design, which is the focal point of the pillow. Mixing and matching different patterns is what makes this pillow awesome; we love keeping the background neutral so that the middle pops! We chose to feature our Paradise by Alisse Courter Collection with Modern Cross, choosing our bright orange, fuchsia, and purple prints for the middle, and a pretty floral, neutral background. We love how it turned out, and think it would be beautiful in any feminine space.
Want to make your own Modern Cross Pillow? Click MORE for the full tutorial.
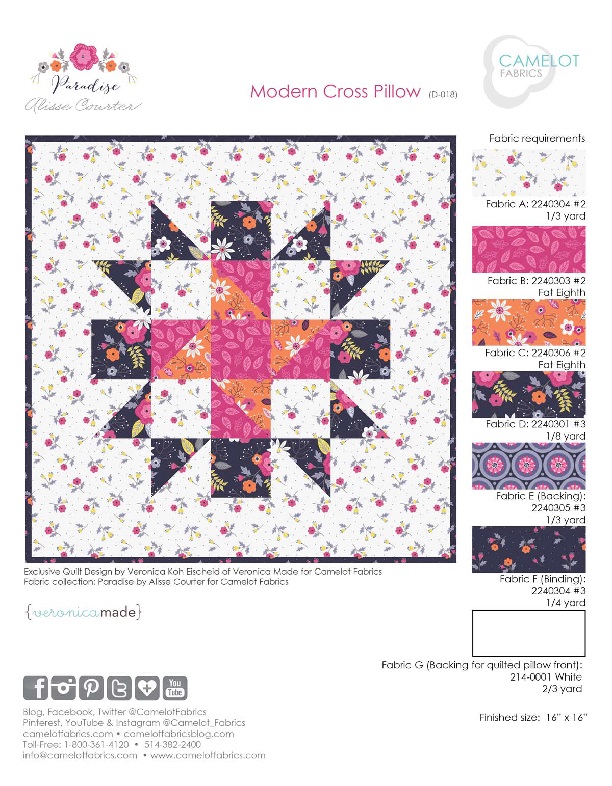
Modern Cross Pillow
Designed By: Veronica Koh Eischeid of VeronicaMade
Fabric Collection: Paradise by Alisse Courter for Camelot Fabrics
OTHER TOOLS & SUPPLIES
– a 16” square pillow form
– basic sewing supplies
– sewing machine
– needle & coordinating thread
– iron & pressing surface
– measuring tape
– fabric shears & rotary cutter
– straight pins
– fabric marker
THE DESIGN
This pillow is made from squares and half squares triangles units (HSTs) with a finished size of
2″. The smaller squares are used for the squares and the larger squares are used to make the
HSTs, which are made slightly oversized and then cut down for accuracy.
NOTES:
– Please wash, dry & iron your fabric before beginning, and trim your selvages.
– WOF = width of fabric.
– Unless otherwise indicated, sew all seams with an accurate 1/4″ seam allowance.
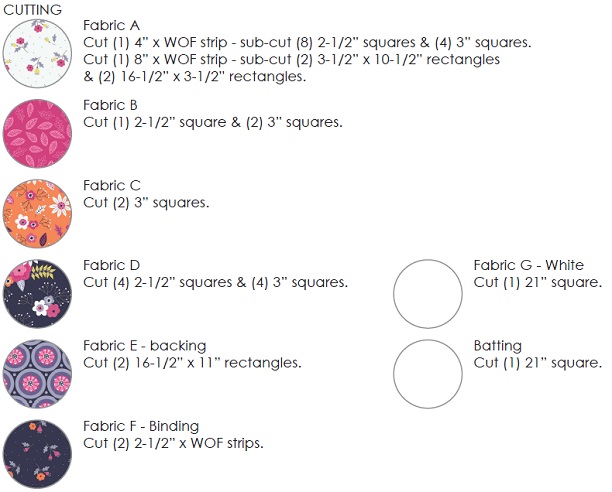
MAKING THE CENTER BLOCK
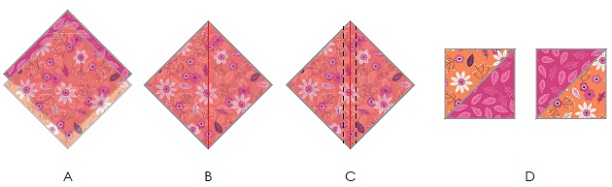
1.
a) Place each 3″ Fabric B square on a 3” Fabric C square, Right Sides together.
b)Use a straight edge to draw corner-to-corner diagonal lines on the wrong side of the
Fabric B squares.
c) Sew 1/4″ away from the marked lines on either side of the lines to make (4) HST units.
d) Cut along the marked lines and open all the units. Press seams toward the darker fabric.
Trim the units down to 2-1/2″.
Note: For directional fabrics, take note of which direction the print will end up facing after it is
sewn. You can also fussy cut to highlight your favorite parts of the fabric’s pattern.
2. Repeat Step 1 with your (4) 3” Fabric A squares & (4) 3” Fabric D squares, to make (8) HST
units.
3. Sew the 2-1/2” HST units together in rows with your 2-1/2” Fabric A & Fabric D squares as
shown, referring to the Assembly Layout.

This completes the Center Block.
ADDING THE BORDERS
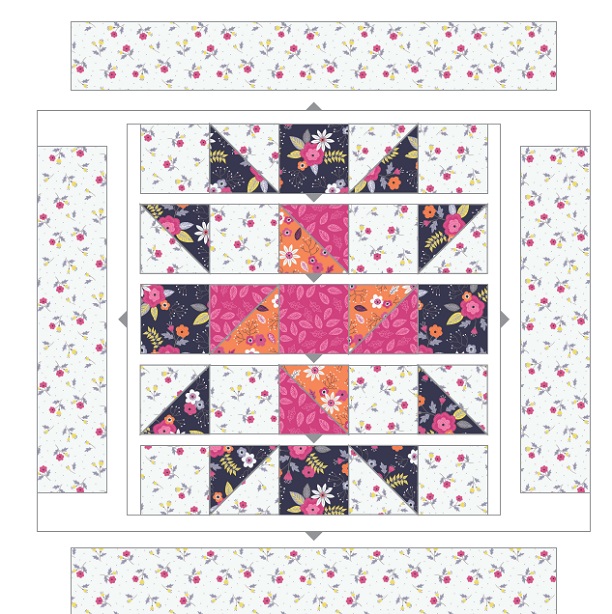
Note: Please refer to the Assembly Layout on the Following page for this section.
1. Take the (2) 3-1/2” x 10-1/2″ Fabric A strips; sew (1) to the left-hand edge of the Center
Block and the other to its right-hand edge.
B. Take the (2) 16-1/2” x 3-1/2″ Fabric A strips; sew (1) to the top edge of the Center Block
and the other to its bottom edge. The pillow top should measure 16-1/2” x 16-1/2″. Trim if
necessary.
ASSEMBLY LAYOUT
I hope you enjoyed today’s tutorial! You can also find the free PDF printout on our website here. Be sure to also check out more from Veronica on her blog. Have a lovely day!
Happy Sewing!
Comments are closed.